This is a sponsored post by Challenge Butter, but the text and opinions are all mine. Thank you for supporting brands that make Kylee's Kitchen possible!
I love eating pancakes, especially on special occasions. But what I don't love is standing over the stove making pancakes. The pancake maker is stuck standing over the skillet watching everyone else eat fresh, hot pancakes. And do you know who the pancake maker in my house is? ME! And I do NOT like eating last.
My solution: sheet pan pancakes! Instead of cooking pancakes one at a time on a skillet, I pour all the batter into a well-greased sheet pan and bake it. Due to the size of the sheet pan, the pancake comes out at about the same thickness as pancakes made on the stove. Bonus: You can use a cookie cutter to make different shapes out of the sheet pan pancake, like what I did here with the gingerbread men.
The key ingredients that make these pancakes taste like gingerbread are ground ginger, ground cinnamon, ground allspice, and molasses. But my "secret" ingredient is Greek yogurt. Greek yogurt provides a lot of benefits. The yogurt reacts with the leavening agents to make the pancake extremely thick and fluffy. It also adds moisture and protein.
When mixing the liquid ingredients, I recommend starting with the Greek yogurt, since it's the thickest ingredient, and then slowly adding and mixing the other liquid ingredients into the yogurt.
One final note: You'll notice the ingredient list shows "butter, melted and cooled." All that means is to not mix boiling butter with the rest of your ingredients because it may cause them to curdle. It's also important to use a good quality butter. That's why I recommend using Challenge unsalted butter for the best results. Challenge butter is made with 100% real pasteurized sweet cream and no artificial ingredients.
This is a sponsored post by Challenge Butter, but the text and opinions are all mine. Thank you for supporting brands that make Kylee's Kitchen possible!
Coffee cake is not typically flavored with coffee—it gets its name from the fact that it's meant to be eaten with coffee. But on honor of National Coffee Day, I was inspired to make a coffee-flavored coffee cake so you can have your coffee and eat it, too!
I incorporated coffee into each of the three parts of this cake: the crumble, the filling, and the cake itself.
There are a few things I want to point out about this recipe.
Many coffee-flavored baked goods use espresso powder, but I used finely ground coffee instead. We purchase coffee beans from local Indianapolis roasters (primarily Helm, Blue Mind, and Tinker). These locally roasted beans have an incredible amount of flavor. So I ground about 20 grams of beans at the finest setting on our grinder, and I used the ground beans instead of espresso powder. If you don't have access to a grinder, you can use espresso powder instead.
Coffee concentrate is highly concentrated coffee. My husband and I make coffee concentrate using beans from our local roasters, and then we use that concentrate for cold brew. If you don't want to make your own concentrate, you can buy it from the store or you can brew a really strong cup of coffee and then let it cool.
As you can tell by reading this blog post, I put a great deal of effort in making sure I use high-quality ingredients to achieve the best tasting product. If I'm going through the effort in grinding my own beans and making my own concentrate, the rest of the ingredients I'm using better be high quality. That's why I only use Challenge butter in my recipes. It creams better, it tastes better, I could go on and on... and it contains no artificial or synthetic ingredients.
I hope you enjoy this coffee cake with your morning (or afternoon or evening) cup of coffee! Stay caffeinated, friends!
Mix brown sugar, flour, butter, ground coffee beans, and pecans until you have large crumbles. Set aside.
For the filling
Mix brown sugar, flour, and ground coffee beans. Set aside.
For the cake
Preheat oven to 350 degrees Fahrenheit. Line 9x5-inch loaf pan with parchment paper or spray with nonstick spray.
In medium-sized bowl, mix flour, cinnamon, baking powder, baking soda, cardamom, and salt. Set aside.
In small bowl, mix sour cream and coffee concentrate.
In bowl of stand mixer, beat butter, brown sugar and ground coffee with paddle attachment on medium speed until light and fluffy. Scrape bowl.
Add eggs 1 at a time while mixing on low speed.
Add dry ingredients in 3 additions, mixing until just combined and alternating with sour cream-coffee mixture in 2 additions. Scrape sides of bowl after each addition.
Pour half the cake batter into the loaf pan.
Sprinkle filling mixture over top of cake batter.
Spread remaining cake batter over filling and sprinkle crumb mixture over top of cake batter.
Bake for 45 to 50 minutes, or until cake is baked through. Cake should spring back when touched.
Allow cake to cool in pan for about 20 minutes before cutting or trying to remove from pan.
This is a sponsored post by Challenge Butter, but the text and opinions are all mine. Thank you for supporting brands that make Kylee's Kitchen possible!
Did you get caught up in fall fever at the apple orchard and now you’re stuck with 20 pounds of apples and you’re not sure what to do with them all? Been there, done that. And I have some ideas on ways to use your apples!
Did you know you can make applesauce by cutting apples into chunks (core apples but keep peels on), sticking them in the microwave, and then blending them in a blender? It doesn’t need to be a multi-hour recipe with a bunch of sugar.
And then you can take some of that applesauce to make apple butter just by simmering it and reducing it on the stove.
And THEN you can use that apple butter to make the most delicious apple muffins!
A couple of notes before you get started:
1. There are 2,500 varieties of apples grown in the United States, but not all of them are great for making applesauce. You want to choose a softer apple with flesh that breaks down easily, like fuji, cortland, or McIntosh.
2. You can absolutely add spices and sugar to your applesauce or apple butter if you want!
3. I was able to blend the apples without adding any extra liquid to the blender. I had to stop and stir the mixture a few times, but eventually it all blended. If your apples aren't very juicy or if you don't have a high-powered blender, you may need to add a little liquid. I recommend apple cider or apple juice if possible, and start with just a tablespoon of liquid, increasing the amount if necessary.
4. Nappe is a term used to describe the thickness and consistency of a sauce. A sauce is nappe when you can coat the back of a spoon and draw a line through the sauce with your finger. The sauce shouldn't move. That's the consistency you want for your apple butter.
5. The amount of apple butter yielded from a certain amount of applesauce will depend on how much liquid evaporates from the sauce and how long you simmer it. So it may not be the same amount each time.
6. I've made the muffins with and without the crumb topping, and I think they're much better with a crumb topping. It adds a lot of texture, and it really jazzes them up. You could also try adding nuts to the muffin batter for texture.
7. You don't want the crumb topping to be a paste. Make sure it looks clumpy. I recommend using Challenge Salted Caramel Butter Snack Spread in the crumb topping. It's the perfect consistency when used straight from the refrigerator, and it gives the muffins an extra flavor boost.
Blender applesauce
Yield: Makes about 20 ounces applesauce
Time: 20 minutes
Ingredients
2 pounds apples (soft variety like fuji, cortland, or McIntosh)
Directions
Microwave apples in microwave-safe bowl with lid for 10 to 15 minutes, or until apples are easily pierced.
Transfer apples with juices to high-speed blender. Blend until desired consistency. If necessary, add apple juice or apple cider, 1 spoonful at a time, until blender runs.
Apple butter
Yield: Makes about 12 ounces apple butter
Time: 20 minutes
Ingredients
20 ounces applesauce
2 teaspoons cinnamon, if desired
Directions
Bring applesauce to simmer in large pot. Continue to simmer over low-medium heat for 15 - 20 minutes.
Check doneness by using spoon to draw line through apple butter on bottom of pot. Apple butter is done if line holds.
Preheat oven to 425 degrees Fahrenheit. Line 12-count muffin pan with liners. Set aside.
Mix together flour, brown sugar, and cinnamon. Use fork to mix in butter until you have large crumbles. Set aside.
For the muffin batter
In large bowl, mix together both flours, baking soda, cinnamon, cloves, salt, and nutmeg.
In medium bowl, mix apple butter, butter, sugar, eggs, and vanilla extract.
Pour wet ingredients into dry ingredients and mix until just combined.
Divide batter evenly into each liner. Spoon crumb topping evenly over batter, gently pressing down.
Bake for 5 minutes at 425 degrees Fahrenheit, then with muffins still in oven, reduce temperature to 350 degrees Fahrenheit. Bake for another 15 minutes or until toothpick inserted in center comes out clean.
Allow muffins to cool for 5 minutes pan before transferring to wire rack.
I'm talking about "spring cleaning" your refrigerator in this bloig post. Many of us are guilty of keeping random open containers in our refrigerator for far too long because we only use half the jar and then forget about it. Or we let produce expire because we forget about it until we find it hiding in the crisper drawer two weeks too late.
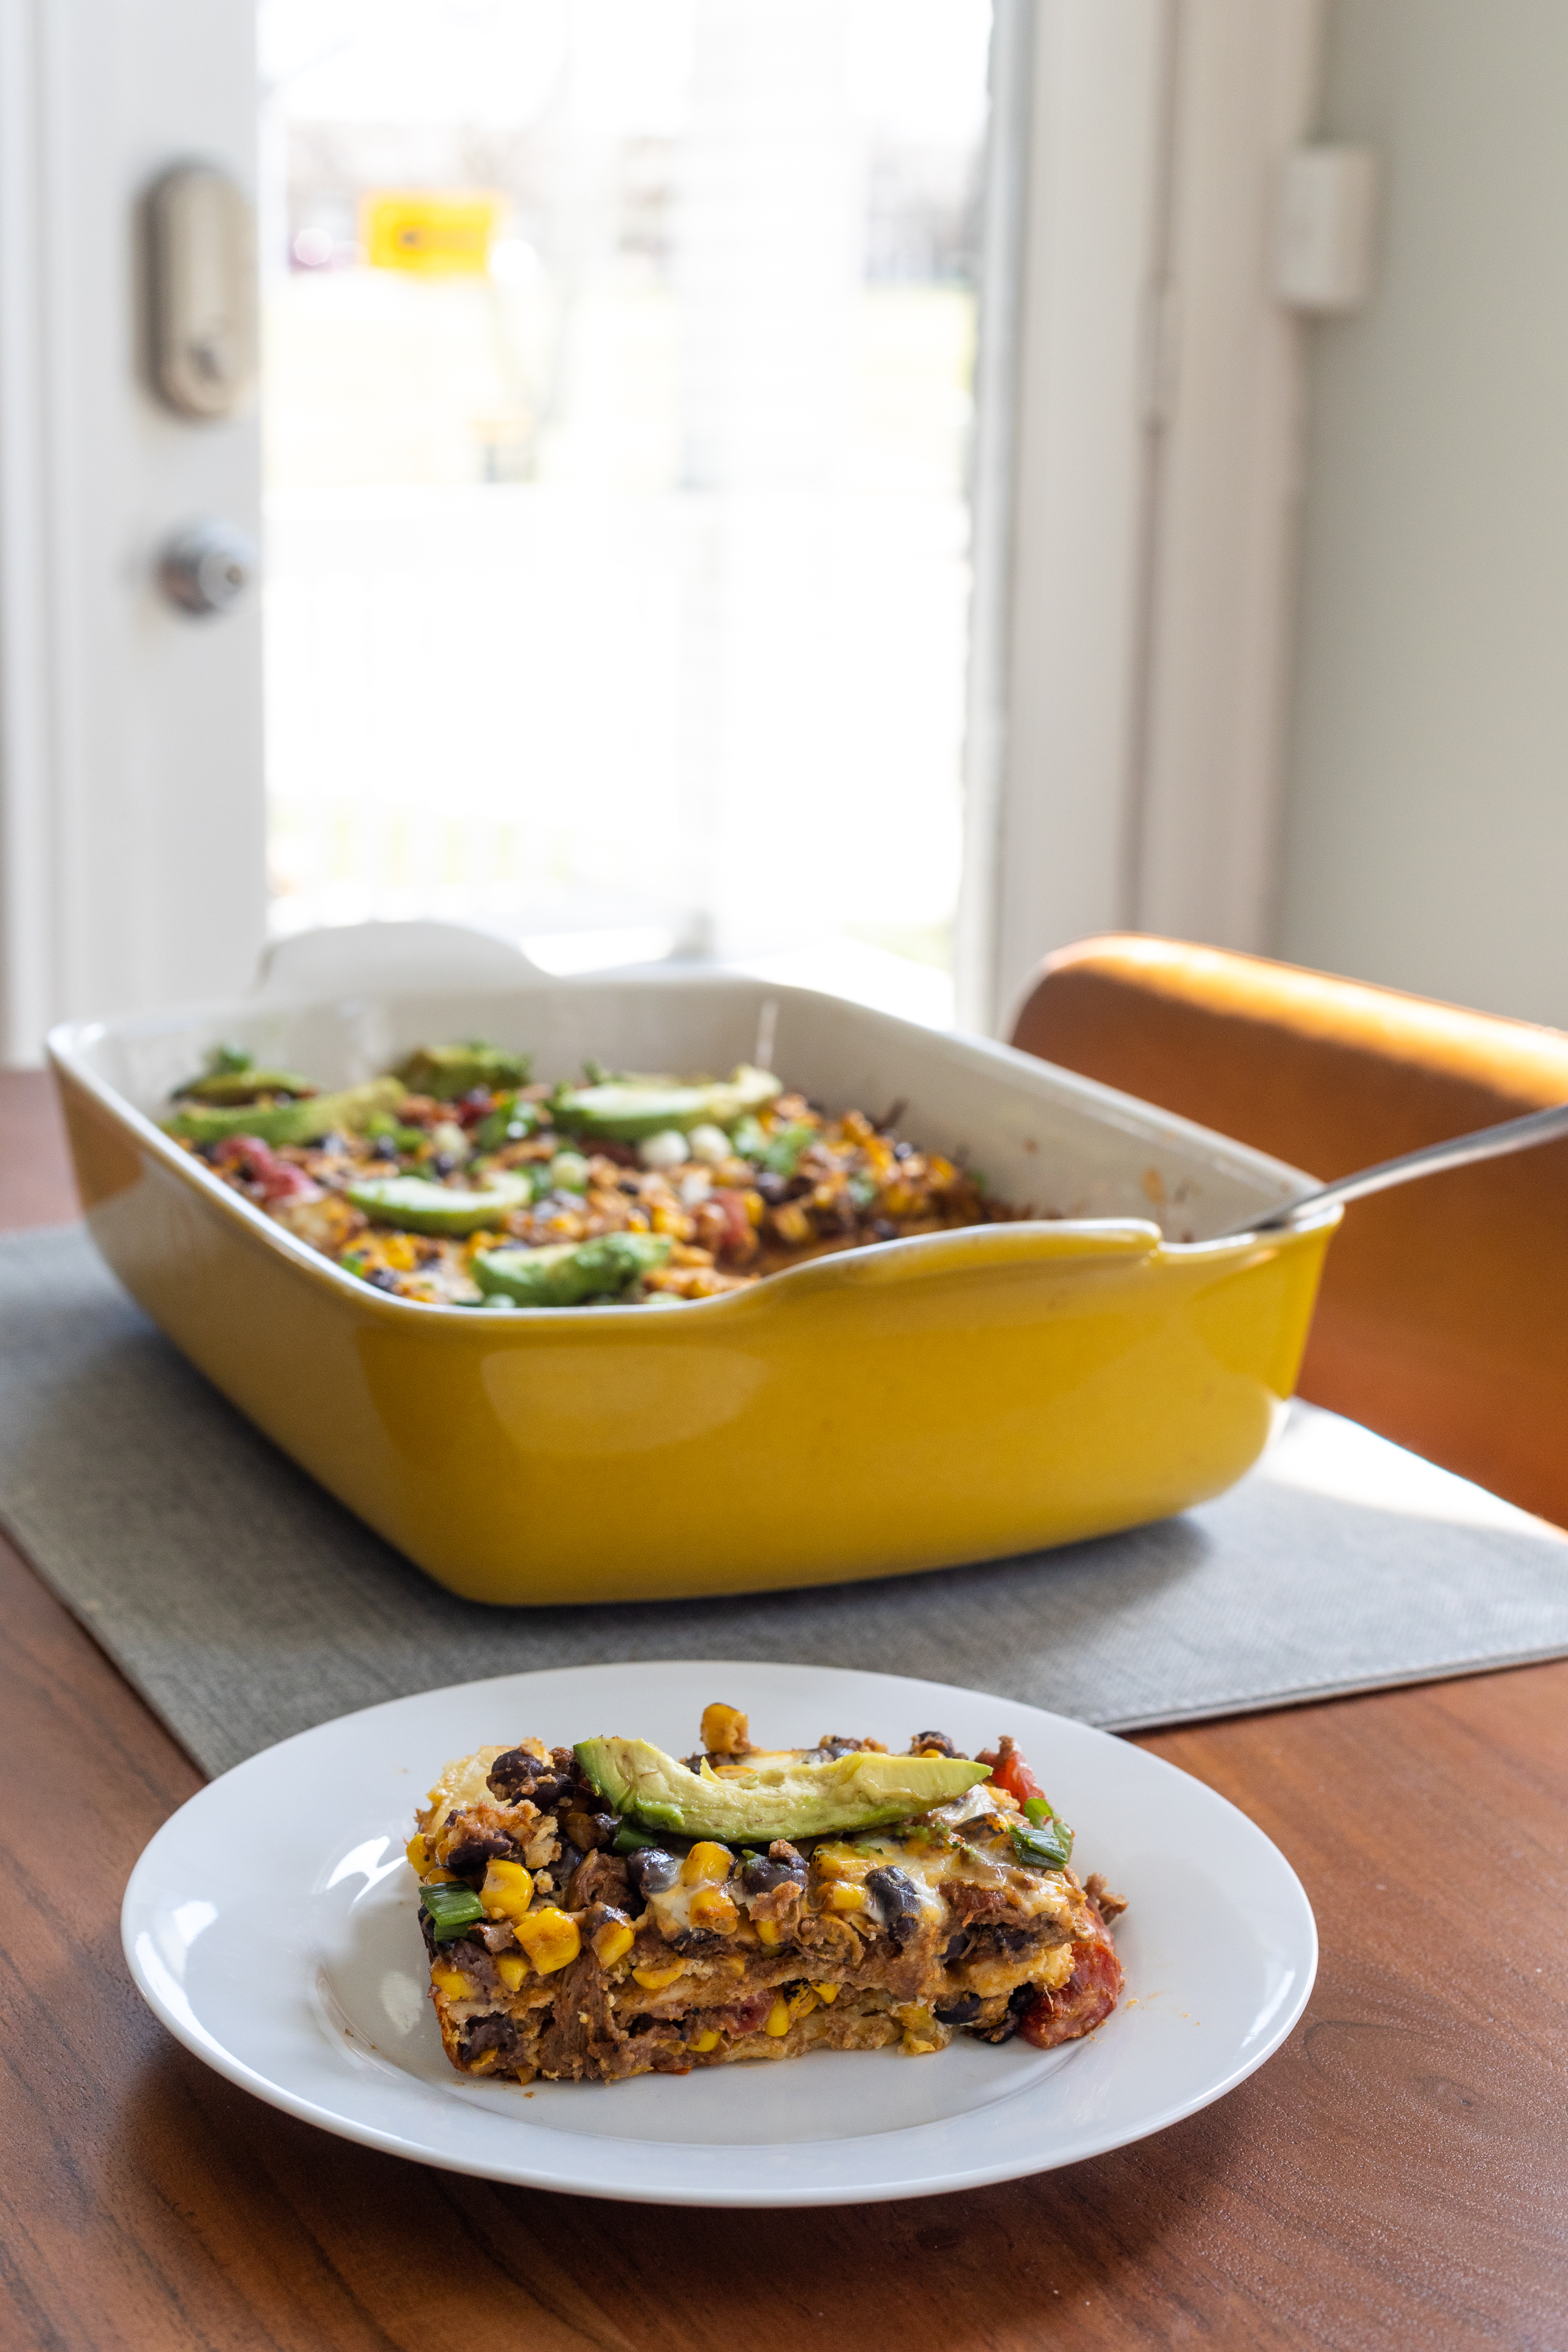
So I created a recipe to clear out my refrigerator and use ingredients I've had far too long. I came up with a breakfast taco casserole.
Here's what I cleared from my refrigerator to use in the recipe:
Salsa: Last about 2-4 weeks
Sour cream: Lasts about 3 weeks
Greek yogurt: Lasts about 1 to 2 weeks
Cooked beans: Last 3-4 days
Cooked meat: Lasts about 3 days
Blocks of cheese: Cheddar, mozzarella, and pepper jack last 4 to 6 weeks max
I included substitution options in italics next to the ingredients because, as I previously mentioned, there are a lot of options for substitutions because I want to help you clean out your refrigerator.
Breakfast taco casserole
Yield: 12 servings
Time: About 90 minutes
Ingredients
1 pound Mexican chorizo (you can substitute with chicken, beef, pork, or omit for vegetarian casserole)
1 yellow onion, small dice (about 6 ounces)
1 red or green bell pepper, small dice (about 4 ounces)
1 (16-ounce) jar salsa (you can substitute with diced or crushed tomatoes)
1 (15-ounce) can black beans, drained and rinsed (you can substitute with pinto beans or refried beans)
1 (15-ounce) can whole kernel corn, drained (you can substitute with frozen corn)
1 Tablespoon ground cumin
2 teaspoons chile powder
1 teaspoon smoked paprika
1/2 teaspoon salt
1/2 teaspoon black pepper
8 corn tortillas, halved
12 ounces (3 cups) cheddar cheese, shredded (you can substitute with pepper jack or omit to make it dairy free)
Preheat oven to 350 degrees Fahrenheit. Spray 9x13-inch baking dish. Set aside.
Heat large skillet over medium heat. Add chorizo and cook until browned, breaking it into smaller pieces as it cooks.
Use slotted spoon to remove chorizo and transfer to plate.
Add onion and pepper to skillet and saute until softened, about 5 minutes.
Stir in salsa, beans, corn, cumin, chili powder, paprika, salt and black pepper. Saute until mixture is combined and fragrant. Remove skillet from heat and stir in chorizo.
In separate bowl, whisk eggs until well-beaten.
Lay half of the tortillas in even layer on bottom of baking dish. Top with half of sausage mixture, half of egg mixture, and half of cheese. Repeat with remaining tortillas, sausage mixture, eggs, and cheese.
Cover baking dish with foil and bake 45 to 55 minutes or until golden brown and not jiggly. Remove from oven.
Let cool 10 minutes before serving with avocado, cilantro, sour cream, salsa, and whatever else you desire.
This is a sponsored post by Challenge butter, but the text and opinions are all mine. Thank you for supporting brands that make Kylee's Kitchen possible!
I’ve shared a Christmas morning breakfast idea every year for the past 7 years. For me, the biggest factors in choosing what to make for breakfast is whether the dish is festive and whether I can prep it ahead of time. This recipe fits the bill.
The recipe looks long, but that's only because there are several components. There's nothing complicated about the steps or the ingredients.
Obviously, cranberries are very festive, but another flavor that really shines this time of year is almond. I love almond everything, and the filling with marzipan is probably the most crucial for achieving the maximum flavor. If you've ever worked with marzipan, you know that it's crumbly and doesn't spread well. That's why I combined it with Challenge Vanilla Fudge Butter Snack Spread. It makes the filling smoother while also adding flavor. If you can't find the snack spread in a store near you, replace it with Challenge unsalted butter and 1/4 teaspoon vanilla extract (that's in addition to the almond extract).
If by chance your wreath doesn't turn out picture perfect—it's okay! The icing will cover up any imperfections. I like the consistency of my icing to be a little bit on the thin side so the layers of puff pastry and cranberry swirls are still visible.
Combine marzipan and Challenge Vanilla Fudge Butter Snack Spread in one bowl and microwave for 20 - 30 seconds or until softened.
Add almond extract to bowl and stir until combined.
For the wreath
Preheat oven to 400 degrees Fahrenheit.
Spread cranberry filling evenly across puff pastry sheet.
Crumble almond filling over top of cranberry filling.
Starting on long side, roll dough into the tube.
Use pizza cutter to cut rolled up dough in half lengthways.
Cross two strips of dough in center. Lift one piece over and under other piece. Continue until strips are intertwined.
Bring both ends of dough together to form wreath.
Transfer dough to parchment paper-lined baking sheet and bake for 30 minutes uncovered. Remove aluminum foil and bake another 15 to 20 minutes or until pastry turns golden brown.
Set aside to cool.
For the icing
Use fork or whisk to combine powdered sugar with 1 Tablespoon of orange juice. Add more orange juice 1 teaspoonful at a time until icing is desired consistency.
Stir in orange zest.
Drizzle icing over cooled wreath.
Sprinkle sliced almonds and pomegranate arils on icing before it hardens.
Cut and serve
Notes: If planning to make this wreath ahead of time, prepare everything up to the point of baking. Cover and refrigerate it. When ready to bake, allow wreath to come to room temperature first.
This is a sponsored post by Challenge butter, but the text and opinions are all mine. Thank you for supporting brands that make Kylee's Kitchen possible!
I had such a hard time photographing this blog post because I couldn't stop eating the pancakes. They're thick and fluffy and so full of flavor. They're perfect for autumn, but also, I would eat these any time of year. And even better—they're actually pretty healthy. One pancake has nearly 9 grams of protein (8.6 grams, to be exact) and no added sugar. Let me break down the ingredients.
Cottage cheese: This is probably a shock to most people, but cottage cheese is the secret to tender, fluffy pancakes that are packed with protein. I recommend using full-fat cottage cheese for the best flavor. You can use small curd or large curd cottage cheese, but the benefit of using small curd is that the curds will mostly melt into the pancake when cooked. But if you use a blender, it doesn't matter. I recently discovered whipped cottage cheese at Kroger, which is perfect for this recipe because the curds aren't really visible at all.
Eggs: Eggs are pretty standard in pancake recipes, and in this case, they contribute to the structure and the protein content.
Pumpkin puree: We can't have pumpkin pancakes without pumpkin puree. I'm so glad it's finally back in stock at stores. I've never tested this, but I imagine you could use mashed sweet potatoes instead of pumpkin if you're trying to recreate this recipe when pumpkin isn't in season.
Vanilla extract: Necessary for additional flavor.
Oat flour: Oat flour is simply ground up rolled oats. I have oat flour on hand almost all the time now because oats are great for lactating moms like myself. But you can make it yourself by grinding rolled oats or old fashioned oats in your food processor or blender. Also, if you use gluten-free oats, this is now a gluten-free pancake recipe. Also, oat flour has more protein than all-purpose flour. If you don't want to be bothered with oat flour, you can substitute all-purpose flour.
Cinnamon and pumpkin pie spice: Essential for flavoring! I didn't include pumpkin pie spice in the first batch I made, and its absence was notable. If you don't have it, substitute an additional 1/2 teaspoon cinnamon plus 1/4 teaspoon ground nutmeg and 1/4 teaspoon ground cloves.
Baking powder: Contributes to the lift and fluffiness of the pancakes.
Challenge Salted Caramel Snack Spread: The best way to top these pancakes is with Challenge Salted Caramel Snack Spread. The extra caramel flavor combined with butter is absolutely delicious.
I recommend making a big batch of these pancakes so you have leftovers for breakfast throughout the week. They last 3 days in the refrigerator. Or you can freeze them and store them for up to 3 months.
Add pumpkin puree and vanilla extract and mix until combined.
In separate bowl, whisk oat flour, cinnamon, pumpkin pie spice, and baking powder.
Add dry ingredients to wet ingredients and mix until smooth with some lumps.
Heat nonstick skillet over medium heat. Add 2 tablespoons oil (my preference is coconut oil).
Once oil is hot, use scoop to place pancake batter into pan.
Cook until pancakes are set around edges and golden-brown on bottom, about 3 minutes.
Flip pancakes and cook until second side is golden-brown, about 2 more minutes. If you're not sure if the pancake is done, you can check the internal temperature. It should register between 190 and 200 degrees Fahrenheit.
Serve pancakes with Challenge Salted Caramel Snack Spread, maple syrup, and pecans if desired.
This is a sponsored post by Challenge butter, but the text and opinions are all mine. Thank you for supporting brands that make Kylee's Kitchen possible!
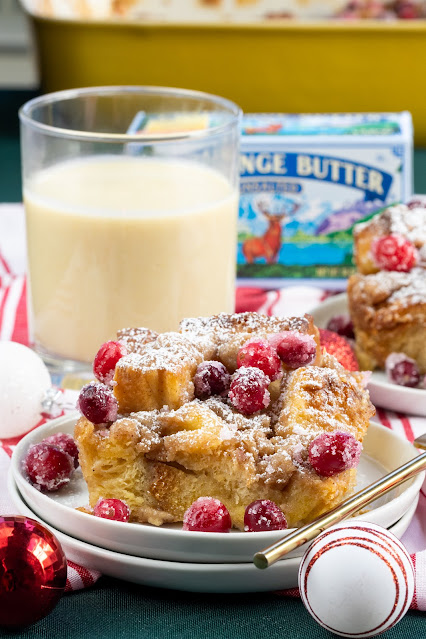
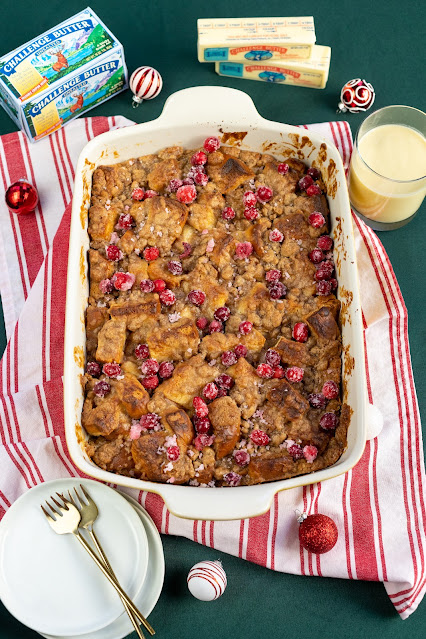
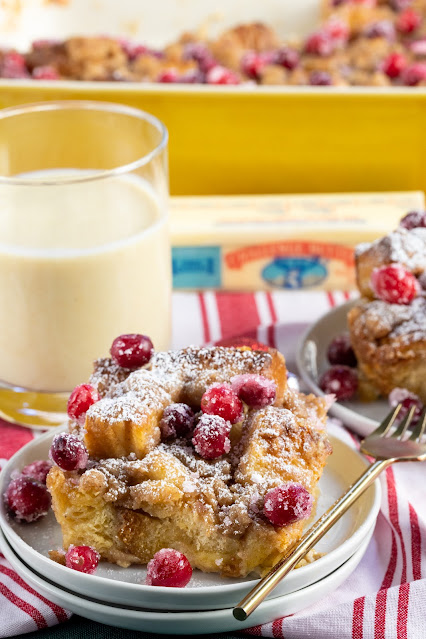
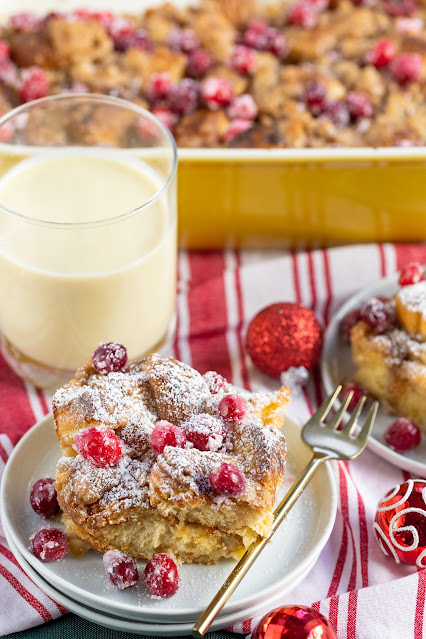
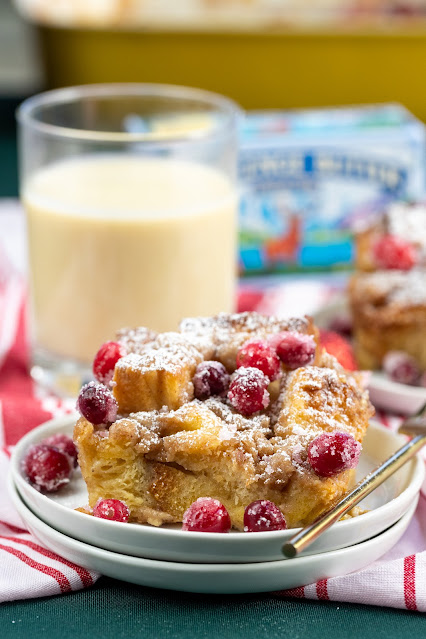
Eggnog is the quintessential holiday drink. It’s thick and creamy with warm holiday spices—all things that pair really well with French toast! But no one wants to be stuck next to the stove making French toast all morning long while the rest of the family has fun opening presents.
The beauty of French toast casserole is that you can do all the prep work the night before and just pop it in the oven in the morning. So you get fluffy French toast full of delicious eggnog flavor without all the fuss.
The base of this recipe is homemade eggnog. You haven’t really had eggnog until you’ve had homemade eggnog. The store-bought drink tastes nothing like the real deal. In fact, I welcome you to make a double batch of the eggnog recipe below so you have a little to sip on! I included directions for how to make the eggnog if you're just using it for the casserole and how to make it if you plan to drink some as well because you have to heat the eggs if you plan to drink it.
My French toast bread of choice is brioche. It’s an enriched bread and is made with butter and sugar, so in my opinion, it really takes the recipe over the top. However, you could also use challah or French bread. I like to cube it and dry it out either overnight air in the oven at a low temperature just like I would with bread pudding and dressing because dry bread soaks up the eggnog better.
For an extra decadent touch, I sprinkle the top with a brown sugar/butter mixture. I only use Challenge unsalted butter because Challenge uses the freshest 100% real pasteurized sweet cream and salt. That’s it. Nothing artificial or synthetic.
At this point, you can either cover the entire casserole and bake it the following morning or you can bake it right away. It just depends on what works best for your schedule.
Before serving the French toast casserole, I like to dust each piece with a little powdered sugar and sprinkle candied cranberries on top for an extra festive pop of color!
Eggnog French Toast Casserole
Ingredients
For the eggnog
7 egg yolks
1/2 cup granulated sugar
2 1/2 cups heavy cream
2 cups whole milk
1/2 teaspoon ground nutmeg
1/2 teaspoon ground cinnamon
1/8 teaspoon ground cloves
1 Tablespoon vanilla
1/4 teaspoon salt
For the French toast
1 large loaf (16 ounces) brioche, challah or French bread, cubed and dried out overnight
Optional: candied cranberries, powdered sugar for decorating
Directions
For the eggnog
If you're only planning to use it in the casserole
Whisk together egg yolks and sugar.
Add heavy cream, whole milk, nutmeg, cinnamon, cloves, vanilla, and salt.
If you want to drink it
Whisk together egg yolks and sugar for about 1 minute, or until mixture is pale yellow.
In a saucepan, combine heavy cream, whole milk, nutmeg, cinnamon, and cloves.
Cook over medium heat until it starts to steam and edges start to bubble.
Temper the egg yolk/sugar mixture by slowly pouring 1 cup of the milk/cream mixture into the egg yolk/sugar mixture and whisking vigorously.
Then pour all of the egg yolk/sugar mixture back into the saucepan while whisking.
Cook over low heat while whisking for about 3 minutes, or until mixture starts to thicken.
Remove from heat and whisk in vanilla and salt.
Allow to cool for several hours before drinking.
For the French toast
Preheat oven to 350 degrees Fahrenheit.
Prepare 9x13-inch baking dish with nonstick spray.
Place bread cubes in baking dish. Pour eggnog on top, making sure all of the bread cubes are saturated.
Mix together flour, brown sugar, nutmeg, cinnamon, and melted butter. Crumble topping over bread cubes.
Bake French toast casserole for about 45 minutes, or until top is slightly browned, egg mixture is cooked, and internal temperature is 160 degrees Fahrenheit.
Let cool for 10 minutes before serving.
Dust with powdered sugar or add candied cranberries on top if desired.
This is a sponsored post by Challenge butter, but the text and opinions are all mine. Thank you for supporting brands that make Kylee's Kitchen possible.
I've always wanted to make hot cross buns—it's one of my favorite Easter treats. I love the combination of warm spices and dried fruits. I'm currently taking a yeast breads class at school, so I was feeling extra motivated to make them this year.
I decided to do a mashup of a hot cross bun and a cinnamon roll. And to make them extra festive, I made bunny ears. I'm calling my creation "Hot Cross Cinnabunnies."
The trick is to not cover the entire rectangle of dough in the filling. Leave a 4-inch border at the top. After you roll it up and cut your rolls, just unravel the part of the dough without the filling and cut it in half lengthwise. Then bend the two cut pieces so they resemble bunny ears.
I like to coat the cinnamon rolls in an apricot glaze after they come out of the oven because it looks shiny and it contributes to the fruity taste of hot cross buns. If you prefer, you can brush the rolls in egg wash before they go in the oven so they're shiny when they come out.
If you don't have time to make homemade cinnamon rolls but still want to try this recipe, there are a few shortcuts you can take. First, you can use frozen (and thawed) sweet dough (I like Rhodes), puff pastry, or crescent sheet dough. If you try this, skip ahead to the "for the filling" section of directions.
Alternatively, you can just buy jumbo cinnamon rolls, mix some dried fruit with a little all spice and orange zest, and stuff the dried fruit in the swirls of the rolls.
I used Challenge unsalted butter and Challenge cream cheese for this recipe. Challenge uses the freshest, purest cream in their products for superior flavor. You can smell the difference immediately upon opening their products.
I've learned a lot about baking breads since I started the class. As you can imagine, there's a lot of science involved! For example, one tip I learned is that when adding sugar to bread dough with a high percentage of sugar, only add half of the sugar at the beginning. Wait to add the other half until the dough appears to be mostly developed.
The reason is sugar is hydroscopic, meaning it attracts moisture. But hydration is required for gluten development and yeast fermentation. If you hold back some sugar and wait to add it until the dough is mostly developed, you don't have to worry about it stealing all the moisture.
Another thing I want to point out is I used instant yeast in this recipe. I like instant yeast better than active dry yeast because it doesn't require proofing. However, it is more difficult to find. (I purchased my instant yeast at Gordon Food Service) If you use active dry yeast instead of instant yeast, multiply the yeast amount by 1.33. This goes for any recipe in which you encounter this situation. And then, of course, you'll need to proof the yeast before moving forward with the recipe.
Combine milk, butter, and eggs in large mixing bowl. Add bread flour, half of the sugar, cinnamon, all spice, instant yeast, and salt.
Knead everything together, using a mixer or by hand, to form a smooth ball of dough. It will take around 8 to 10 minutes on second speed of stand mixer. About halfway through the kneading process, add the other half of the sugar. Dough will be sticky, but it should pull away from sides of bowl. If it doesn't add more flour, a tablespoon at a time.
Place dough in large, greased bowl. Tightly cover dough with plastic wrap. Allow to rise in warm, draft-free environment until it doubles in size, around 90 minutes to 2 hours.
Punch dough down and transfer onto pastry mat or lightly floured surface. Roll into large rectangle, about 20 inches by 14 inches, it doesn't need to be those exact dimensions.
For the filling
Mix the orange marmalade with cinnamon and all spice. Spread mixture on dough, leaving 4-inch border on top.
Sprinkle dried fruit on top of marmalade.
Tightly roll up rectangle and cut into about 14 equal pieces. Arrange pieces, cut side down, on 2 baking sheets.
Uncurl the 4 inches of the roll without filling and cut in half lengthwise. Bend dough strips and pinch ends to look like bunny ears. Cover rolls and let rise in warm place about 30 minutes or until dough is noticeably puffy.
Preheat oven to 350 degrees Fahrenheit. Bake rolls about 15 to 20 minutes, or until they're light brown. If the bunny ears brown too quickly, cover baking sheet with aluminum foil.
Remove rolls from oven.
For the glaze
Place jam and water in bowl and microwave 30 seconds. Mix to combine. Brush cinnamon roll bunnies with jam mixture while warm.
Allow to cool.
For cream cheese frosting
Beat together cream cheese, butter, vanilla extract, and salt until smooth. Slowly add powdered sugar and beat until smooth.
Transfer cream cheese frosting to plastic sandwich bag and snip about 1/4 inch from corner.
Pipe crosses onto cinnamon rolls to indicate hot cross buns.
Serve immediately or store in air-tight container at room temperature for several days.
This is a sponsored post by Challenge butter, but the text and opinions are all mine. Thank you for supporting brands that make Kylee's Kitchen possible.
Bougatsa is best described as a Greek custard pie with warm spices and a phyllo crust. When I visited Greece, it was served every morning for breakfast. But it's delicious any time of day. I love the contrast of the creamy filling with the crisp phyllo.
It's typically baked in a large casserole dish and cut into squares, but in honor of Pie Day, I made it into an actual pie in a skillet. The phyllo dough serves as the crust to the custard filling.
I use clarified butter whenever I work with phyllo. The butter we buy from the grocery store consists of butterfat, milk solids, and water. Clarified butter is the butterfat with everything else removed. Because the milk solids are removed, clarified butter has a higher smoking point. Phyllo dough is very delicate and using clarified butter helps it to brown evenly. I recommend using a good quality butter like Challenge European Style Unsalted Butter. Challenge European butter is churned slower and longer than other butters to produce a more flavorful butter with less moisture and higher butterfat. In fact, it consists of 83% butterfat, whereas standard American butters contain 80% butterfat.
I have a bit of advice if you haven't worked with phyllo dough: Use a damp towel and work quickly to prevent the phyllo from drying out. It's important to first allow your phyllo dough to come to room temperature, but don't open the package until you're ready to work with it. Once you open the roll and expose it to air, it will dry out. This is problematic because phyllo becomes brittle and breaks easily when dry. I recommend you lightly dampen a tea towel and use it to cover the phyllo you aren't currently using while you layer and butter each phyllo sheet in the skillet. Use one entire roll as the base of your crust. A standard roll has 20 sheets. If one or more of your sheets rips, that's okay! Just use as many sheets as you can.
1/2 cup (80 grams) semolina flour (can substitute with 60 grams all purpose flour)
1 1/4 cups (283 grams) whole milk
3/4 cup (170 grams) heavy cream
1 1/2 teaspoons (7 grams) vanilla extract
1 teaspoon ground cinnamon
1/2 teaspoon ground nutmeg
1/4 teaspoon salt
1/8 teaspoon ground cardamom
20 sheets phyllo dough, thawed
Directions
For the clarified butter
Melt butter in small saucepan over low heat. Don't stir!
Skim off foamy milk solids that rose to the top.
Carefully ladle golden butterfat into bowl, leaving behind residue of milky white solids that settled at bottom of pan.
Keep clarified butter at room temperature throughout duration of spanakopita recipe. When finished, cover and store in refrigerator.
For the custard
Preheat oven to 350 degrees Fahrenheit.
In large bowl, whisk together the egg yolks, eggs, sugar, and semolina flour. Add whole milk, heavy cream, vanilla extract, cinnamon, nutmeg, salt and cardamom. Whisk to combine.
Brush bottom and sides of 10-inch cast-iron skillet with clarified butter.
Lightly dampen dish towel. Unroll roll of phyllo dough and lay dish towel on top. Keep towel on top of unused phyllo while you work to prevent dough from drying out.
Working quickly, remove one phyllo sheet from rest of stack and gently press in bottom and up sides of skillet. Lightly brush entire sheet with butter.
Repeat with remaining phyllo sheets, rotating each sheet in a different direction as you add it.
Pour cream mixture into skillet.
Carefully crimp overhanging edges of phyllo so it looks like pie crust. Lightly brush exposed surface of phyllo with butter.
Carefully move skillet to oven and bake until phyllo is golden brown, about 30 to 35 minutes. The edge should be set, but the center should still be a little jiggly. Double-check with an instant-read thermometer. The custard is done when it reaches 170 degrees Fahrenheit.
Remove skillet from oven and let cool for 10 minutes before cutting into 8 wedges and serving.
This is a sponsored post by Challenge butter, but the text and opinions are all mine. Thank you for supporting brands that make Kylee's Kitchen possible.
Spanakopita is usually described as spinach and feta pie, but it's typically baked in a large casserole dish or shaped into triangles. But in honor of Pie Day, I made it into an actual pie with phyllo dough serving as the crust to the spinach and feta filling.
I grew up making spanakopita with my mom and my Yiayia, so I want to share some tips I learned from them throughout the years.
Use clarified butter. The butter we buy from the grocery store consists of butterfat, milk solids, and water. Clarified butter is just the butterfat with everything else removed. Because the milk solids are removed, clarified butter has a higher smoking point. Phyllo dough is very delicate and using clarified butter helps it to brown evenly. I recommend using Challenge European Style Unsalted Butter. Challenge European butter is churned slower and longer, in the tradition of fine European butters, to produce a more flavorful butter with less moisture and higher butterfat than American butter (83% in European versus 80% in standard butters).
Use frozen spinach. I've used fresh spinach and frozen spinach, and I cannot taste a difference. Using frozen spinach is cheaper, and it eliminates the step of having to saute the spinach. You have to make sure to thaw the frozen spinach ahead of time and squeeze all of the water out of it.
Use cottage cheese. Cottage cheese makes for a really creamy consistency. However, if you're very anti-cottage cheese or if you can't find it in the small curd variety, just omit it.
Use a damp towel and work quickly to prevent phyllo from drying out. Allow your phyllo dough to come to room temperature before working with it, but don't open the packaging until you're ready to work with it. Once you open the roll and expose it to the air, it will dry out. This is problematic because it will become brittle and break easily. Lightly dampen a tea towel and use it to cover up the phyllo dough you aren't currently using.
3 bunches (about 6 ounces) green onions, white and green parts
4 garlic cloves, minced
8 ounces feta cheese, crumbled
6 ounces small curd cottage cheese
4 ounces Parmesan cheese, grated
3/4 cup parsley leaves, chopped
2 Tablespoons fresh dill, chopped
2 Tablespoons fresh lemon juice
Zest from 1 lemon (about 1 Tablespoon)
1 teaspoon salt
1/2 teaspoon black pepper
1/4 teaspoon ground nutmeg
2 large eggs
20 sheets phyllo dough, thawed
Directions
For the clarified butter
Melt butter in small saucepan over low heat. Don't stir!
Skim off foamy milk solids that rose to the top.
Carefully ladle golden butterfat into bowl, leaving behind residue of milky white solids that settled at bottom of pan.
Keep clarified butter at room temperature throughout duration of spanakopita recipe. When finished, cover and store in refrigerator.
For the spanakopita
Preheat oven to 400 degrees Fahrenheit.
Drain and squeeze all excess water from spinach. This is very important! A potato ricer works really well for this task.
In a skillet, melt 1 tablespoon of your clarified butter over medium-low heat. Add green onions and garlic and cook until tender and fragrant, about 5 minutes. Remove from heat and combine with spinach in large bowl.
Add feta, cottage cheese, Parmesan, parsley, dill, lemon juice, lemon zest, salt, pepper, and nutmeg. Combine with spinach mixture and season to taste with salt and pepper. Taste and adjust seasonings if necessary. Stir in eggs. Set aside.
Brush bottom and sides of 10-inch cast-iron skillet with clarified butter.
Lightly dampen dish towel. Unroll roll of phyllo dough and lay dish towel on top. Keep towel on top of unused phyllo while you work to prevent dough from drying out.
Working quickly, remove one phyllo sheet from rest of stack and gently press in bottom and up sides of skillet. Lightly brush entire sheet with butter.
Repeat with remaining phyllo sheets, rotating each sheet in a different direction as you add it.
Spoon spinach-feta mixture into skillet and spread in even layer.
Carefully fold overhanging edges of phyllo toward center of pan. Lightly brush exposed surface of phyllo with butter.
Cook skillet over medium heat on stovetop for 5 minutes to crisp bottom crust.
Transfer skillet to oven and bake until phyllo is golden brown, about 20 to 25 minutes.
Remove skillet from oven and let cool for 10 minutes before cutting into 8 wedges and serving.
This is a sponsored post by Challenge, but the text and opinions are all mine. Thank you for supporting brands that make Kylee's Kitchen possible!
Going out for dinner on Valentine’s Day is always a big deal, but you may want to consider kicking off the holiday with a special breakfast, especially since it's on a Sunday this year. One of my favorite traditions growing up was a special Valentine's Day breakfast. My mom always made heart-shaped pancakes for my dad and me. It made me feel really special, and I looked forward to Valentine's Day every year. It was the inspiration behind this heart-shaped coffee cake.
Coffee cakes were a big deal on my dad's side of the family. My grandpa would always order them for the holidays, and they were at the center of every family reunion. That being said, I wanted to make a special coffee cake for Valentine's Day, but because I love following a theme, I wanted to make it in the shape of a heart.
The first step when making this coffee cake was deciding what I wanted for the base of the cake. I experimented with a classic yeast dinner roll recipe that I learned in culinary school; I experimented with sweet dough that I purchased from the grocery store (this one is great!); and I experimented with puff pastry. They all worked really well, so use whichever one you prefer.
The second thing I needed to decide was what I wanted for the filling. I like classic cinnamon-sugar and pecan coffee cake, but I've also tried cherry cheesecake with cherry pie filling and sweetened cream cheese. I think Nutella would be really tasty too.
I used Challenge unsalted butter in the filling because their product is 100% natural without the use of the synthetic hormone rBST. You can smell the difference as soon as you unwrap a stick.
There are a couple different methods for making the dough look like a heart, I experimented with this one from The Bread Monk and this one from The Proper Binge Blog. I decided the second one is my favorite. It involves rolling the dough up jellyroll-style, folding the dough, making a cut through the fold, and fanning out the two heart lobes. The key is you need to fan the lobes out farther than what you would think for a normal heart shape because the dough expands while it bakes, and you don't want one big blob.
After baking the coffee cake and letting it cool a bit, I poured a simple glaze over it—just powdered sugar, milk, and maple extract. Using vanilla extract or almond extract in the glaze would also be tasty, or you could make caramel or butterscotch icing, or even a cream cheese frosting would work well, too.
Cake for breakfast is always a good idea, and this heart-shaped coffee cake on Valentine's Day morning will surely become your new favorite tradition.
1 roll of your favorite store-bought sweet dough, thawed (I like this one)
Or
1 sheet puff pastry, thawed
For the glaze
1/2 cup powdered sugar
1/4 teaspoon ground cinnamon
1 Tablespoon milk
1/2 teaspoon maple extract or vanilla extract
Directions
For the filling
Mix brown sugar, granulated sugar, cinnamon, and salt together in medium bowl.
Stir in melted butter and pecans. Set aside.
For the dough (skip to number 9 if you don’t need to make dough)
Dissolve yeast in water in bowl.
Combine flour, salt, sugar, milk powder,
shortening, butter and eggs in bowl of mixer fitted with a dough hook.
Add the water/yeast mixture; stir to combine.
Knead on medium speed 10 minutes.
Transfer the dough to a lightly greased bowl; cover and place in a warm spot. Bulk
ferment until it doubles, approximately 1 hour.
Punch down dough. Let it rest a few minutes to allow the gluten to relax.
Preheat oven to 350 degrees Fahrenheit.
Roll dough into rectangle, approximately 10” x 12”
Sprinkle filling across surface of dough, leaving a 1-inch border around edges.
Roll the dough jellyroll-style into a log.
Fold the dough in half on top of itself. The fold should be facing you.
Cut through the middle of the dough, both the top and bottom layers, stopping about 2 inches from the cut ends.
Move dough to baking sheet lined with parchment paper. Open up the cut ends and lay them flat so it looks like a heart shape. You’ll want to pull the two top lobes out farther than you think because they’ll spread when they bake.
Bake for 25 to 30 minutes, or until it’s lightly browned and dough is cooked through.
For the glaze
While coffee cake is cooling, whisk together powdered sugar and cinnamon. Pour in milk and maple extract or vanilla extract and whisk until smooth.
Pour glaze over coffee cake. Sprinkle with additional toasted pecans if desired.
Roll out dough and add filling on top, leaving 1-inch border around edges. Roll up dough like jellyroll.
Fold dough in half. Make cut down center of fold, stopping 1-2 inches from end.
Fan out cut sides so it looks like a heart and pinch bottom portion so it comes to a point.
.png)