Monday, November 29, 2021

Gingerbread peppermint stick ice cream sandwiches

This is a sponsored post by Hudsonville Ice Cream, but the text and opinions are all mine. Thank you for supporting brands that make Kylee's Kitchen possible!

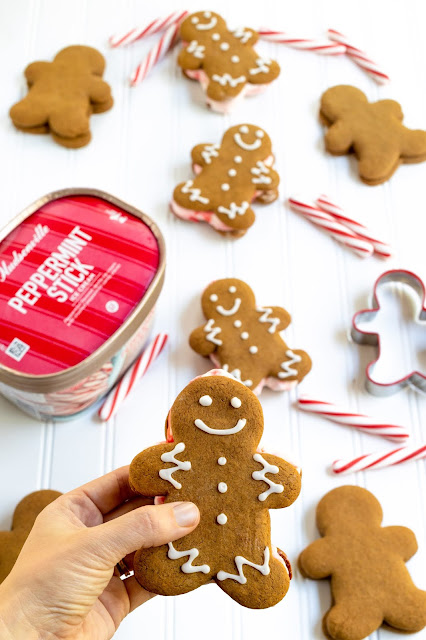
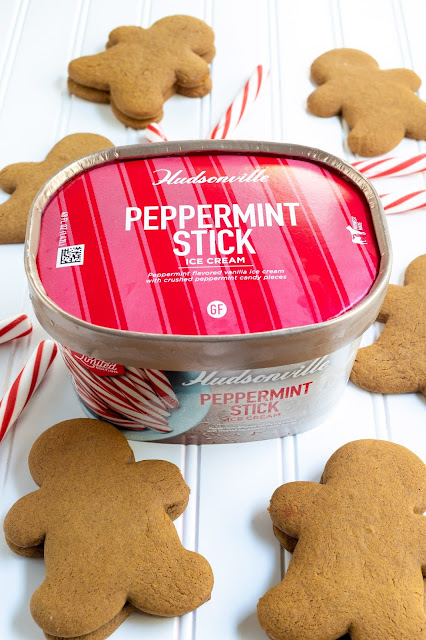
There are few desserts that symbolize the holiday season more than gingerbread cookies. I love the combination of warm, comforting spices. The only way to make these sweet treats even more festive is by pairing them with peppermint ice cream, specifically, Hudsonville’s Limited Edition Peppermint Stick ice cream

The Limited Edition Peppermint Stick ice cream is delightful on its own, but it’s truly heavenly when sandwiched between two gingerbread cookies. It’s all the flavors of the holiday season in one bite!

Gingerbread cookies are notoriously tricky to make. The dough is really sticky because of the molasses, and it’s hard to get just the right combination of spice, soft centers, and crisp edges. Fortunately, after many trials and errors, I have lots of tricks up my sleeve for creating the best gingerbread cookies!

First, you must cream the butter with the sugar until it is light and fluffy, not just smooth. It should take about 4 to 5 minutes on medium speed. The butter will be pale and yellow, and it should look noticeably different. The purpose of creaming is to aerate the butter by beating it over and over again, and the tiny sugar crystals work to help the process. 

Properly creaming your butter creates cookies that are less dense, and it expands the volume of the dough, which results in more cookies!

It’s also imperative that you scrape your bowl throughout the mixing process. Scraping ensures that a thick film of butter and sugar doesn’t collect against the bowl. I always scrape before I add each additional ingredient to ensure a more uniform dough.

Getting the spice level just right in gingerbread cookies can be tricky. Too much spice and the cookies can taste bitter. Too little spice and you can’t taste anything at all. I tinkered with which spices to use and the amount. I found that using a combination of ginger, cinnamon, cloves, and allspice gave the cookies a complex flavor without being over-the-top.

Gingerbread cookie dough is nearly impossible to work with right after mixing because it’s so sticky. That’s why you must chill the dough before rolling it out. The dough is only manageable when it’s firm. The best way to do this is to divide the dough in half, wrap each half in plastic wrap, flatten into discs, and refrigerate at least 2 hours or up to 3 days.

When you’re ready to roll out the dough, generously flour your work surface, your hands, and your rolling pin. I promise, the flour won’t affect the taste! Roll the dough out to about 1/4-inch thick. Any thinner, and you’ll have cracker cookies. No one likes cracker cookies.

The cookies take between 8 to 10 minutes to bake, depending on your oven and your desired softness level. Many ovens heat unevenly and have hot spots, so it’s important that you rotate the baking sheets at the halfway point. Since these cookies will ultimately be frozen and become ice cream sandwiches, it’s best to bake them on the softer side.

Once your cookies are cool, you can decorate them if you choose or you can leave them plain. I included a simple icing recipe in this post. Remember, you only need to decorate half of the cookies since one cookie goes on the bottom of the ice cream sandwich.

The last and most important step in completing this recipe is evenly spreading the Limited Edition Peppermint Stick ice cream between two cookies. It’s easy to do when working with round cookies, but it’s a little harder when working with cookies that are different shapes. The easiest way to achieve an even spread is to turn one cookie bottom side up, place the cookie cutter on top, add a scoop of ice cream in the center of the cookie cutter, and spread it with a knife.

These gingerbread peppermint stick ice cream sandwiches are adorable and delicious, and they will certainly be the highlight of your holiday gatherings. Hudsonville’s Limited Edition Peppermint Stick ice cream is proof that sometimes the sweetest packages aren't under the tree—they’re in the freezer.

Use this Scoop Locator tool to find Peppermint Stick ice cream near you!

Gingerbread peppermint stick ice cream sandwiches

Yield: Makes 18 cookies / 9 ice cream sandwiches

Ingredients

For the cookies

  • 3 1/2 cups all purpose flour (420 grams)
  • 1 Tablespoon ground ginger 
  • 1 Tablespoon ground cinnamon
  • 1 teaspoon baking soda
  • 1/2 teaspoon cloves
  • 1/2 teaspoon allspice
  • 1/4 teaspoon salt
  • 12 Tablespoons unsalted butter, room temperature (170 grams)
  • 3/4 cup brown sugar (160 grams)
  • 1/2 cup molasses (170 grams)
  • 1 large egg (55 grams)
  • 2 teaspoons vanilla extract

For the icing (optional)

  • 1/2 cup powdered sugar, sifted (60 grams)
  • 1/2 teaspoon vanilla extract
  • 1 tablespoon water or milk

For ice cream sandwiches

Directions

For the cookies

  1. Mix flour, ginger, cinnamon, baking soda, cloves, allspice, and salt. Set aside.
  2. Cream butter and brown sugar for 5 minutes on medium speed until light and fluffy.
  3. Add molasses, egg, and vanilla and cream on medium speed for 1 minute.
  4. Add flour mixture to wet ingredients and mix on low speed until just combined.
  5. Divide dough in half. Wrap each half in plastic wrap and shape into discs.
  6. Refrigerate dough for at least 2 hours and up to 3 days.
  7. Preheat oven to 350 degrees Fahrenheit and line 2 baking sheets with silicone mats or parchment paper.
  8. Remove cookie dough from refrigerator. Flour work surface, hands, and rolling pin.
  9. Roll out dough 1/4-inch thick. Use your cookie cutter and cut dough into gingerbread man shapes and place on baking sheets.
  10. Re-roll leftover scraps and use cookie cutter again. Repeat until all dough is used.
  11. Bake cookies 8-10 minutes. They shouldn’t get any darker.
  12. Allow to cool.

For the icing

  1. Mix together all ingredients until no clumps remain. It should be very thick. Add more powdered sugar if needed.
  2. Transfer icing to squeeze bottle or pour into pastry bag with small tip.
  3. Decorate gingerbread men as desired.

For assembly

  1. Turn one cookie bottom-side-up and place cookie cutter on top.
  2. Add 1/4 cup softened ice cream to center of cookie cutter and spread. 
  3. Remove cookie cutter and top with second cookie.
  4. Press cookies together and place in freezer for at least 30 minutes before serving.
  5. Store extra ice cream sandwiches in freezer.

Thursday, November 25, 2021

Brussels Sprouts Au Gratin


This is a sponsored post by Challenge butter, but the text and opinions are all mine. Thank you for supporting brands that make Kylee's Kitchen possible! 

I am so excited to be cooking my first turkey this Thanksgiving, but honestly my favorite things on the menu for Thursday don’t even include meat. I love loading up on all the sides! And I am so excited to debut this brussels sprouts au gratin recipe as my new favorite side dish. 

When I presented this dish to my husband the first time I made it, he said, "I don’t know why anyone even bothers with green bean casserole when you can have this." And I have to agree! Frankly, I’m not sure why we don’t make everything au gratin. What’s not to love about toasted cheese and breadcrumbs? In fact, I slowly increased the au gratin topping throughout my numerous recipe test attempts because I think the texture it adds is so vital to getting this recipe just right.

As always, it's very important to the best quality ingredients in your recipes, especially when it's for an important meal like Thanksgiving! That's why I only use Challenge butter. Challenge churns their butter from the freshest 100% real pasteurized sweet cream and salt. They don't use any artificial or synthetic ingredients. And that's really important to me.

Brussels Sprouts Au Gratin

Yield: About 10 servings

Ingredients

For the filling

  • 4 ounces pancetta
  • 4 Tablespoons Challenge unsalted butter
  • 2 leeks, sliced thin and cut in half moons
  • 2 shallots, small dice
  • 1 teaspoon salt
  • 1 teaspoon black pepper
  • 5 cloves garlic
  • 1 pound brussels sprouts, trimmed, shredded on largest mandolin setting or cut 1/8" thick
  • 1 Tablespoon fresh thyme
  • 2 cups heavy cream
  • 4 ounces gruyere cheese, grated
  • 4 ounces parmesan cheese, grated
  • 1 Tablespoon dijon mustard
  • 1/2 teaspoon ground nutmeg
  • 1/2 teaspoon black pepper
  • 1/4 teaspoon cayenne

For the topping

Directions

For the filling

  1. Preheat oven to 425 degrees Fahrenheit
  2. Sauté pancetta until lightly browned and fat is rendered, remove from skillet
  3. Leave pancetta fat in skillet and add butter
  4. Add leeks and shallots to pan. Season with salt and pepper. Sauté on low until leeks and shallots start to caramelize.
  5. Add garlic and cook on low until garlic is fragrant and softens.
  6. Add brussels sprouts and thyme to skillet and return pancetta to skillet. Mix thoroughly. Scrape mixture into 11x7” baking dish.
  7. Using same skillet, add cream, Gruyere, parmesan, dijon mustard, thyme. salt, nutmeg, black pepper, and cayenne. Bring to a simmer stirring continuously until cheese melts and it turns into a thick sauce, about 3 minutes.
  8. Pour the sauce over sprouts and leeks mixture and toss to coat.
  9. Bake for 15 to 20 minutes. Mixture should be bubbling and starting to brown around the edges.
  10. Remove from oven.

For the topping

  1. Combine panko, parmesan, and melted butter. Scatter mixture over brussels sprouts and return to oven.
  2. Bake until golden brown, about 5 to 8 minutes.


Monday, November 22, 2021

No oven necessary for these 3 Thanksgiving desserts


This is a sponsored post by Challenge butter, but the text and opinions are all mine. Thank you for supporting brands that make Kylee's Kitchen possible! 

Today I’m sharing three dessert ideas that don't require use of an oven, so you don't have to worry about competing for oven space on Thanksgiving day! Two of the desserts are no-bake recipes, and the last dessert is made in a slow cooker. 


Pumpkin tiramisu
  1. Traditional tiramisu custard is made with eggs, but the pumpkin puree in this desserts acts as a binder, which means no eggs necessary.
  2. Make sure to use crunchy ladyfingers when making tiramisu because sponge ladyfingers get too soggy. 
  3. If you don’t have access to an espresso machine (I certainly don’t) just buy instant espresso and mix a teaspoon with 1/2 cup boiling water. Traditionally, tiramisu also has a little alcohol mixed in with the espresso. You can use rum, brandy, cognac, any variety of liqueurs, or just omit it. 
  4. Another tip for avoiding soggy ladyfingers is to use a pastry brush to brush them with the espresso instead of dipping them in it.

Pumpkin tiramisu

Yield: 9 pieces

Ingredients

For the mousse

  • 1 1/4 cup (300 grams) pumpkin puree
  • 8 ounces mascarpone cheese
  • 1 cup (113 grams) powdered sugar
  • 2 teaspoons pumpkin pie spice
  • 2 teaspoons vanilla extract
  • 1/4 teaspoon salt
  • 1 1/2 cups (360 milliliters) heavy cream

For espresso mixture

  • 3/4 cup boiling water
  • 1 Tablespoon (4 grams) espresso powder
  • 1 Tablespoon (15 milliliters) brandy, Bailey’s, rum, cognac, or hazelnut liqueur (optional)

For assembly

  • 7 ounces Italian ladyfingers, crunchy

Directions

For the mousse

  1. In large bowl, beat together pumpkin puree on low speed with mascarpone, powdered sugar, pumpkin pie spice, vanilla extract and salt.
  2. Slowly pour in heavy cream while continuing to beat on low speed. Once heavy cream is incorporated, beat mixture at medium speed until soft peaks form.

For espresso mixture

  1. Mix espresso powder with boiling water. Once cooled, stir in alcohol.

For assembly

  1. Use pastry brush to brush ladyfingers with espresso mixture. Place in single layer at bottom of 9x9-inch baking dish.
  2. Scrape half of pumpkin mousse mixture on top of lady fingers.
  3. Use pastry brush to brush remaining ladyfingers with espresso mixture. Place in single layer on top of mousse. Scrape remaining mousse on top of lady fingers and smooth.
  4. Cover and refrigerate at least 6 hours but overnight is preferable.
  5. When ready to serve, garnish with pumpkin pie spice, if desired.


Chocolate Grand Marnier pie
  1. The crumb crust is just Oreo crumbs and butter. I used 1/2 package of cookies to make a 9-inch pie crust. The crumb mixture should be the consistency of wet sand. Freeze the crust 15 minutes before pouring the filling in--no need to bake it.
  2. You can use dark, bittersweet, or milk chocolate depending on your taste preference. I actually found dark chocolate with orange flavoring at Trader Joe’s which worked perfectly for this recipe.
  3. Since this is a no-bake recipe, it’s very important to use high qualityChallenge salted butter ingredients. That’s why I only use Challenge dairy products. I used Challenge salted butter for the crumb crust and Challenge cream cheese for the filling. The salted butter perfectly balanced the sweetness of the Oreo cookie crumbs. And the silky cream cheese is made with real milk, cream, and natural ingredients for superior flavor and an ultra smooth finish. 


Chocolate Grand Marnier Pie

Yield: 8 servings

Ingredients

For the crumb crust

For the filling

  • 8 ounces Challenge cream cheese
  • 1 cup (113 grams) powdered sugar
  • 1 Tablespoon Grand Marnier
  • 1 Tablespoon orange zest
  • 2 teaspoons vanilla extract
  • 1 teaspoon salt
  • 10 ounces bittersweet chocolate, melted
  • 2 cups (480 milliliters) heavy cream

Directions

For the crumb crust

  1. Mix crumbs with melted butter.
  2. Press evenly into bottom and up sides of 9-inch pie dish. Freeze for at least 15 minutes before adding filling.

For the filling

  1. With whip attachment on mixer, beat cream cheese and powdered sugar until light and fluffy, about 3 minutes.
  2. Add Grand Marnier, orange zest, vanilla, and salt, and mix to combine.
  3. With mixer running, slowly add warm chocolate and whip on low speed until just combined.
  4. With mixer still running, add heavy cream in slow steady stream. 
  5. Once heavy cream is fully incorporated, whip on medium speed to medium stiff peaks. 
  6. Pour filling into pie crust and spread into even layer. Cover directly to surface with plastic wrap and refrigerate until set—at least 6 hours.
  7. Decorate with chocolate curls and/or candied orange peels when ready to serve.


Slow cooker white chocolate macadamia nut bread pudding
  1. Make sure your bread cubes are very dry so they soak up the cream/egg mixture as much as possible. I like to dry mine out in an even layer on a baking sheet overnight. If you don’t have time for that, you can bake them in the oven at 300 degrees Fahrenheit for about 10-15 minutes, or until they feel dry. 
  2. Strain the cream/egg mixture over the dried bread cubes so no stringy egg parts make their way into the bread pudding.
  3. Let the bread cubes soak up the cream/egg mixture for at least an hour before cooking.
  4. Because it's made in the slow cooker, there are no crunchy top pieces like you get when you make bread pudding in the oven. And some people may find the texture too mushy. But you can fix that if you brûlée the bread pudding! Just sprinkle some sugar on top and using a kitchen torch on it lightly. 


Slow cooker white chocolate macadamia nut bread pudding

Yield: 8 servings

Ingredients

  • 4 large eggs
  • 1/2 cup (100 grams) granulated sugar
  • 1 Tablespoon vanilla extract
  • 2 cups heavy cream
  • 2 Tablespoons Challenge unsalted butter
  • 4 cups (6 ounces) challah, brioche, or French bread, cut into 3/4-inch cubes, crusts removed, dried out overnight
  • 4 ounces white chocolate, coarsely chopped
  • 3/4 cup (94 grams) macadamia nuts, chopped and toasted
  • 4 ounces white chocolate, grated

Directions

  1. Beat eggs, sugar, and vanilla extract on low speed in large bowl. Beat in heavy cream on low. Set aside.
  2. Butter 4 or 5-quart slow cooker. Place bread cubes and white chocolate in slow cooker.
  3. Strain cream/egg mixture over bread cubes and stir to combine. Let stand at least an hour so bread absorbs cream/egg mixture.
  4. Sprinkle macadamia nuts on top. Cover and cook on low for 2 - 3 hours, or until bread pudding is mostly set but still slightly jiggly and edges are starting to turn golden brown. (If you prefer, bake in oven at 375 degrees Fahrenheit for 40 - 45 minutes)
  5. Optional: When done baking sprinkle top of bread pudding with more granulated sugar and use a kitchen torch to brûlée the top of the bread pudding.
  6. Sprinkle top of bread pudding with grated white chocolate. Cool 20 minutes and serve.


Pin It button on image hover