Monday, February 21, 2022

Confetti cake with strawberry buttercream


This is a sponsored post by Challenge butter, but the text and opinions are all mine. Thank you for supporting brands that make Kylee's Kitchen possible! 

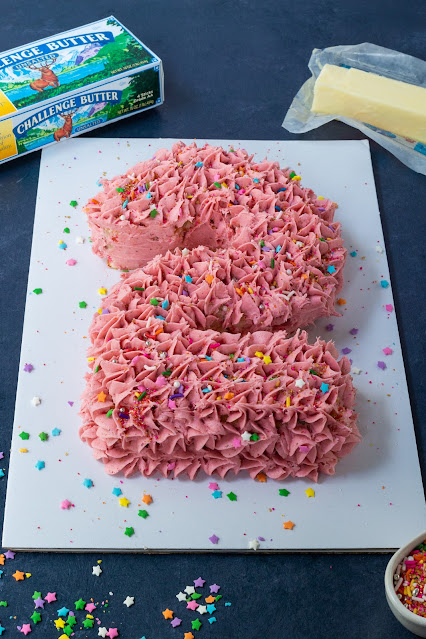
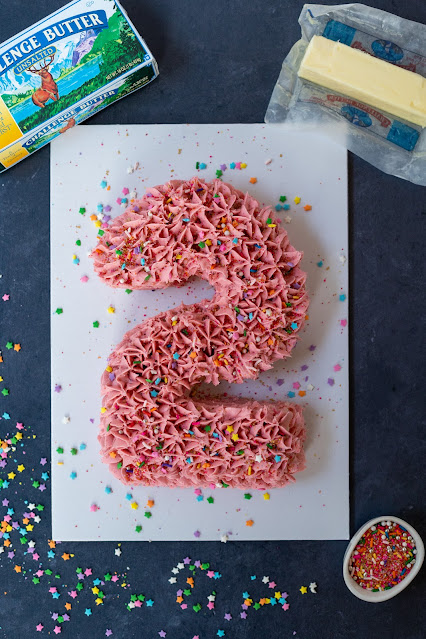
I'm celebrating Tuesday (or should I say Twosday) 2/22/22 by making a number 2-shaped confetti cake with strawberry buttercream frosting! If you are not celebrating an occasion in which the number two is involved (which is probably the case for most of you reading this blog post), the good news is that this is still an incredibly delicious cake and buttercream recipe.

Before you jump into the recipe, I want to share a few tips that are very important when making cakes.

First, ALWAYS MEASURE INGREDIENTS BY WEIGHT! I cannot emphasize this enough, and I'm sure you've heard me say this many times. It is the most accurate way to measure ingredients. And it's very very important to be accurate when baking because baking is a science. My $15 mini scale is my most used tool in the kitchen.

Second, make sure all your ingredients are room temperature. Ingredients mix together better when they're all the same temperature. Room temperature butter should still be slightly cool, and it shouldn't look greasy and melty. When you touch it, your finger should leave an imprint, but it shouldn't sink down into the butter. I only use Challenge unsalted butter in my baking recipes. It doesn't have any artificial ingredients, so the taste is pure and the flavor is consistent.

Third, spray your cake pans, line with parchment paper, and spray again. It's the best way to ensure that your cakes will easily pop out of the pans.

Fourth, do not use the "toothpick test" to see if your cake is done. It is not fail proof. There are three things I want you to do instead. The first is to lightly touch the top of the cake. It should bounce back. Next, look at the edges. The cake will start to pull away from the pan when it's done. Lastly, use a thermometer to check the temperature of the center of the cake. It should register between 200 and 205 degrees Fahrenheit.

Confetti cake with strawberry buttercream

Makes 3, 8” cakes (or 1, 8” circle cake and 1, 8” square cake)

Ingredients

For the funfetti cake

  • 680 grams (3 1/2 cups) granulated sugar
  • 567 grams (4 3/4 cups) cake flour
  • 20 grams (5 teaspoons) baking powder
  • 6 grams (2 teaspoons) salt
  • 340 grams (1 1/2 cups) Challenge unsalted butter, softened to room temperature
  • 16 fluid ounces (473 grams) buttermilk 
  • 237.5 grams egg whites (from about 7 eggs)
  • 187.5 grams whole eggs (from about 4 eggs)
  • 14 grams (1 Tablespoon) vanilla extract
  • 4 grams (1 teaspoon) almond extract
  • 3/4 cup sprinkles (130g)

For the strawberry buttercream

  • 1 cup (about 25g) freeze-dried strawberries
  • 227 grams (1 cup) Challenge unsalted butter, softened to room temperature
  • 454 grams (4 cups) confectioners’ sugar, sifted
  • 58 grams (1/4 cup) heavy cream
  • 5 grams (1 teaspoon) vanilla extract
  • 2 grams (1/2 teaspoon) salt

Directions

For the funfetti cake

  1. Preheat oven to 350 degrees Fahrenheit. Prepare cake pans by spraying and lining with parchment paper.
  2. Combine sugar, flour, baking powder and salt in large mixing bowl with paddle. Mix on low speed for 2 minutes until aerated.
  3. Add butter in small increments on low speed, scraping down bowl periodically. Once all butter is incorporated, mix on low speed for 2 minutes.
  4. Combine buttermilk, egg whites, eggs, vanilla extract, and almond extract in medium bowl.
  5. Add in 4 stages to dry ingredient / butter mixture at low speed. Scrape sides and bottom of bowl between each addition.
  6. Once all liquid is in mixing bowl, mix at medium speed for 1 minute 
  7. Fold sprinkles into cake batter until evenly distributed.
  8. Divide batter into cake pans.
  9. Bake for 30 to 40 minutes, or until top bounces back, edges start to pull away, and internal temperature registers between 200 and 205 degrees Fahrenheit.
  10. Once cool, remove cakes from pans

For the strawberry frosting

  1. Pulverize freeze-dried strawberries in food processor or blender. Set aside.
  2. Beat butter on medium speed until smooth and creamy, about 2 minutes.
  3. Add confectioners’ sugar, freeze-dried strawberry powder, heavy cream, vanilla extract, and salt. Beat on low speed until ingredients are combined. Then beat on high speed for 2 minutes. If frosting is too thick, add another tablespoon of heavy cream

For #2 cake assembly

  1. Cut small circle from center of circle cake. Remove circle from center.
  2. Cut cake in half. Cut one of the halves in half.
  3. Cut rectangle from square pan that is the same width as the circles.
  4. Put a little dab of frosting on cake board where you plan to place cake pieces.
  5. Place the half circle cut side facing down at the top of the cake board.
  6. Line up the two quarter circle pieces so it resembles the shape of the number two.
  7. Place the rectangle at the end of the second quarter circle. It should look like the number two.
  8. Frost cake and decorate with sprinkles if desired.

Thursday, February 10, 2022

Turtle Ice Cream Pie

This is a sponsored post by Hudsonville Ice Cream, but the text and opinions are all mine. Thank you for supporting brands that make Kylee's Kitchen possible!

I’ve always loved the classic combination of caramel, chocolate, and pecan flavors in turtle candies. So I created an easy, no-bake turtle ice cream pie recipe that combines all those flavors into a much larger dessert. It’s sweet, it’s salty, it’s creamy, and it’s crunchy. The base is a pretzel pie crust; the filling is Hudsonville’s Limited Edition Crispy Caramel Candy Bar ice cream; and the topping is a rich, chocolate ganache. Of course, I decorated the pie with whipped cream and pecans.

You’re probably familiar with graham cracker pie crusts and cookie crumb pie crusts, but you may have never heard of a pretzel pie crust. It’s the same concept as the other two crumb crusts but with pretzels! I pulverized whole pretzels to create crumbs in a food processor and then mixed the crumbs with melted butter and brown sugar. If you don’t have access to a food processor, you can certainly put the pretzels in a zip-top bag and crush them with a rolling pin. You want the crumbs to be pretty small so the crust holds together well. It should feel like wet sand, and you should be able to pinch it together. If it’s too dry, add another tablespoon of melted butter and test it again. 

The pie filling is Hudsonville’s Limited Edition Crispy Caramel Candy Bar ice cream. The vanilla ice cream base is loaded with ribbons of caramel and thick fudge ribbons with chocolate-covered rice crisps. It’s a Limited Edition flavor, so you’ll want to grab it before it’s gone for the season. I recommend softening the ice cream by moving it to the refrigerator about 20-30 minutes before filling your pie shell. I used half a carton for my 9-inch pie plate, but the amount you use may vary depending on the size of your dish. After filling your pie with ice cream, make sure you put it back in the freezer.

The chocolate ganache is like a hot fudge sauce, but it’s 10 times better. And it’s incredibly easy to make! Just heat the heavy cream in the microwave (or on the stove) until it steams. For me, this was about 90 seconds in the microwave. Then pour the heavy cream over your chocolate and let it sit for 2 to 3 minutes. The chocolate will soften and melt. Slowly stir the mixture until it’s combined, and then add the corn syrup, vanilla, and salt. Why corn syrup? It makes the ganache shiny! Once the ganache is cool to touch, remove the pie from the freezer and pour the ganache over the ice cream. Then place the pie right back in the freezer. 

The hardest part of this entire recipe is waiting for the pie to set up. I had to wait 4 hours until my pie was firm enough to cut. 

Once it’s ready, decorate it with whipped cream and toasted pecan pieces. I always prefer homemade whipped cream because I think it tastes infinitely better than canned.

The contrast of a crunchy, salty pretzel crust with ultra creamy Limited Edition Crispy Caramel Candy Bar ice cream and rich, smooth chocolate ganache makes for the perfect combination of flavors and textures. Check out this Scoop Locator tool to find Hudsonville’s Limited Edition Crispy Caramel Candy Bar ice cream at a store near you!


Turtle Ice Cream Pie

Yield: 12 servings

Ingredients

For the crust

  • 1 1/2 cups (180 grams) pretzels
  • 8 Tablespoons (113 grams) unsalted butter, melted
  • 3 Tablespoons (40 grams) brown sugar)

For the filling

For the ganache

  • 3/4 cup heavy cream
  • 8 ounces dark chocolate, chopped
  • 1 Tablespoon corn syrup
  • 2 teaspoons vanilla extract
  • 1/8 teaspoon salt

For the whipped cream

  • 1 cup heavy cream
  • 1/4 cup (30 grams) powdered sugar
  • 1 teaspoon vanilla extract

Topping

  • 1/4 cup (33 grams) toasted pecans, chopped

Directions

For the crust

  1. Combine pretzels, butter, and brown sugar in food processor.
  2. Pulverize until mixture resembles wet sand. Add 1 Tablespoon additional butter if mixture is too dry.
  3. Press mixture into bottom and up side of greased 9-inch pie dish.

For the filling

  1. Spoon 1/2 carton Limited Edition Crispy Caramel Candy Bar ice cream into pie crust and smooth top.
  2. Place in freezer.

For the ganache

  1. Heat heavy cream until it's steaming (in microwave or on stove).
  2. Pour over chocolate and let sit for 3 minutes.
  3. Stir until chocolate is melted and mixture is spoon.
  4. Stir in corn syrup, vanilla extract, and salt.
  5. Allow ganache to sit until it is no longer hot to touch.
  6. Remove pie from freezer and pour ganache over pie. Return pie to freezer.

For the whipped cream

  1. Using wire whisk attachment on stand mixer or hand-held mixer, beat heavy cream, powdered sugar, and vanilla extract until stiff peaks form.
  2. Remove pie from freezer and either pipe or spread whipped cream on top of pie.
  3. Sprinkle pecan pieces on top and return pie to freezer.
  4. Allow pie to set up in freezer for at least 2 hours before serving.


Monday, February 7, 2022

Pepperosies

This is a sponsored post by Challenge butter, but the text and opinions are all mine. Thank you for supporting brands that make Kylee's Kitchen possible! 

I know there are a lot of Valentine’s Day haters, but I am not one of them. I’m far from it. I love cheesy cards, chocolates, and pink and red everything. I especially embrace Valentine’s Day baking.

Instead of experimenting with another heart-shaped baked good this year, I made pepperoni roses. They’re kind of like a garlic knot and a stuffed breadstick all in one. I’ve seen people make roses with thinly sliced apples and puff pastry, but my heart craves savory food.

You can either start by making your own pizza dough or by purchasing pizza dough. There is no shame in buying the dough! But please buy good quality dough. I recommend calling your favorite local pizza place and asking if they will sell you their dough. If that doesn’t work, I really like Trader Joe’s pizza dough and Wewalka classic pizza dough.

Then just stretch or roll out the pizza dough until it's a rectangle approximately 15 - 18 inches wide. You want the dough to be pretty thin. Cut it into strips about 1 1/2 inches wide.

Once your pizza dough is ready, mix together the melted butter, garlic, and Italian seasoning, and brush all the strips with the butter mixture. I highly recommend using Challenge salted butter. It has just the right amount of saltiness, and it's made from 100% pure pasteurized sweet cream, making it the highest quality butter available. I used a lot of garlic in the butter mixture because I like strong garlic flavor, but you can certainly use less. Then sprinkle shredded mozzarella cheese on top.  It's important to shred the cheese yourself because pre-shredded cheeses is coated in preservatives to prevent it from clumping together, and as a result, it doesn't melt as well.

The last step is to line up the pepperoni and roll up each strip. Make sure the top half of each pepperoni hangs over the strip and each piece overlaps slightly. Rolling up the strip may be the trickiest part. I try to hold the pepperoni in place with one finger while I roll it up. Then just brush it with more garlic butter and bake!

These are absolutely delicious on their own, but I also recommend serving them with ranch or marinara dipping sauce. I recently hopped on the ranch fan train, and I don't think I'll ever get off. I made my own ranch, and I think it's the perfect complement to these pepperosies.

Pepperosies

Yield: About 12 rolls

Prep time: 20 minutes

Cook time: 20 minutes

Ingredients

For the pepperosies

  • 1 recipe pizza dough or 1 package pre-made pizza dough
  • 6 Tablespoons Challenge salted butter, melted
  • 4 cloves garlic, minced
  • 1 teaspoon Italian seasoning
  • 4 ounces mozzarella, shredded
  • 6 ounces pepperoni (about 8 pieces per rose)
For the ranch dipping sauce
  • 1 cup buttermilk
  • 1/2 cup sour cream
  • 2 Tablespoons mayonnaise
  • 2 packets Hidden Valley ranch seasoning

Directions

For the pepperosies

  1. Preheat oven to 400 degrees Fahrenheit. Spray muffin pan with nonstick pray.
  2. Roll out pizza dough as thin as possible into rectangle.
  3. Cut pizza dough lengthwise into 1 1/2-inch strips.
  4. Mix butter, garlic, and Italian seasoning in small bowl. Brush each pizza strip with mixture.
  5. Sprinkle mozzarella evenly over each strip.
  6. Line up pepperoni on top half of each strip. Each piece should overlap slightly and the top half should hang over the dough.
  7. Tightly roll up each dough strip and brush with butter mixture.
  8. Place each roll into muffin pan cavity.
  9. Bake for 18 to 20 minutes or until crust is golden and pepperoni is crips.
  10. Remove from oven and serve.
For the ranch dipping sauce
  1. Slowly whisk the buttermilk into the sour cream.
  2. Whisk in the mayonnaise.
  3. Whisk in the ranch seasoning packets.
  4. Refrigerate for 30 minutes before serving.

Pin It button on image hover