Showing posts with label holidays. Show all posts

Wednesday, December 21, 2022

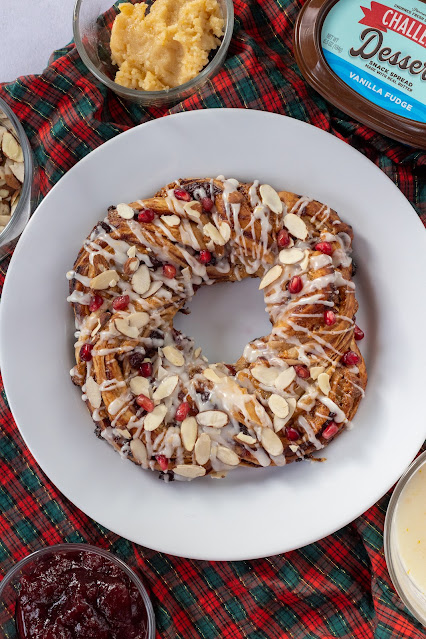
Cranberry almond wreath


This is a sponsored post by Challenge butter, but the text and opinions are all mine. Thank you for supporting brands that make Kylee's Kitchen possible!

I’ve shared a Christmas morning breakfast idea every year for the past 7 years. For me, the biggest factors in choosing what to make for breakfast is whether the dish is festive and whether I can prep it ahead of time. This recipe fits the bill.

The recipe looks long, but that's only because there are several components. There's nothing complicated about the steps or the ingredients.

Obviously, cranberries are very festive, but another flavor that really shines this time of year is almond. I love almond everything, and the filling with marzipan is probably the most crucial for achieving the maximum flavor. If you've ever worked with marzipan, you know that it's crumbly and doesn't spread well. That's why I combined it with Challenge Vanilla Fudge Butter Snack Spread. It makes the filling smoother while also adding flavor. If you can't find the snack spread in a store near you, replace it with Challenge unsalted butter and 1/4 teaspoon vanilla extract (that's in addition to the almond extract).

If by chance your wreath doesn't turn out picture perfect—it's okay! The icing will cover up any imperfections. I like the consistency of my icing to be a little bit on the thin side so the layers of puff pastry and cranberry swirls are still visible.

Cranberry almond wreath

Yield: 6 servings

Time: 20 minutes prep, 1 hour cook

Ingredients

For the cranberry filling

  • 5 ounces whole cranberry sauce
  • 1 teaspoon fresh ginger, grated

For the almond filling

For the wreath

  • 1 all-butter puff pastry sheet

For the icing

  • 120 grams (1 cup) confectioners' sugar
  • Juice from 1 orange
  • Zest from 1 orange

Optional decorations

  • Sliced almonds
  • Pomegranate arils

Directions

For the cranberry filling

  1. Mix cranberry sauce and ginger. Set aside.

For the almond filling

  1. Combine marzipan and Challenge Vanilla Fudge Butter Snack Spread in one bowl and microwave for 20 - 30 seconds or until softened.
  2. Add almond extract to bowl and stir until combined.

For the wreath

  1. Preheat oven to 400 degrees Fahrenheit.
  2. Spread cranberry filling evenly across puff pastry sheet.
  3. Crumble almond filling over top of cranberry filling.
  4. Starting on long side, roll dough into the tube.
  5. Use pizza cutter to cut rolled up dough in half lengthways.
  6. Cross two strips of dough in center. Lift one piece over and under other piece. Continue until strips are intertwined.
  7. Bring both ends of dough together to form wreath.
  8. Transfer dough to parchment paper-lined baking sheet and bake for 30 minutes uncovered. Remove aluminum foil and bake another 15 to 20 minutes or until pastry turns golden brown.
  9. Set aside to cool.
For the icing
  1. Use fork or whisk to combine powdered sugar with 1 Tablespoon of orange juice. Add more orange juice 1 teaspoonful at a time until icing is desired consistency.
  2. Stir in orange zest.
  3. Drizzle icing over cooled wreath.
  4. Sprinkle sliced almonds and pomegranate arils on icing before it hardens.
  5. Cut and serve
Notes: If planning to make this wreath ahead of time, prepare everything up to the point of baking. Cover and refrigerate it. When ready to bake, allow wreath to come to room temperature first. 

Monday, December 14, 2020

Holiday snack mix ideas

Cookies are always the stars of the holiday season, but personally, I go nuts over snack mixes. So today I'm sharing a few of my favorites, like Brown Butter Rosemary Nuts, White Chocolate Peppermint Popcorn, Cinnamon Candied Pecans, and Spiced Cocoa Almonds. What are your favorite holiday snack mixes?

Brown Butter Rosemary Nuts

Ingredients

  • 3 cups unsalted, raw mixed nuts
  • 3 Tablespoons unsalted butter
  • 3 Tablespoons brown sugar
  • 2 Tablespoons fresh rosemary, chopped
  • 3 teaspoons salt
  • 1/2 teaspoons cayenne pepper (add 1/4 teaspoon more if you like spice)
  • 1/2 teaspoon cumin powder
  • 1/2 teaspoon black pepper

Directions

  1. Place mixed nuts in a microwave-safe bowl and microwave for 2 minutes to toast the nuts.
  2. Put butter in large microwave-safe bowl and cover bowl. Microwave for 2 minutes. Remove from bowl and stir. Continue to microwave in 30-second intervals until the butter is amber in color and there are brown flakes of butter at the bottom of the bowl.
  3. Remove butter from microwave. Stir in brown sugar, rosemary,  salt, cayenne pepper, cumin, and black pepper.
  4. Add nuts to bowl and mix to combine.
  5. Microwave in 30-second increments for 4 minutes, stirring each time.
  6. Spread out nuts in single layer on parchment paper and let cool before serving.

White Chocolate Peppermint Popcorn

Ingredients

  • 24 cups (about 2 microwave bags) popped plain popcorn (sea salt is fine, but not buttered popcorn)
  • 12 ounces white chocolate 
  • 1/2 cup peppermint candies (about 8 candy canes)
  • Red sprinkles (optional)

Directions

  1. Spread out popcorn in a single layer on a baking sheet lined with parchment paper
  2. Crush candy canes by placing them in bag and smashing them with rolling pin
  3. Melt white chocolate in microwave in 30-second intervals until smooth, stirring each time. 
  4. Drizzle white chocolate over popcorn and sprinkle with crushed peppermint candies and sprinkles.
  5. Allow white chocolate to harden before breaking into pieces and serving.

Cinnamon Candied Pecans

Ingredients

  • 1/2 cup brown sugar
  • 1/4 cup white sugar
  • 1 tablespoon ground cinnamon
  • 1 teaspoon salt
  • 1 egg white
  • 1 teaspoon vanilla extract
  • 16 ounces raw, unsalted pecans halves

Directions

  1. Preheat oven to 300 degrees Fahrenheit. Line large baking sheet with parchment paper and set aside.
  2. In medium bowl, add sugars, cinnamon, and salt. Whisk until combined. Set aside.
  3. In large bowl, whisk egg white and vanilla together until frothy. Add pecans and gently toss until they're well-coated. Add cinnamon sugar mixture and toss until pecans are covered.
  4. Spread pecans out in single layer on prepared baking sheet. Bake for about 30 minutes, stirring after 15 minutes. 
  5. Remove from oven and let cool on baking sheet. When completely cool, store in airtight container.

Spicy Cocoa Almonds 

Ingredients

  • 2 cups raw, unsalted almonds
  • 1 Tablespoon unsalted butter
  • 2 ounces chocolate (milk or dark)
  • 4 Tablespoons cocoa powder + 1 Tablespoon for dusting
  • 2 Tablespoons cinnamon
  • 1 teaspoon salt
  • 1/2 teaspoon cayenne pepper 

Directions

  1. Melt butter in a medium saucepan on low heat. Add chocolate and stir frequently until just melted.
  2. Add almonds and stir to coat evenly; remove from heat.
  3. Combine cocoa powder, cinnamon, salt, and cayenne in bowl.
  4. Dump almonds and powder mixture into container with lid. Vigorously shake until almonds are coated with powder.
  5. Pour almonds onto baking sheet and sprinkle with cocoa powder to ensure all almonds are evenly coated.
  6. Let cool and then store in airtight container. 


Thursday, December 13, 2018

Painting Plaid Christmas Cookies


This is a sponsored post by Challenge Butter, but the text and opinions are all mine. Thank you for supporting brands that make Kylee's Kitchen possible!

I’ve been wanting to try painting cookies for a while now. Some people are really artistic and paint gallery-worthy pictures on their cookies. Considering I haven’t actually painted anything since elementary school, I set expectations low for myself.

Honestly, I just really wanted to make plaid cookies. I think it’s a really classic print, and it symbolizes the holiday season well.

First thing’s first, start with your favorite sugar cookie recipe. I’ve shared my favorite recipe below. I like my cookies nice and thick. A trick to achieving that is to roll your dough out between two sheets of parchment paper before refrigeration. Refrigeration prevents the dough from spreading, and it makes it a heck of a lot easier when it comes time to cutting out your shapes.

Once your cookies are baked and cooled, it’s time to add the icing. I’ve always been a buttercream girl. I love the way it tastes. But these cookies require a flat surface since we’re going to be painting on them, so royal icing is a must.

Like I said, I don’t love royal icing, so I used a variation of the recipe. Also, I discovered another fun trick: buy a can of white frosting (Duncan Hines ranks the highest on taste tests), melt it in the microwave, and dip the cookies in that. You can add a little almond or vanilla extract to the store-bought frosting to spruce it up a bit.

I’m not usually a proponent of store-bought frosting, but this wasn’t bad! I’ll let my co-workers do a taste test, and I’ll update this later with which frosting they preferred.

Once the frosting is dry, prepare your paint colors. All you need is food coloring and lemon extract.

A lot of food coloring goes a long way! I would say start by mixing 1/4 teaspoon lemon extract with 1/8 teaspoon (about 13 drops) of food coloring.

It’s important to use extract because extract is mainly alcohol which evaporates quicker than water. You can use any extract. I just really like the taste of lemon.

Painting a plaid design on the cookies is really quite easy. I’ve broken down the steps below. Drawing straight lines is the trickiest part, but I think it’s easier if you have a very light hand. Also, I recommend painting the first color on a bunch of cookies before painting the second color on top. The colors are less likely to bleed together that way.

The painting will take anywhere from 10 minutes to a half hour to dry.


Holiday Cut-Out Sugar Cookies
Ingredients
For the cookies
  • 3 cups flour (360 grams)
  • 2 teaspoons baking powder
  • 1/2 teaspoon salt
  • 2 sticks Challenge butter, room temperature
  • 1 cup granulated sugar (198 grams)
  • 1 egg
  • 1 teaspoon vanilla extract
  • 1 teaspoon almond extract
For the icing
  • 4 cups powdered sugar
  • 5 tablespoons whole milk
  • 5 tablespoons light corn syrup
  • 1 ½ teaspoons almond extract
For the paint
  • 1/4 teaspoon lemon extract
  • 1/8 teaspoon food coloring of your choice
  • Note: You can increase the amount using this same ratio if you need more paint
Directions
For the cookies
  1. Mix together the flour, baking powder, and salt and set aside.
  2. In a large bowl, cream the butter for one minute; add the sugar and beat on high speed until light and fluffy.
  3. Scrape down sides of bowl as needed and add egg, vanilla extract, and almond extract. Beat until combined.
  4. Add dry mixture to bowl and beat on low until just combined.
  5. Lay a piece of parchment paper on your counter top, place dough on paper, and then put another piece of parchment paper on top of dough.
  6. Use a rolling pin to gently roll out the dough between the two sheets of parchment paper.
  7. Once dough is about 1/3-inch thickness stick it in the refrigerator to chill for about 30 minutes.
  8. After cookie dough is chilled, preheat oven to 350 degrees Fahrenheit.
  9. Use cookie cutter to cut out shapes and transfer to baking sheet.
  10. Bake for about 8 to 10 minutes, or until edges of cookies just barely turn golden.
  11. Repeat with remaining dough; cool completely before frosting.
For the icing
  1. Sift the powdered sugar into bowl.
  2. Add the milk and whisk until it’s smooth.
  3. Add the corn syrup and almond extract and continue whisking until it’s pourable consistency
  4. Using a squeeze bottle or a pastry bag, cover the top surface of the cookie, and let dry before painting.
To paint plaid
  1. Mix the lemon extract with food coloring
  2. Paint a cross
  3. Add a line above and below the cross and to the right and left.
  4. Add one or two little lines in between each of those thick lines.


Thursday, November 30, 2017

Grinch Gooey Butter Cookies


This is a sponsored post by Challenge butter, but the text and opinions are all mine. Thank you for supporting brands that make Kylee's Kitchen possible!

We all have a favorite Christmas cookie. I always reach for Spritz cookies. My dad loves buckeyes. My mom claims to not like cookies because she is apparently superior to the rest of us and can abstain from delicious treats. Kidding… kind of.

But you get my point. Cookies are one of the most popular holiday desserts, and it’s fun to try new varieties this time of year. And that’s exactly what I did this week with a new cookie I’m calling “Grinch Gooey Butter Cookies.”

The Gooey Butter cookie recipe I posted a few years ago is one of my most visited blog posts, so I decided to take that same recipe and give it a holiday twist. I put green food coloring in the dough and drew a little heart near the edge to represent the Grinch’s heart which “grew 3 sizes that day.”

You can use any light-colored cake mix available. I like the taste of yellow cake mix best. I also used Challenge cream cheese and butter in these cookies because they only use real cream, and there are no hormones, additives, or fillers. For the heart, you can either use homemade icing or get a small bottle of store-bought icing. Ideally, I would have used heart-shaped sprinkles, but unfortunately I couldn’t find any!

Grinch Gooey Butter Cookies
Yield: Makes about 24 cookies
Ingredients
  • 1 (8 ounce) package Challenge cream cheese, softened
  • 1/2 cup Challenge butter, softened
  • 1/4 teaspoon vanilla extract
  • 1 egg
  • 1 (15.25 ounce) box of cake mix
  • 1 Tablespoon green food coloring
  • 1/4 cup powdered sugar
  • Red icing
Directions
  1. In a medium bowl, cream together butter and cream cheese until smooth (about 2 minutes)
  2. Add vanilla, egg, cake mix, and green food coloring to the bowl and mix until combined.
  3. Chill dough for a half hour so it’s easy to form into balls. Dough will be very sticky if you skip this step.
  4. Once dough has been chilled for half hour, preheat oven to 350 degrees Fahrenheit
  5. Form dough into 1-inch balls and roll in powdered sugar. Place on baking sheet.
  6. Bake cookies for 9-10 minutes – no longer! You want the cookies to be very soft.
  7. Allow to cool before drawing a small heart with red icing.


Monday, January 2, 2017

Fruitcake Biscotti


This is a sponsored post by Challenge Butter, but the text and opinions are all mine. Thank you for supporting brands that make Kylee's Kitchen possible!

I think each New Year it’s a good idea to look at how we spend our time and where we place our priorities. I feel like we, as Americans, are always going going going.

For example, this is my average daily routine: wake up hours before the sun rises, check my email, work out, check my email, go to work for 9+ hours, go to class*, check my email (I get around 500 work emails a day), eat a quick dinner before starting on homework, fall asleep on the couch while working on something for my blog.

And I don’t have children, so I can’t even imagine how parents must feel!

The point I’m trying to make is we never seem to take enough time for ourselves. I think some of us even feel guilty when we do.

As we enter the New Year, I think it would do us all good to treat ourselves for at least 10 to 20 minutes every day. Use that time to read a chapter in a book, flip through a magazine, do a crossword puzzle, or even pray.

I think the way we treat ourselves has a direct impact on the way we treat others

Just start by thinking about when would be a good time to fit this in.

Personally, I think the best time for me is before going to work out in the morning. My emails are still going to be there when I return. I can wait to check them.

So I’m going to make it my goal to start the first 20 minutes of each day with a cup of coffee and my Bible.


The biscotti recipe I’m sharing today will hopefully provide some encouragement to treat yourself.

Originating from Italy, biscotti is a crunchy biscuit that can be sweet like a cookie and typically dunked in coffee or tea. For that reason, in my mind it’s a reminder to relax and enjoy the morning.

Biscotti comes in a wide variety of flavors, and there are especially a lot of seasonal flavors. Today I am sharing a recipe for fruitcake biscotti. Yes, you read that correctly. So why the fruitcake flavor?

Fruitcake actually combines a variety of spices like nutmeg and cinnamon and cloves that work really well for the winter months. Additionally, since fruitcake is generally considered to be a “Christmas” dessert, candied and dried fruit typically goes on sale big time after the holidays. In fact, the candied fruit that I bought for this recipe was 50% off!

I got the idea for this biscotti from some family friends who gifted us with it for Christmas. This was actually my first time making biscotti, so I wanted to share some tips that I discovered while making several batches.


1. Definitely separate the dough into two parts before baking. If you try to bake it in one big blog, it won’t bake right.

2. The biscotti dough will be very sticky, so before you work with it, lightly moisten your hands with a splash of water or a little bit of vegetable oil.

3. Form the dough into two long, skinny logs no more than 3 inches wide.  You want the logs to be skinny because they will expand significantly. I can’t stress that enough!

4. After baking the first time, allow the dough to cool for approximately 20 minutes before cutting. If you cut it too soon, the dough will still be soft, and you won’t get clean-cut pieces. If you wait too long to cut it, the dough will harden too much and it will be difficult to cut.

5. Use a serrated knife to cut the biscotti into 1/2-inch slices. Don’t cut them any thicker than that.

I probably should have put these tips at the very beginning of the post since they are the most important part, but hopefully you’ve made it through this novel. As always, thanks for reading, and Happy New Year!


Fruitcake biscotti
Yield: Makes about 24 biscotti biscuits
Ingredients
  • 1/2 cup Challenge butter, softened
  • 1/2 cup granulated sugar
  • 1/4 cup brown sugar
  • 2 eggs
  • 2 cups flour
  • 1 1/2 teaspoons baking powder
  • 1 1/2 teaspoons all spice (or substitute 1/2 teaspoon cinnamon, nutmeg, cloves)
  • 1/4 teaspoon ground ginger
  • 1 cup chopped dried fruit or candied fruit
  • Optional: 1/2 cup white chocolate chips for drizzling on top
Directions
  1. Preheat oven to 350 degrees Fahrenheit and line baking sheet with silicone liner or parchment paper and set aside.
  2. In large bowl, beat together the butter and sugars until light and fluffy, about 3 minutes.
  3. Add eggs and beat until well combined.
  4. In separate bowl, combine flour, baking powder, and spices.
  5. Slowly add to butter mixture, beating at medium-low until just incorporated. Stir in candied fruit.
  6. Separate dough into two long, skinny logs about 3 inches in width.
  7. Bake for about 20 to 25 minutes--the top should be lightly browned.
  8. Remove from oven and let cool for about 20 minutes.
  9. Transfer biscotti to a cutting board, and use a serrated knife to cut pieces about 1/2-inch thick.
  10. Reduce oven heat to 300 degrees and return slices to prepared baking sheet, cut side down.
  11. Bake on one side for about 10 minutes, remove from oven and flip each piece to other side to bake for another 10 minutes.
  12. Remove biscotti from oven and transfer to wire rack to let cool.
  13. You can serve biscotti plain or you can spruce it up bit by dusting powdered sugar on top each piece or drizzling white chocolate on top.
  14. Store biscotti in airtight container for up to 2 weeks or freeze for up to 2 months. 
Recipe adapted from Taste of the South magazine.


*For those who aren’t aware, I’m taking classes in hopes of getting accepted into a didactic program and ultimately becoming a registered dietitian.


Saturday, November 21, 2015

Healthy Cranberry Relish


During the holidays, we’re surrounded by so many caloric and unhealthy treats that sometimes it’s actually refreshing to eat something healthy.

This cranberry relish is exactly that. It’s literally just raw fruit with a teeny tiny bit of sweetener. The combination of fruits works really well together too, and the colors in the relish make for a very festive addition to your holiday table.

Additionally, it is very very minimal work – you don’t need to worry about peeling the fruit because it just gets ground up in the food grinder – talk about all the extra fiber!


Cranberry relish
Ingredients
  • 1 (12 ounce) package of cranberries
  • 2 apples, cored with skin still on
  • 2 oranges, seeded with peel still on
  • 1 (8 ounce) container pineapple tidbits
  • 1/4 to 1/2 cup sugar or sugar substitute like Splenda, depending on level of sweetness you want
Directions
  1. Cut the fruit into chunks. The chunks don’t need to be small – they just need to fit in you food grinder or food processor
  2. Stick chunks of fruit in food grinder
  3. Stir in sugar and serve


Sunday, December 21, 2014

Classic Spritz Cookies


Spritz cookies are the cookies I most associate with the holidays. Mainly because we only make them during the holidays and we always make them in the shape of Christmas trees. 

Spritz cookies have always been my favorite. I love the dough (don't tell my mom that I eat it), I love the classic buttery taste, and I love the fact that they're small enough that you can eat two or three (or four or five)!

The secret to making these cookies is making sure the dough is chilled and hard enough that it comes out of the cookie press firmly, that way the shape of the cutter stays (meaning it doesn't melt into one big blob).


Classic Spritz Cookies

Ingredients
  • 2 and 1/2 cup flour
  • 1/4 teaspoon baking powder
  • 2 sticks (1 cup) salted butter
  • 3/4 cup sugar
  • 1 egg
  • 1 teaspoon almond extract
You will also need a cookie press, although I suppose you could make this same recipe without one - they just won't come out in fun shapes!

Directions
  1. Preheat oven to 375 degrees Fahrenheit
  2. Mix flour and baking powder in medium bowl and set aside
  3. Combing butter, sugar, egg, and almond extract in large bowl. Beat at medium speed, scraping bowl often until creamy.
  4. Slowly add flour mixture to large bowl and beat at low speed until well-mixed.
  5. Chill dough for about an hour.
  6. Fit cookie press with desired template and fill press with dough.
  7. Press dough onto ungreased cookie sheet about one inch apart. Sprinkle with decorator sugar or other desired sprinkles.
  8. Bake cookie for 8-10 minutes, or until the edges are light brown.


Pin It button on image hover