Sunday, October 30, 2022

Halloween hand pies


This is a sponsored post by Challenge butter, but the text and opinions are all mine. Thank you for supporting brands that make Kylee's Kitchen possible! 

I'm talking about hand pies two ways today with both a savory and sweet option. A hand pie is essentially just a mini pie that you can hold in your hand. You can make it with puff pastry or pie dough. The filling can be a homemade pie filling, or you can use store-bought ingredients to make a delicious treat.

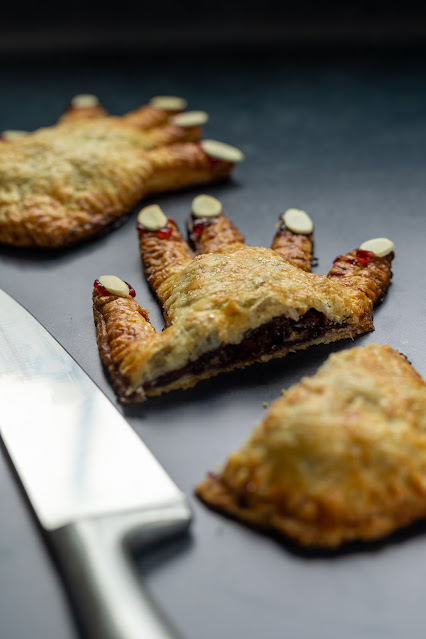
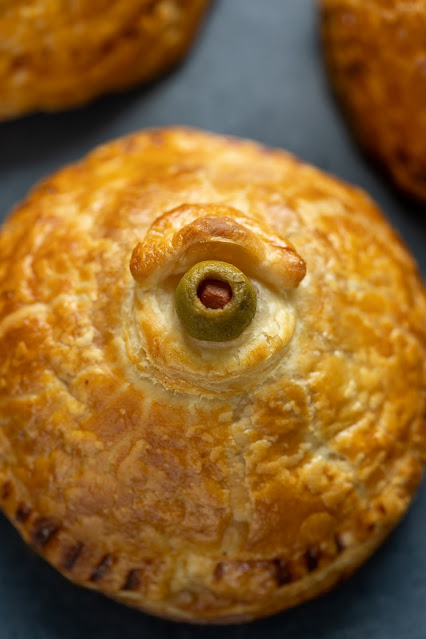
Since we're celebrating Halloween, I thought it would be fun to make hand pies in a super literal sense—pies with eyes (I wanted to spell it p-eyes, but I didn't think it would make sense) and pies shaped like hands!

You can use any type of filling, puff pastry, pie dough that you want. It's kind of like a "choose your own adventure" book. I like to buy my puff pastry and make my pie dough. Trader Joe's carries the best puff pastry, hands down (that's a Halloween hand pie joke)! It's seasonal, and they only carry it in the fall leading up to Christmas. So stock up while you can!


If you make the pie dough, it’s important to use good quality butter. It makes a tremendous difference in your final product. I use Challenge European Style Butter when I make pie dough. It’s churned slower and longer, in the tradition of fine European butters, to produce a more flavorful butter with less moisture and higher butterfat. 

A few more tips:

It's important to roll the pie dough out to 1/8-inch thick. If it’s too thick, the crust will be gummy and chewy, not flaky.

If you're using a fruit filling, you need to make a mealy pie crust. This means the butter pieces in the dough are the size of peas. Mealy pie dough is best for fruit pies because it is good at repelling moisture from liquid fillings. If your filling isn't very juicy, you can make a flaky pie crust. This means the butter pieces in the dough are the size of walnut halves.


Spinach artichoke hand pies

Yield: Makes 3 pies

Time: 1 hour

Ingredients

  • 1 sheet puff pastry
  • 3 slices prosciutto
  • 1/2 cup spinach artichoke dip
  • 3 green olives with pimentos, cut in half
  • Egg wash (1 egg mixed with 1 Tablespoon water)

Directions

  1. Preheat oven to 425 degrees Fahrenheit.
  2. Use circle cookie cutter or jar lid to create 6 large circles on puff pastry. Use end of piping tip or other small circle cutter to create 6 small circles. Fold 3 of the small circles in half.
  3. Place 3 large circles on baking sheet and brush egg wash around the edge. 
  4. Top each large circle with 1 piece prosciutto and add about 2 Tablespoons spinach artichoke dip on top of prosciutto.
  5. Cover with large circle and seal the edge using fork prongs.
  6. Add 1 small circle to center of hand pie. Place half green olive on top. Place folded small circle partly over olive so it looks like an eyelid. 
  7. Brush the pies with egg wash.
  8. Place in oven for 15 to 20 minutes, or until puff pastry is golden brown.
  9. Remove from oven and serve.
  10. Refrigerate leftover pies and eat within 3 days.


Warm-spiced cherry hand pies

Yield: Makes 2 hand pies

Time: About 90 minutes

Ingredients

For the filling

  • 1 cup cherries (thawed if frozen)
  • 2 Tablespoons granulated sugar
  • 1 teaspoon corn starch
  • 1 teaspoon Grand Marnier
  • 1/4 teaspoon ground cinnamon
  • 1/8 ground cloves
  • 1/8 teaspoon ground allspice

For the dough

  • 113 grams (8 tablespoons or 1 stick) Challenge European Style Unsalted Butter
  • 150 grams (1 1/4) cups all-purpose flour
  • 13 grams (1 Tablespoon) granulated sugar
  • 1 gram (1/4 teaspoon) kosher salt
  • 60 grams (1/4 cup ice water)
  • Egg wash (1 egg mixed with 1 Tablespoon water)
  • Optional: 1 Tablespoon cherry jam, 10 almond slices

Directions

For the filling

  1. Mix together all ingredients and set aside.

For the dough

  1. Cut butter into 1/2-inch cubes. Place in freezer for at least 20 minutes or until very cold.
  2. In large bowl, combine flour, sugar, and salt.
  3. Cut butter into flour mixture with pastry blender or food processor until butter is pea-sized.
  4. Make well in flour mixture and add water.
  5. Mix to create shaggy mixture then knead to form dough. If dough is too dry, add up to 2 Tablespoons additional ice water.
  6. Form dough into flat disc and wrap. Refrigerate for at least 30 minutes or up to 2 days.
  7. Once dough is chilled, preheat oven to 425 degrees Fahrenheit.
  8. Roll dough out on floured surface to 1/8-inch thick.
  9. Trace hand on wax paper or parchment paper and cut out with scissors. This will be your stencil.
  10. Place paper hand on pie dough and cut out with knife. Continue three more times so you have a total of 4 hands, gathering and re-rolling dough if necessary.
  11. Place 2 dough hands on baking sheet. Brush edges with egg wash.
  12. Put 1/4 to 1/2 cup cherry filling in center of each palm.
  13. Place a second hand on top of each of the hands. Use a fork to crimp the edges.
  14. Brush the hands with egg wash, sprinkle with additional granulated sugar if desired, and place in oven.
  15. Bake for 15 to 20 minutes, or until pie dough is golden brown. Remove from oven.
  16. Spread small amount of jam onto each fingertip. Place almond slice on jam so it looks like nails.
  17. Serve immediately. Store leftovers at room temperature. Eat hand pies within 3 days.


Friday, October 21, 2022

Entertaining with a Buttercream Board


This is a sponsored post by Challenge butter, but the text and opinions are all mine. Thank you for supporting brands that make Kylee's Kitchen possible!

Butter boards are the latest food trend to blow up on social media. It involves spreading softened butter on a wooden cutting board, garnishing it with herbs, spices, etc., and serving it with bread. Just like a charcuterie board, it's endlessly versatile and a great dish to share when entertaining a group.

I'm sure this admission comes as no surprise, but I have a big sweet tooth. So when I first heard about butter boards, I thought, "That sounds delicious, but what about a buttercream board?"

American buttercream is really easy to make, and you can easily make a big batch. So I thought this would be a fun dessert idea for a big group. There are endless possibilities for the board's theme, including the buttercream flavor, the design, and what you serve with it. For example, I made pumpkin buttercream and piped pumpkins onto the board shown in the picture above. I also plan to make a buttercream board with vanilla frosting in the design of a ghost. I will include both those buttercream recipes in this post.

Some companies add yellow dye in their butter. Unfortunately, that affects the color of your buttercream. That's why it's important to use good quality butter. I use Challenge unsalted butter because it's 100% real cream butter. It doesn't have any artificial or synthetic ingredients. You may wonder why I use unsalted butter since salt is on the ingredients list. I always use unsalted butter when baking so I have greater control over the flavor.

Tips and Tidbits:

  • You can leave buttercream frosting at room temperature for several days because the high sugar content will prevent it from spoiling despite that fact that there's dairy in the recipe. You can also store it in the refrigerator for about a month, and it will last in the freezer for several months.
  • The buttercream will form a crust if you haven't used it in a while. That's okay! Briefly mix it, and it will return to the proper consistency.
  • You can thin out the buttercream by adding heavy cream, or you can make it stiffer by adding more powdered sugar.
  • Make sure your butter is room temperature. Cold, solid butter is very hard to cream. On the flip side, butter that's too warm may not allow your frosting to form.
  • Boards can be expensive! I found the best deal is at Ikea. It's $10 for a large board and $4 for a small board.


Vanilla buttercream board

Yield: Makes enough buttercream to decorate 1 large board

Time: About 30 minutes

Ingredients

  • 1 cup unsalted Challenge butter
  • 1 Tablespoon (15 milliliters) vanilla extract (or extract of choice)
  • 1/2 teaspoon kosher salt
  • 1 pound confectioner's sugar, sifted
  • 3 Tablespoons (45 milliliters) heavy whipping cream
  • Optional: gel food coloring, sprinkles, pretzels, graham crackers, cookies

Directions

  1. Beat butter on medium speed for about 1 minute until smooth.
  2. Mix in vanilla extract and salt on low speed.
  3. Add confectioner's sugar in several additions, mixing on low and scraping the bowl after each addition.
  4. Add heavy whipping cream and mix on low speed. Continue mixing until frosting is smooth and fluffy.
  5. Spread or pipe buttercream onto board. Decorate with candy and sprinkles if desired. Serve with graham crackers, cookies, pretzels, etc.


Pumpkin buttercream board

Yield: Makes enough buttercream to decorate 1 large board

Time: About 30 minutes

Ingredients

  • 1 cup unsalted Challenge butter
  • 1 Tablespoon (15 milliliters) vanilla extract (or extract of choice)
  • 1 Tablespoon pumpkin pie spice
  • 1/2 teaspoon kosher salt
  • 1 pound confectioner's sugar, sifted
  • 1/4 cup pumpkin puree
  • Optional: gel food coloring, sprinkles, pretzels, graham crackers, cookies

Directions

  1. Beat butter on medium speed for about 1 minute until smooth.
  2. Mix in vanilla extract, pumpkin pie spice, and salt on low speed.
  3. Add confectioner's sugar in several additions, mixing on low and scraping the bowl after each addition.
  4. Add pumpkin puree and mix on low speed. Continue mixing until frosting is smooth and fluffy.
  5. Spread or pipe buttercream onto board. Decorate with candy and sprinkles if desired. Serve with graham crackers, cookies, pretzels, etc.


Sunday, October 16, 2022

Lamb chili


Today's post is all about chili in honor of National Chili month, and I'm sharing my new favorite chili recipe, which has lamb and white beans.

What defines chili?
The possibilities are endless when it comes to making chili, and preferences are very much regional.

Some groups of people like Texans don’t believe chili should have beans. This version, often referred to as Chile con carne, is simply a thick tomato and meat sauce with peppers and spices.

Many other people, myself included, like beans in chili. I like the texture, and it gives the chili more substance. Also, beans are a great source of fiber and protein.

Some other people always eat chili with noodles.

Topping preferences also vary (I like lime and sour cream), as well as what to serve alongside chili (I love cornbread, but some people like cinnamon rolls with their chili).

Chili is meant to be eaten, so you should make chili whichever way you think tastes best.


Good foundation
The most important part of making chili is developing a good foundation. This is why I don’t believe in dump it all in slow cooker meals. To achieve maximum flavor, you must brown the meat, sauté the onions and peppers, and toast the spices. There’s actually quite a bit of work before the chili starts simmering on the stove.

Avoid water
Water is great for hydrating, but it has no flavor. So why would you add an ingredient with no flavor to your chili when there are plenty of other flavorful liquid options? The recipe I’m sharing today uses the liquid from a can of petite diced tomatoes, crushed tomatoes, and beer.

Canned beans vs. dried beans
I always use dried beans when possible because they’re more cost-effective, they’re easier to digest, they’re more nutritionally dense, and I have more control over the texture / taste. It is imperative that you soak and cook the dried beans before adding them to your chili because the acidity in the tomatoes will prevent the beans from softening. That said, canned beans are a heck of a lot easier to work with (just drain and rinse), so I understand if you choose to go that route. One of my favorite tips is to use the Instant Pot to cook dried great northern beans. Put the beans and liquid in the Instant pot with a 1 : 3.5 bean to liquid ratio and cook for 30 minutes with 15 minutes natural release.

Toppings
Acidity from a squeeze of lime brightens and rounds out the flavor; sour cream balances the spicy chilies; and cilantro makes it taste fresh.


What makes this chili recipe extra special
  • The key to this chili recipe is the meat—lamb. I love lamb, and I think it gives the chili a rich, unique flavor you don’t get with beef or other meats. 
  • Traditionally, white beans pair well with lamb, so I used great northern beans. They have a thick skin, are medium sized, and have a mild taste.
  • I used both crushed tomatoes and petite diced tomatoes because I like the varieties in texture.
  • A 12-ounce bottle of dark beer imparts sugars, malty flavors, and a pleasant bitterness that balances out the spices. 
  • I used three types of chili peppers for extra depth of flavor: poblano peppers for mild spice, jalapeño peppers for sharp bite, and chipotle peppers in adobo sauce for smokiness. 
  • Fire roasting the poblano and jalapeño peppers concentrates their flavors and makes them a little sweeter while also imparting a grilled, charred flavor.

Lamb chili

Yield: 10 cups

Time: 1 hour and 30 minutes

Ingredients

  • 1 pound ground lamb
  • 1 large yellow onion, small dice
  • 2 poblano peppers, seeded and small dice (fire roasting optional)
  • 2 jalapeño peppers, seeded and small dice (fire roasting optional)
  • 3 chipotle peppers in adobo sauce, small dice
  • 6 garlic cloves, minced
  • 1 Tablespoon chili powder
  • 1 Tablespoon ground cumin
  • 1 Tablespoon ground coriander
  • 1 1/2 teaspoons smoked paprika
  • 28 ounces crushed tomatoes
  • 14.5 ounces petite diced tomatoes (with liquid)
  • 12 ounces dark beer
  • 3 1/2 cups great northern beans, cooked
  • Salt and black pepper to taste
  • Optional: Lime, sour cream, cilantro

Directions

  1. Heat soup pot over medium heat. Add lamb. Break up clumps with wooden spoon and sauté until browned. Transfer to plate and set aside.
  2. Add onion and peppers and sauté until caramelized.
  3. Add garlic and cook until fragrant, about 2 minutes.
  4. Add chili powder, cumin, coriander, and smoked paprika and cook 1 minute.
  5. Stir in tomatoes, beer, and beans. Return lamb to pot. 
  6. Bring chili to boil and reduce to simmer. Cover and continue simmering for 1 hour. Taste and add salt and black pepper as necessary.
  7. Serve with lime, sour cream, and cilantro, if desired.


Pin It button on image hover