Monday, December 20, 2021

Eggnog French Toast Casserole


This is a sponsored post by Challenge butter, but the text and opinions are all mine. Thank you for supporting brands that make Kylee's Kitchen possible! 

Eggnog is the quintessential holiday drink. It’s thick and creamy with warm holiday spices—all things that pair really well with French toast! But no one wants to be stuck next to the stove making French toast all morning long while the rest of the family has fun opening presents.

The beauty of French toast casserole is that you can do all the prep work the night before and just pop it in the oven in the morning. So you get fluffy French toast full of delicious eggnog flavor without all the fuss.

The base of this recipe is homemade eggnog. You haven’t really had eggnog until you’ve had homemade eggnog. The store-bought drink tastes nothing like the real deal. In fact, I welcome you to make a double batch of the eggnog recipe below so you have a little to sip on! I included directions for how to make the eggnog if you're just using it for the casserole and how to make it if you plan to drink some as well because you have to heat the eggs if you plan to drink it.

My French toast bread of choice is brioche. It’s an enriched bread and is made with butter and sugar, so in my opinion, it really takes the recipe over the top. However, you could also use challah or French bread. I like to cube it and dry it out either overnight air in the oven at a low temperature just like I would with bread pudding and dressing because dry bread soaks up the eggnog better.

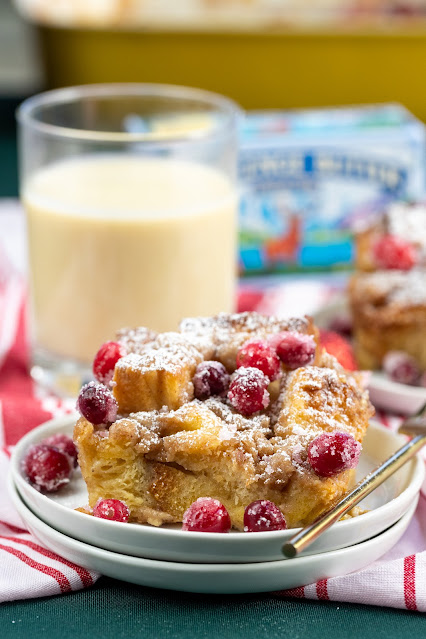
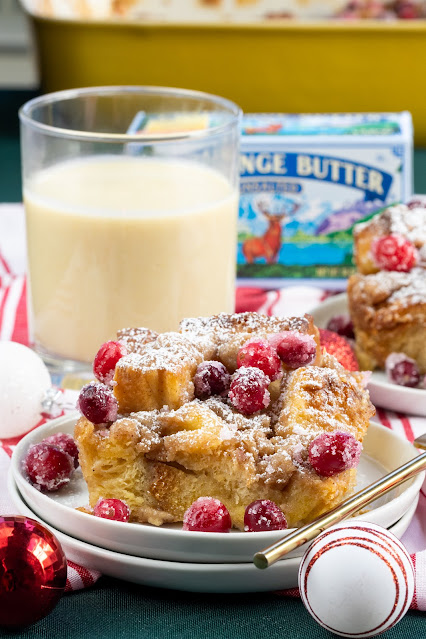
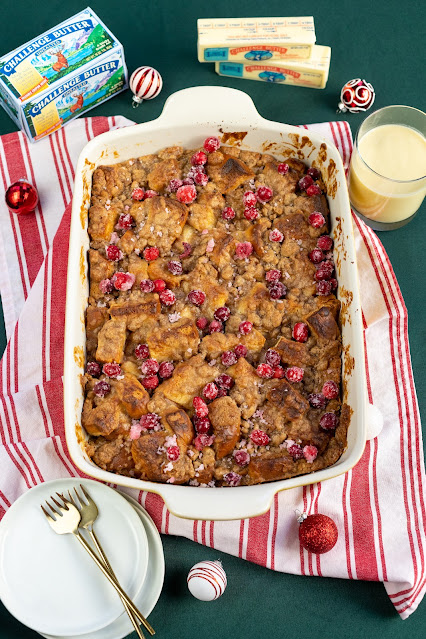
For an extra decadent touch, I sprinkle the top with a brown sugar/butter mixture. I only use Challenge unsalted butter because Challenge uses the freshest 100% real pasteurized sweet cream and salt. That’s it. Nothing artificial or synthetic.

At this point, you can either cover the entire casserole and bake it the following morning or you can bake it right away. It just depends on what works best for your schedule.

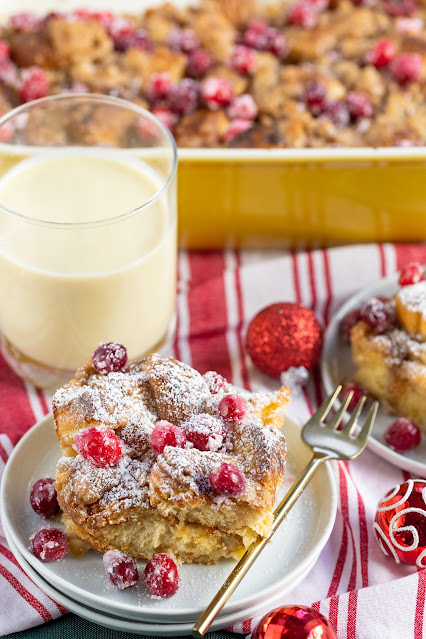
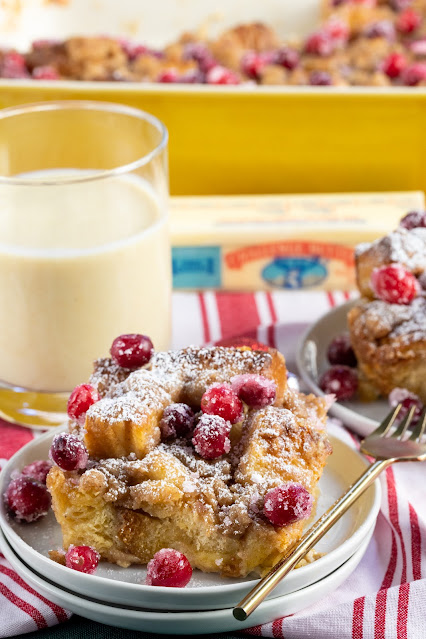
Before serving the French toast casserole, I like to dust each piece with a little powdered sugar and sprinkle candied cranberries on top for an extra festive pop of color!


Eggnog French Toast Casserole

Ingredients

For the eggnog

  • 7 egg yolks
  • 1/2 cup granulated sugar
  • 2 1/2 cups heavy cream
  • 2 cups whole milk
  • 1/2 teaspoon ground nutmeg
  • 1/2 teaspoon ground cinnamon
  • 1/8 teaspoon ground cloves
  • 1 Tablespoon vanilla
  • 1/4 teaspoon salt

For the French toast

  • 1 large loaf (16 ounces) brioche, challah or French bread, cubed and dried out overnight
  • 1/2 cup (60 grams) all-purpose flour
  • 1/2 cup (110 grams) brown sugar
  • 1/2 t nutmeg
  • 1/2 t cinnamon
  • 1/4 cup (4 Tablespoons) Challenge unsalted butter, melted
  • Optional: candied cranberries, powdered sugar for decorating

Directions 

For the eggnog 

If you're only planning to use it in the casserole

  1. Whisk together egg yolks and sugar. 
  2. Add heavy cream, whole milk, nutmeg, cinnamon, cloves, vanilla, and salt.
If you want to drink it
  1. Whisk together egg yolks and sugar for about 1 minute, or until mixture is pale yellow.
  2. In a saucepan, combine heavy cream, whole milk, nutmeg, cinnamon, and cloves.
  3. Cook over medium heat until it starts to steam and edges start to bubble.
  4. Temper the egg yolk/sugar mixture by slowly pouring 1 cup of the milk/cream mixture into the egg yolk/sugar mixture and whisking vigorously.
  5. Then pour all of the egg yolk/sugar mixture back into the saucepan while whisking.
  6. Cook over low heat while whisking for about 3 minutes, or until mixture starts to thicken.
  7. Remove from heat and whisk in vanilla and salt.
  8. Allow to cool for several hours before drinking.

For the French toast

  1. Preheat oven to 350 degrees Fahrenheit.
  2. Prepare 9x13-inch baking dish with nonstick spray.
  3. Place bread cubes in baking dish. Pour eggnog on top, making sure all of the bread cubes are saturated.
  4. Mix together flour, brown sugar, nutmeg, cinnamon, and melted butter. Crumble topping over bread cubes.
  5. Bake French toast casserole for about 45 minutes, or until top is slightly browned, egg mixture is cooked, and internal temperature is 160 degrees Fahrenheit.
  6. Let cool for 10 minutes before serving.
  7. Dust with powdered sugar or add candied cranberries on top if desired.


Festive Brown Butter Foccacia


This is a sponsored post by Challenge butter, but the text and opinions are all mine. Thank you for supporting brands that make Kylee's Kitchen possible! 

I am very passionate about focaccia because I feel like it’s the most underrated bread. Not only is it incredibly delicious, it is also one of the easiest breads to make and customize. You all may remember how popular focaccia art became during the pandemic. Essentially, people used focaccia dough as a blank canvas to recreate famous paintings with herbs, vegetables, fruits, cheese, etc. I’m using the same concept to create a festive scene for the holidays!

People love decorating Christmas cookies because it’s fun and gets you in the holiday spirit, but there are so many sweets this time of year. So decorating focaccia in a festive manner fills the void without generating even more sugar-filled snacks. 

Regardless of whether you give it away or keep it for yourself, I think most everyone would be really excited to enjoy some homemade bread this holiday season!

But before you scroll to the recipe, please take some time to read this information in order to insure the success of your bread.

First, let’s talk yeast.

Everyone seems to always reach for active dry yeast at the grocery store, and I don’t understand it. I ONLY use instant yeast. Why? Because then you don’t have to worry about activating it or pre-dissolving it in water before mixing it with the rest of your ingredients. Also, it gets to work much more quickly than active dry yeast.

You can use active dry yeast interchangeably with instant yeast in this recipe, but you will need to proof it in water first (follow the directions on the package) and allow for it to take about 15 minutes longer to rise.

This article from King Arthur Baking does a good job at explaining yeast in case you have more questions. 

Now, let’s talk about water temperature.

Can you accurately define the degree for “tepid” or “lukewarm?” Me neither! It isn’t a precise temperature, and that’s why it is ludicrous to me how many online recipes call for “lukewarm” water. And if you aren’t careful and your water is too warm, you can kill the yeast.

In my yeast breads class in culinary school, we learned a formula for determining accurate water temperature. It’s called the desired dough temperature formula. Basically, the ideal dough temperature is between 76 degrees Fahrenheit and 78 degrees Fahrenheit. There are four factors that affect the dough temperature: air temperature, flour temperature, friction factor, and water temperature. Water temperature is usually the only factor you can manipulate. You can determine the water temperature by multiplying 76 by 3 and then subtracting the air temperature, flour temperature, and friction factor.

Instead of boring you with more talk about desired dough temperature (learn more about it here), I’ll skip to the point and tell you the optimal water temperature is almost always between 70 - 72 degrees Fahrenheit, which about room temperature. That’s why it says “room temperature” in the recipe.

And if you want to listen to a British baker emphasize the importance of room temperature water, you can watch this video

If you throughly read the recipe, you’ll notice I put the liquids in the mixing bowl first, which isn’t typical of most recipes. I always do this when mixing bread because oftentimes a pocket of flour will get stuck in the dimple at the bottom of the bowl if you don’t add the liquid first.

Last, let’s discuss gluten development.

Proper gluten development is crucial to determining how long to knead bread. So how do you know when it has developed enough? The easiest way is the check for a windowpane in your dough. First, dampen your fingers, otherwise the dough will stick too much to your hands. Then pull off a small piece of dough and gently stretch it with your fingers and thumbs. If you can stretch the dough without breaking it, you’ve achieved proper gluten development. If the dough tears easily before you’re able to stretch it, knead the dough for about 2 minutes longer on second speed and try again. You can read more about the window pane test here. 

I wanted to make this focaccia bread even more special for the holidays, so before serving it, I drizzled brown butter on top. I start with Challenge salted butter. Challenge churns their butter daily from 100% pure pasteurized sweet cream in order to deliver the highest quality butter available. I melt the butter over medium heat on the stove until it turns golden brown and little brown flecks appear at the bottom of the pan. Then I drizzle it all over top of the bread. It’s an easy but very impactful addition!


Festive Brown Butter Focaccia

Yield: 15 servings (half sheet pan)

Ingredients

  • 540 grams bread flour
  • 10 grams kosher salt
  • 9 grams instant yeast
  • 350 grams water (room temperature)
  • 35 grams olive oil
  • 90 grams white onion, small dice
  • 90 grams parmesan cheese, shredded
  • 1/2 cup (8 Tablespoons) Challenge salted butter, cut in chunks
  • Toppings: Rosemary, thyme, sage, tomatoes, cranberries, onion, etc.

Directions

  1. Mix flour, salt, and yeast together in medium bowl. Set aside. 
  2. Add water and olive oil to mixing bowl. Add flour/salt/yeast mixture. Use dough hook to knead on first speed for 5 minutes. Mix on second speed until you achieve proper gluten development, about 2 minutes. (Learn more about checking for proper gluten development here.)
  3. Mix in onion and parmesan cheese.
  4. Place dough in an oiled bowl, cover, and proof until it doubles in size, about an hour.
  5. Gently punch down dough, round it, cover it, and let it rest for 10 minutes.
  6. Oil half sheet pan and spread dough to evenly fit in pan. Brush the top of the dough with oil and proof until it doubles in size, about 30 minutes.
  7. Preheat oven to 400 degrees Fahrenheit.
  8. Gently dimple top of dough and brush with more oil.
  9. Use herbs and vegetables to create festive scene on focaccia. 
  10. Bake for 20 minutes or until top is golden brown and internal temperature is 200 degrees Fahrenheit.
  11. While bread cools, place butter in small saucepan on medium heat. Stir butter in pan as it melts. The butter will foam. 
  12. About 5 minutes later, the foam will subside, and you'll see golden brown flecks at the bottom of pan. Remove pan from heat and drizzle over focaccia.


Wednesday, December 15, 2021

Ice cream-filled cannoli


This is a sponsored post by Hudsonville Ice Cream, but the text and opinions are all mine. Thank you for supporting brands that make Kylee's Kitchen possible!

Fresh, homemade cannoli are one of life's greatest pleasures. I love the contrast between the classic cream filling and the crisp fried shell. But the only people I know who actually make their own cannoli shells are Italian grandmothers. I think it's because most people think they're difficult to make, and it's an incredibly arduous task. But I promise you, homemade cannoli aren't as difficult to make as you think. In fact, I find the process very similar to making pie dough, but actually, I think the cannoli dough is easier to work with.

There are a few tools that will make your life easier when making homemade cannoli shells. You definitely need cannoli forms to ensure the shells maintain their shape when frying. I have these forms. A 4-inch round cookie cutter is also very helpful. This is the one I have. And last, a thermometer is necessary for monitoring the temperature of the frying oil. I recommend this one.

The ingredient list for cannoli dough can vary greatly. Most all recipes contain flour, sugar, salt, butter, egg, and marsala wine (for flavor and to help soften the gluten). The dough recipe I've adapted over the years also has a little cinnamon (I like the background flavor), egg yolks (makes it easier to roll out the dough), and white wine vinegar (helps create light, crispy shells).

Cannoli are traditionally filled with a slightly sweet and creamy ricotta mixture. But one of the best parts about homemade cannoli shells is their versatility. Recently, I thought it would be fun to fill the shells with ice cream, kind of like an Italian style Choco Taco. I filled the cannoli with one of my favorite classic flavors, Hudsonville's Vanilla Bean ice cream.

Vanilla Bean ice cream is a simple treasure made from vanilla bean mixed with cane sugar and fresh cream. It's pure and simple.

The ice cream is divine on its own, but it’s truly heavenly when stuffed inside a crisp, homemade cannoli shell. Use this Scoop Locator tool to find Vanilla Bean ice cream near you—it’s at Meijer and Fresh Thyme stores in the Indianapolis area.

The trickiest part of working with cannoli shells is ensuring they stay crispy. If you plan to eat the cannoli right away, you don't have to worry about the shells getting soggy. But if you're planning to fill the shells with ice cream and freeze them to eat later on, I recommend coating the inside of the shell with melted chocolate and then letting it harden before stuffing it with ice cream. The chocolate will act as a moisture barrier to prevent the shells from getting soggy.

If you want a dessert that will "wow" guests this holiday season, look no further. I guarantee you'll impress everyone when you serve them homemade cannoli shells stuffed with Hudsonville's Vanilla Bean ice cream

Ice cream-filled cannoli

Yield: Makes about 12 cannoli

Ingredients

  • 2 cups all-purpose flour (240 grams)
  • 2 Tablespoons granulated sugar (25 grams)
  • 1/2 teaspoon ground cinnamon
  • 1/4 teaspoon salt
  • 3 Tablespoons (43 grams) unsalted butter 
  • 2 large eggs, yolks and whites separated
  • 1/3 cup (80 milliliters) marsala wine
  • 1 Tablespoon (15 milliliters) white wine vinegar
  • Vegetable oil for frying (about 4 cups)
  • 2 cups Hudsonville's Vanilla Bean ice cream
  • Optional: Mini chocolate chips, chopped pistachios, candied orange peel

Directions

  1. Combine flour, sugar, cinnamon, and salt in a food processor, and mix until its uniformly combined.
  2. Add butter to food processer and pulse several time until butter is size of peas.
  3. Add 2 egg yolks, wine, and vinegar and pulse to mix well.
  4. Dump mixture onto work surface and knead several times until dough comes together; form into flat disc and wrap in plastic wrap. Chill in refrigerator for at least an hour.
  5. Roll dough out to 1/8-inch thickness and cut into 4-inch round.
  6. Wrap rounds around cannoli forms, lightly brushing one end with egg white to seal dough.
  7. Heat 1 1/2 inches oil in large pot to 360 degrees Fahrenheit. Carefully immerse shells in oil and fry until crisp and golden brown, about 2.5 to 3 minutes.
  8. Transfer shells to paper towel-lined plate. Once cool enough, remove shells from forms and repeat process.
  9. Once shells are completely cool, use melon baller to scoop Vanilla Bean ice cream and stuff into prepared shells. 
  10. Dip ends in mini chocolate chips, chopped pistachios, or candied orange peels. Serve immediately.
Pin It button on image hover