Showing posts with label apple. Show all posts

Friday, September 22, 2023

Apple butter crumb muffins


This is a sponsored post by Challenge Butter, but the text and opinions are all mine. Thank you for supporting brands that make Kylee's Kitchen possible! 

Did you get caught up in fall fever at the apple orchard and now you’re stuck with 20 pounds of apples and you’re not sure what to do with them all? Been there, done that. And I have some ideas on ways to use your apples!

Did you know you can make applesauce by cutting apples into chunks (core apples but keep peels on), sticking them in the microwave, and then blending them in a blender? It doesn’t need to be a multi-hour recipe with a bunch of sugar.

And then you can take some of that applesauce to make apple butter just by simmering it and reducing it on the stove. 

And THEN you can use that apple butter to make the most delicious apple muffins!

A couple of notes before you get started:

1.  There are 2,500 varieties of apples grown in the United States, but not all of them are great for making applesauce. You want to choose a softer apple with flesh that breaks down easily, like fuji, cortland, or McIntosh.

2. You can absolutely add spices and sugar to your applesauce or apple butter if you want! 

3. I was able to blend the apples without adding any extra liquid to the blender. I had to stop and stir the mixture a few times, but eventually it all blended. If your apples aren't very juicy or if you don't have a high-powered blender, you may need to add a little liquid. I recommend apple cider or apple juice if possible, and start with just a tablespoon of liquid, increasing the amount if necessary.

4. Nappe is a term used to describe the thickness and consistency of a sauce. A sauce is nappe when you can coat the back of a spoon and draw a line through the sauce with your finger. The sauce shouldn't move. That's the consistency you want for your apple butter.

5. The amount of apple butter yielded from a certain amount of applesauce will depend on how much liquid evaporates from the sauce and how long you simmer it. So it may not be the same amount each time.

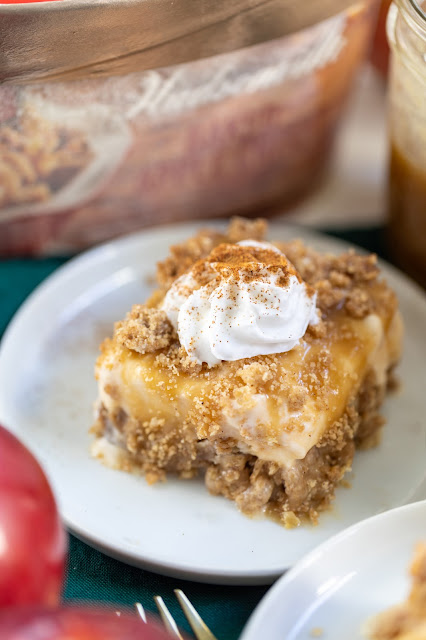
6. I've made the muffins with and without the crumb topping, and I think they're much better with a crumb topping. It adds a lot of texture, and it really jazzes them up. You could also try adding nuts to the muffin batter for texture.

7. You don't want the crumb topping to be a paste. Make sure it looks clumpy. I recommend using Challenge Salted Caramel Butter Snack Spread in the crumb topping. It's the perfect consistency when used straight from the refrigerator, and it gives the muffins an extra flavor boost.


Blender applesauce 

Yield: Makes about 20 ounces applesauce

Time: 20 minutes

Ingredients

  • 2 pounds apples (soft variety like fuji, cortland, or McIntosh)

Directions

  1. Microwave apples in microwave-safe bowl with lid for 10 to 15 minutes, or until apples are easily pierced.
  2. Transfer apples with juices to high-speed blender. Blend until desired consistency. If necessary, add apple juice or apple cider, 1 spoonful at a time, until blender runs.

Apple butter

Yield: Makes about 12 ounces apple butter

Time: 20 minutes

Ingredients

  • 20 ounces applesauce
  • 2 teaspoons cinnamon, if desired

Directions

  1. Bring applesauce to simmer in large pot. Continue to simmer over low-medium heat for 15 - 20 minutes.
  2. Check doneness by using spoon to draw line through apple butter on bottom of pot. Apple butter is done if line holds.

Apple butter crumb muffins

Yield: Makes 12 muffins

Time: About 45 minutes

Ingredients

For the crumb topping

For the muffin batter

  • 3/4 cup / 90 grams all-purpose flour
  • 3/4 cup / 90 grams whole-wheat flour
  • 1 teaspoon baking soda
  • 2 teaspoons ground cinnamon
  • 1/2 teaspoon ground cloves
  • 1/2 teaspoon kosher salt
  • 1/4 teaspoon ground nutmeg
  • 1 cup / 240 milliliters apple butter
  • 1/2 cup / 113 grams butter, melted
  • 1/2 cup / 105 grams dark brown sugar 
  • 2 large eggs, room temperature
  • 1 teaspoon vanilla extract

Directions

For the crumb topping

  1. Preheat oven to 425 degrees Fahrenheit. Line 12-count muffin pan with liners. Set aside. 
  2. Mix together flour, brown sugar, and cinnamon. Use fork to mix in butter until you have large crumbles. Set aside.

For the muffin batter

  1. In large bowl, mix together both flours, baking soda, cinnamon, cloves, salt, and nutmeg.
  2. In medium bowl, mix apple butter, butter, sugar, eggs, and vanilla extract.
  3. Pour wet ingredients into dry ingredients and mix until just combined.
  4. Divide batter evenly into each liner. Spoon crumb topping evenly over batter, gently pressing down.
  5. Bake for 5 minutes at 425 degrees Fahrenheit, then with muffins still in oven, reduce temperature to 350 degrees Fahrenheit. Bake for another 15 minutes or until toothpick inserted in center comes out clean. 
  6. Allow muffins to cool for 5 minutes pan before transferring to wire rack.


Monday, August 8, 2022

Zapple Crisp


This is a sponsored post by Challenge butter, but the text and opinions are all mine. Thank you for supporting brands that make Kylee's Kitchen possible!

It’s zucchini season and you or someone you know is probably overloaded with zucchini. Fortunately, it is an incredibly versatile ingredient. So versatile, in fact, that it makes a great apple substitute in apple crisp. I first saw “zapple crisp” on TikTok and thought “No way!” But it actually works really well. I can almost guarantee no one would notice the substitution (I tricked my own family). Zucchini slices even look like apple slices once the seeds are removed!


I don’t recommend doing a straight substitute of zucchini using your favorite apple crisp recipe. There are a few changes you need to make in order for it to taste more like apple. You definitely need to use lemon juice to make it a little tart. Additionally, I used a little cream of tartar, which is an acidic ingredient and it gives baked goods a slightly sour, tangy taste (that’s what gives snickerdoodles their unique flavor).

Additionally, how you slice the zucchini is very important. You have to remove the peel and the seeds.. When you do those two things, the zucchini slices really look like apple slices.


One more thing I want to point out—I baked this in an 11 x 7-inch baking dish. It would certainly fit in an 8x8 or 9x9, but you get a better crisp topping to zucchini filling ratio when you spread it out in a larger dish.

I also want to point out that I used melted butter in the crisp topping. If you use cold butter pieces crumbled into the oats and flour, the topping won't crisp and the texture isn't as good. It's called zapple CRISP for a reason! But if you start with melted butter, the topping will brown and crisp better on top of the filling. I use Challenge unsalted butter in this recipe because it's churned daily from the freshest 100% real pasteurized sweet cream.


Zapple Crisp

Yield: 8 servings

Ingredients

For the zucchini filling

  • 2 pounds zucchini
  • 105 grams (1/2 cup) brown sugar
  • 3 Tablespoons lemon juice
  • 8 grams (1 Tablespoon) all-purpose flour 
  • 1 1/2 teaspoons ground cinnamon
  • 1 teaspoon cream of tartar
  • 1/2 teaspoon ground nutmeg
  • 1/4 teaspoon kosher salt

For the crisp topping

  • 210 grams (1 cup) brown sugar
  • 120 grams (1 cup) all-purpose flour 
  • 90 grams (1 cup) rolled oats
  • 8 Tablespoons (1/2 cup) Challenge unsalted butter, melted
  • 1 teaspoon baking powder
  • 1 teaspoon ground cinnamon
  • 1/4 teaspoon kosher salt

Directions

For the zucchini filling

  1. Preheat oven to 350 degrees Fahrenheit. Spray 11x7-inch baking dish with nonstick cooking spray. Set aside.
  2. Peel zucchini and slice in half lengthwise. Remove seeds from center of zucchini and slice into 1/8-inch pieces. They should resemble apple slices. Place in large bowl.
  3. Mix remaining filling ingredients and add to bowl with zucchini slices. Mix until slices are evenly coated. Spread evenly in baking dish.

For the crisp topping

  1. Mix all topping ingredients and spread evenly over zucchini filling.
  2. Bake for 40 - 45 minutes or until filling is bubbly and crisp topping is golden brown.
  3. Zapple crisp is best served hot with vanilla ice cream.


Wednesday, September 29, 2021

Amaretto Apple Crisp Ice Cream Bars

This is a sponsored post by Hudsonville Ice Cream, but the text and opinions are all mine. Thank you for supporting brands that make Kylee's Kitchen possible!

I grew up down the street from an apple orchard, and during the fall season, my mom and I frequently visited the orchard after school to grab a few apples for dessert. Apple crisp was one of the first dishes I learned how to make. It’s an unfussy dessert that uses very basic ingredients. I used the same recipe for years, except I always doubled the crisp part of the recipe because the buttery, brown sugar oat pieces are my favorite. 

Last year I experimented with a new flavor pairing: apple and amaretto. I added a little amaretto to the crisp topping and to the apple mixture. Wow! The almond liqueur is the difference between tasty apple crisp and incredible apple crisp. It really makes the flavors pop!

Of course, the dessert isn’t complete without a big scoop of ice cream. Hudsonville recently released Limited Edition Baked Apple Crisp ice cream, and it truly tastes exactly like the dessert. The ice cream is packed with apple pieces and crispy oat crumbles. It made me think—why do I even bother peeling and dicing apples for apple crisp when I could just serve this Hudsonville Ice Cream?

That’s when I decided to make bars using Baked Apple Crisp ice cream and my favorite amaretto crisp topping as the base. I baked the buttery oat crumbles in a baking pan, and then I pressed half of it into a baking dish. I made an easy stovetop amaretto caramel sauce to help the pieces adhere together, and I poured it over the oat crumbles before adding 4 cups of ice cream on top. I finished off the bars with more caramel sauce and the other half of the crisp topping.

I guarantee everyone will love the apple-amaretto flavor combo, and you’ll want this tasty treat stocked in your freezer all season long! Use the Scoop Locator tool to find Limited Edition Baked Apple Crisp ice cream at a store near you.

Amaretto Apple Crisp Ice Cream Bars

Yield: 16 servings

Ingredients

For the amaretto caramel sauce

  • 1/2 cup butter (110 grams)
  • 1 cup brown sugar (200 grams)
  • 1/3 cup heavy whipping cream
  • 1/4 cup amaretto (60 milliliters)
  • 1/4 teaspoon salt (1 gram)

For the crisp topping

  • 1 1/3 cup brown sugar (266 grams)
  • 1 1/2 cup all purpose flour (180 grams)
  • 2/3 cup old fashioned oats (54 grams)
  • 1/2 cup butter, melted (110 grams)
  • 3 Tablespoons amaretto (45 milliliters)
  • 2 teaspoons cinnamon (6 grams)
  • 1/2 teaspoon salt (2 grams)

For assembly

Directions

For the amaretto caramel sauce

  1. Combine butter and brown sugar in a small saucepan. Heat over medium, stirring until smooth.
  2. Add heavy whipping cream, amaretto, and salt to saucepan, and stir. Bring to a simmer.
  3. Simmer for 5 minutes. Make sure to stir regularly.
  4. Remove from heat and allow to cool while you make crisp topping.

For the crisp topping

  1. Preheat oven to 350 degrees Fahrenheit. Line baking sheet with nonstick aluminum foil and set aside.
  2. Mix together brown sugar, flour, oats, butter, amaretto, cinnamon, and salt.
  3. Spread mixture in even layer on baking sheet. Bake for 10 minutes, making sure to stir the mixture at the halfway mark.
  4. Remove from oven.
For assembly
  1. Line 8-inch or 9-inch square baking pan with parchment paper, leaving 2-inch overhang on two sides. 
  2. Transfer half of crisp mixture to prepared pan and press down into even layer on bottom.
  3. Drizzle about 1/3 of amaretto caramel sauce over bottom layer.
  4. Spread ice cream evenly over sauce.
  5. Drizzle another 1/3 of amaretto caramel sauce over ice cream and top with rest of crisp mixture.
  6. Freeze until ice cream hardens, at least 1 hour.
  7. When ready to serve, use parchment overhang to transfer bar to cutting board. Cut into 16 squares.
  8. Serve with remaining amaretto caramel sauce and whipped cream, if desired.


Saturday, October 24, 2020

Amaretto Brown Butter Apple Crisp


This is a sponsored post by Challenge butter, but the text and opinions are all mine. Thank you for supporting brands that make Kylee's Kitchen possible!

I can't think of a more classic fall dessert than apple crisp. It's warm, it's comforting, and it's a great way to use up the excessive amount of apples you picked over the weekend when you got caught up in the moment doing all the fall things. 

One of these best things about apple crisp is you can't really mess it up. Even a bad apple crisp is better than no apple crisp. That being said, I really wanted to elevate an already delicious dessert with two special ingredients: amaretto and brown butter. It's the difference between good and WOW! 

I tested this recipe with apple slices and diced apples. I liked the look of sliced apples better, but the diced apples may have been a little easier to eat. You decide what you like best, though!

I used Challenge butter in this recipe because I like that they use hormone-free milk from local dairies, and they don’t add any unnatural additives.


Amaretto Brown Butter Apple Crisp 

Yield: One 8 x 8 dish, about 6 servings

Ingredients

For the topping

  • 6 Tablespoons Challenge butter
  • 1 cup oats*
  • 1/2 cup all-purpose flour**
  • 1/2 cup chopped pecans
  • 1/2 cup brown sugar
  • 2 Tablespoons amaretto
  • 1 teaspoon vanilla
  • 1 teaspoon cinnamon
  • 1/4 teaspoon salt

For the filling
  • 6 medium apples (about 26 ounces)
  • 1/4 cup all-purpose flour***
  • 1/4 cup brown sugar
  • 1 teaspoon cinnamon
  • 1/4 teaspoon salt
  • 1/3 cup amaretto

Directions 

For the topping

  1. Slice butter into Tablespoon-sized pieces and heat in skillet over medium heat
  2. Stir butter around and wait for it to melt. It will foam around the edges.
  3. Around 6 to 8 minutes of cooking butter, you'll notice light brown specks at the bottom of the pan. Smell butter; it should have nutty aroma.
  4. Remove butter from stovetop and pour into medium-size heat-proof bowl.
  5. Chill butter in refrigerator until it becomes solid again, about 10 to 15 minutes.
  6. Add all other topping ingredients to bowl with brown butter and stir to combine. Set aside.

For the filling

  1. Preheat oven to 375 degrees Fahrenheit.
  2. Prepare 8x8 baking dish with nonstick spray. Add filling ingredients to baking dish and stir to combine.
  3. Sprinkle topping evenly over apple mixture and bake for about 40 minutes on low oven rack. Put aluminum foil over top of dish after 20 minutes to ensure topping doesn't burn. Mixture should be bubbly on sides when it's removed from oven.
  4. Allow it to set for about 10 minutes before serving warm with ice cream.

* Use gluten-free oats to make apple crisp gluten free
** Can substitute equal amounts gluten-free flour of choice
*** If you prefer juicier apple crisp, you can reduce flour amount to 2-3 Tablespoons


Tuesday, September 1, 2020

Apple Sundaes with Pie Crust Bowls


This is a sponsored post by Hudsonville, but the text and opinions are all mine. Thank you for supporting brands that make Kylee's Kitchen possible!


This time is year is so nostalgic. My mind is flooded with memories of heading back to school, cheering at football games, and picking apples. The sight of leaves changing colors and the feeling of a cool autumn breeze transport me back to my childhood.


One of my favorite annual activities was attending the Johnny Appleseed Festival in Fort Wayne, which is where I grew up. I’m not sure if the rest of the country knows much about John Chapman, aka Johnny Appleseed, but he is a major cultural icon in Fort Wayne. We started learning about the man who planted apple trees throughout Indiana when I was in kindergarten, and every year we visited his gravesite, which is located at Johnny Appleseed Park, of course.


I’ve attended a lot of fall festivals, and none compare to the Johnny Appleseed Festival. There are games, crafts, and a wide variety of apple treats. My favorite food item was always the apple dumpling with a big scoop of ice cream on top. The dumpling is tasty on its own, but a scoop of cool, creamy ice cream makes it even better.


Unfortunately, as with most everything this year, the Johnny Appleseed Festival is canceled for 2020. I was pretty bummed when I heard the news, but I wanted to make the best of the situation. So even though I can’t get my apple fix at the festival this year, I created an apple recipe using my favorite Hudsonville Ice Cream to cheer me up.


The recipe consists of an edible bowl made entirely of pie crust, rich and creamy Hudsonville Ice Cream, and cinnamon apple topping. 


Normally, I pair apple desserts with Hudsonville’s French Vanilla ice cream, but there were two other flavors that caught my eye at my local Fresh Thyme: Seaside Caramel ice cream and Belgian Cookie Butter ice cream.


I knew the Seaside Caramel ice cream, which is a vanilla-based ice cream with a caramel swirl and caramel sea salt truffle pieces, would go well with this apple dessert. Apples and caramel are a match made in heaven!


The Belgian Cookie Butter ice cream also seemed like another great option. It’s blended with Speculoos cookie pieces, which have a deep caramel flavor and notes of ginger and cinnamon.


The first step in preparing the apple sundae is making the edible ice cream bowls. I used this 4-inch fluted circle cookie cutter to cut circles out of pie crust. I then used the backside of a cupcake pan and molded the pie circles around the inverted cupcake cavities to form the bowls. After baking in the oven, they’ll pop right off.


I recommend making your apple topping while the bowls are baking. I know a lot of people like to cook with Granny Smith apples, and that’s great, but I actually prefer the taste of Honeycrisp apples. I like to use minimal ingredients in my topping to allow the apple flavor to really shine. The topping actually comes together quickly—peeling, slicing, and dicing the apples is the most time-consuming part.


Assembling the sundaes is as easy as pie (bad joke)! Fill a pie crust bowl with two scoops of Hudsonville Ice Cream, and add a big spoonful of apple topping. Whipped cream is also always welcome.


The combination of the rich and creamy ice cream with the warm, cinnamon apple topping is the perfect marriage of cold and hot.


Even if your fall activities look a little different this year, you'll surely create sweet moments and memories serving up these apple sundaes with Hudsonville Ice Cream. Use this Scoop Locator tool to find which Hudsonville flavors are available at your local grocery stores, and click here for for a coupon to get $2 off any flavor. 


Apple Sundaes with Pie Crust Bowls

Yield: Makes 8 sundaes
Ingredients

For the pie crust bowls

  • Nonstick spray
  • 1 9-inch pie crust

For the apple topping

Directions

For the pie crust bowls

  1. Preheat oven to 350 degrees Fahrenheit
  2. Cut circles in pie crust with round cookie cutter
  3. Spray bottom of cupcake pan with nonstick spray
  4. Mold pie crust circles around inverted cupcake pan cavities
  5. Bake for about 12 to 15 minutes or until pie crust turns golden brown
  6. Remove cupcake pan from oven and allow bowls to cool for several minutes before gently removing from pan

For the apple topping

  1. Melt butter in large skillet on medium heat
  2. Add apples to skillet and sauté for 5 minutes
  3. Add brown sugar and cinnamon to skillet and stir until sugar dissolves
  4. Add corn starch to small bowl and slowly stir in 1 Tablespoon warm water until it’s combined with no lumps
  5. Pour corn starch slurry into skillet and stir for about 2 minutes until mixture thickens
  6. Pour heavy cream into skillet and simmer for about 5 minutes
  7. Remove skillet from heat
  8. Scoop Hudsonville Ice Cream into pie crust bowls and spoon apples onto ice cream
  9. Top with whipped cream, if desired


Tuesday, September 26, 2017

Caramel Apple Dutch Baby Pancake


This is a sponsored post by Challenge butter, but the text and opinions are all mine. Thank you for supporting brands that make Kylee's Kitchen possible!

Don't want to be that person stuck next to the griddle flipping pancakes all morning long while everyone else eats and asks for more? BINGO, here's your answer!

Dutch baby pancakes are essentially giant pancakes in a skillet. There's no standing around the griddle waiting to flip them because they're baked in the oven. They look like a pillow when they're first removed from the oven -- a testament to how light and fluffy they are -- and then they slowly sink.

This particular recipe is for a Caramel Apple Dutch Baby Pancake. The apples are first baked right in the bottom of the skillet with butter and a little sugar before adding the pancake batter on top. So easy and so delicious!

In order to make sure the pancake puffs up, it's important to start with all room temperature ingredients. Also, there should be zero lumps in the batter. I noticed a lot of other Dutch baby pancake recipes called for using a blender to mix the batter. That's a great idea! I tried it, and it worked really well. However, it's not necessary. If you whisk it, whisk it real good, then that's totally fine.

Because there are so few ingredients in this recipe, it's important to make sure each one is of very good quality. That's why I used Challenge butter. I choose Challenge over every other brand because I know there are no hormones, additives, or fillers in their products. The taste is also superior to other brands because they use real cream.

To finish it all off, I made the most simple caramel syrup ever to go on top! And of course, dusting with powder sugar is a must. Depending on your appetite, these pancakes can either be shared with a friend, or there's no shame in eating it all by yourself!


Caramel Apple Dutch Baby Pancake
Ingredients
For the pancake
  • 2 Tablespoons Challenge butter
  • 1 apple, sliced with skin removed
  • 1/4 cup brown sugar
  • 3 eggs
  • 1/2 cup milk
  • 1 teaspoon vanilla
  • 1/2 cup flour
  • 2 teaspoons cinnamon
For the caramel syrup
  • 1/4 cup heavy cream
  • 1/4 cup light corn syrup
  • 1/4 cup brown sugar
Directions
For the pancake
  1. Preheat oven to 425 degrees Fahrenehit
  2. Add butter to cast iron skillet or other oven-safe skillet and melt in oven, should take about 1 to 2 minutes.
  3. Add brown sugar and apple to skillet and bake for 10 minutes
  4. Meanwhile, combine eggs, milk, vanilla, flour, and cinnamon until no lumps remain.
  5. Once apples are done baking, remove skillet from oven, pour pancake batter on top, and bake for about 15 to 20 minutes.
  6. Remove from oven and serve immediately with caramel syrup.
For the caramel syrup
  1. Combine heavy cream, light corn syrup, and brown sugar in sauce pan and bring to low boil. 
  2. Let boil for about 1 to 2 minutes or until syrup starts to thicken. Do no let it boil too long or it will burn.


Friday, October 21, 2016

Mini Caramel Apples


This is a sponsored post by Challenge Butter, but the text and opinions are all mine. Thank you for supporting brands that make Kylee's Kitchen possible!

Caramel apples are a classic fall treat! But I don’t know anyone who enjoys biting into them. They’re so big and they get all over your face and you practically lose a tooth in the process.

But then it occurred to me if I make mini caramel apples, like cake pops, they’re much easier to eat! You can just pop them in your mouth without getting a facemask of caramel in the process!

So the concept for mini caramel apples looks simple enough, but it’s a little more complicated than what you may think. It’s important that you follow these tips in order to make this adorable little dessert a success!

1. You should use Granny Smith apples. Normally, I’m not a fan of Granny Smith, but they’re known for being less juicy and that’s what you want. You see, the biggest issue with making these a success is the fact that because the apple ball doesn’t have skin, the caramel has trouble sticking to the outside because of the apple’s juice. So you want to start out with the least juicy apple possible.

2. It’s crucial that you squeeze the apple balls into a paper towel to remove excess juice before dipping into caramel sauce.

3. Do not let you caramel sauce cool off too much! You want it to stay warm so it easily coats the apple.

4. Make sure you get some of the caramel sauce about ¼ inch up on the stick so that it creates a better seal when you dip it into the ice water bath.

5. The ice water bath is absolutely necessary because it helps sets the caramel.

Mini Caramel Apples
Yield: Makes about 16 mini caramel apples

Ingredients
  • 2 Tablespoons Challenge butter
  • 1/2 cup brown sugar
  • 1/4 cup honey
  • 1/2 cup heavy cream
  • 3 Granny Smith Apples
  • Crushed peanuts, sprinkles or mini chocolate chips.
 Other necessary items
  • Candy sticks or toothpicks
  • Small bowl of ice water
Directions
  1. Melt butter in saucepan over medium heat. Add brown sugar and honey, stirring with wooden spoon until combined.
  2. Slowly add the heavy cream and let mixture come to a boil.
  3. Boil for 10 minutes, stirring continuously and then set aside.
  4. Peel apples and then use a melon baller to scoop out apple balls.
  5. Thoroughly dry apple balls with paper towel to soak up any extra moisture from its surface.
  6. Insert candy stick into apple balls, making sure to not puncture the other end.
  7. Dip apple into caramel, letting any excess drip off.
  8. Immediately stick it into ice water bath for a few seconds to harden caramel.
  9. Press caramel apple into crushed peanuts or desired topping.
  10. Immediately transfer them onto plate with wax paper and stick in freezer for at least 15 minutes to finish setting.
  11. Once caramel is hard, remove from freezer and enjoy.

Recipe adapted from Instructables and Divas Can Cook


Pin It button on image hover