Showing posts with label frosting. Show all posts

Saturday, June 1, 2024

Chocolate chip cookie cake with vanilla buttercream frosting


This is a sponsored post by Challenge Butter, but the text and opinions are all mine. Thank you for supporting brands that make Kylee's Kitchen possible! 

Early summer is filled with celebrations--graduation parties, end of school year celebrations, Indy 500, etc. And I can't think of a better way to celebrate than with cookie cake. Cookie cakes are incredibly easy to make. In fact, they're easier to make than actual cookies. So under no circumstances should you actually buy a cookie cake when you can make one that tastes 100 times better.

My favorite recipe includes instant vanilla pudding powder. I have tried and tried to make cookie cake without pudding mix, and it is just not the same. The pudding mix makes helps the cookie cake retain moisture and makes it extremely soft and chewy. Also, I think the vanilla in the pudding gives the cookie a deeper flavor.

Cookie Cake FAQ

What type of pan do I use?

My preferred cookie cake pan is 12 inches in diameter. I actually like to use a deep-dish pizza pan. When I make a cookie this large, I do not remove it from the pan, primarily because I don't have a big enough serving dish to put it on. And I think it looks just fine. But if I make smaller 9-inch or 6-inch cookie cakes, I line the bottom of the pans with parchment paper. Then once the cookies cool, I go around the edge with a butter knife to loosen it, and the cookie cake pops right out. Regardless of what size pan you use, the dough should be about 1/2-inch thick in the pan.

Why use melted butter?

The best part about cookie cakes is you don’t have to use a mixer for the dough. You can just melt the butter and stir everything together because we aren’t worried about individual cookies spreading too much. I always use Challenge unsalted butter. It melts really well, and I think it tastes better than other brands.

What type of chocolate chips?

I actually like to use a mini chocolate chips for a more even distribution of chocolate. Also, it makes it easier to cut into the cookie cake.

How do I decorate it?

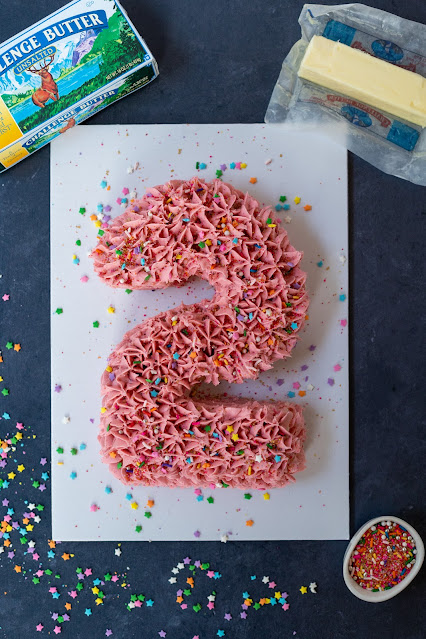
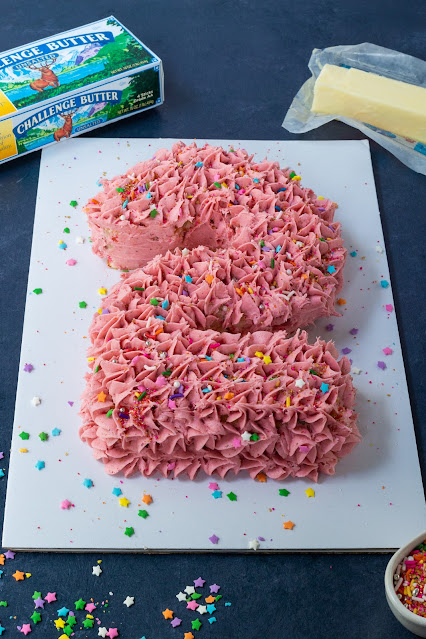
I like to decorate the cookie cake with buttercream frosting. I included my frosting recipe in this post. You can color the frosting with food coloring or just leave it. I use a piping bag fitted with a star tip for the border, and I leave the center open to write a message. Writing with frosting takes a lot of practice, so don't get discouraged if you mess up. You can always scrape off the frosting and try it again. And always top it off with sprinkles!

Chocolate chip cookie cake with vanilla buttercream frosting

Yield: 1 (12-inch) cookie cake or 2 (9-inch) cookie cakes or 4 (6-inch) cookie cakes

Time: About 90 minutes

Ingredients

For the cookie cake

  • 12 tablespoons (170 grams) Challenge unsalted butter, melted
  • 1 cup (200 grams) dark brown sugar 
  • 1 (3.4 ounce) package instant vanilla pudding mix (just the powder)
  • 2 large eggs
  • 1 Tablespoon vanilla extract
  • 2 1/4 cups (270 grams) all-purpose flour 
  • 1 teaspoon baking soda
  • 1 teaspoon kosher salt
  • 1 1/2 cups (168 grams)  mini semi-sweet chocolate chips

For the vanilla buttercream frosting

  • 1 cup (226 grams) Challenge unsalted butter, room temperature
  • 4 cups (450 grams) confectioners’ sugar
  • 2 teaspoons vanilla extract
  • 1/2 teaspoon kosher salt
  • 1/4 cup (60 milliliters) heavy cream

Directions

For the cookie cake

  1. Move oven rack to lowest setting and preheat oven to 350 degrees Fahrenheit. Spray pan or pans with nonstick spray, line with parchment paper, and spray again.
  2. In large bowl, combine melted butter, brown sugar, pudding mix, eggs and vanilla extract.
  3. In separate bowl combine flour, baking soda, and salt. Add to wet ingredients and mix until just combined. 
  4. Fold in chocolate chips.
  5. Divide cookie dough evenly among pans and press down until evenly distributed. Dough should be about 1/2-inch thick.
  6. Bake about 20 minutes for 12-inch and 9-inch cookies and about 15 minutes for 6-inch cookies. Edges should be golden brown and center should be just barely set.
  7. Remove from oven and cool completely on wire rack.
  8. Once cool, use knife to loosen edges. Remove cookies from pans and transfer to serving dishes.

For the vanilla buttercream frosting

  1. Beat butter on high speed for about 2 minutes or until light and creamy. Scrape down bowl with spatula.
  2. With mixer on low speed, slowly add powdered sugar. Scrape sides of bowl after addition of every cup. 
  3. Add vanilla extract and salt and mix until combined.
  4. Mix in heavy cream 1 Tablespoon at a time until frosting is desired consistency for piping. Frosting should be medium stiffness. You should be able to pipe easily without putting too much pressure on bag.
  5. Use food coloring to color frosting if desired.
  6. Decorate cookie cake and serve.
  7. Cover leftover cookie cake and store at room temperature for up to 5 days.


Monday, February 21, 2022

Confetti cake with strawberry buttercream


This is a sponsored post by Challenge butter, but the text and opinions are all mine. Thank you for supporting brands that make Kylee's Kitchen possible! 

I'm celebrating Tuesday (or should I say Twosday) 2/22/22 by making a number 2-shaped confetti cake with strawberry buttercream frosting! If you are not celebrating an occasion in which the number two is involved (which is probably the case for most of you reading this blog post), the good news is that this is still an incredibly delicious cake and buttercream recipe.

Before you jump into the recipe, I want to share a few tips that are very important when making cakes.

First, ALWAYS MEASURE INGREDIENTS BY WEIGHT! I cannot emphasize this enough, and I'm sure you've heard me say this many times. It is the most accurate way to measure ingredients. And it's very very important to be accurate when baking because baking is a science. My $15 mini scale is my most used tool in the kitchen.

Second, make sure all your ingredients are room temperature. Ingredients mix together better when they're all the same temperature. Room temperature butter should still be slightly cool, and it shouldn't look greasy and melty. When you touch it, your finger should leave an imprint, but it shouldn't sink down into the butter. I only use Challenge unsalted butter in my baking recipes. It doesn't have any artificial ingredients, so the taste is pure and the flavor is consistent.

Third, spray your cake pans, line with parchment paper, and spray again. It's the best way to ensure that your cakes will easily pop out of the pans.

Fourth, do not use the "toothpick test" to see if your cake is done. It is not fail proof. There are three things I want you to do instead. The first is to lightly touch the top of the cake. It should bounce back. Next, look at the edges. The cake will start to pull away from the pan when it's done. Lastly, use a thermometer to check the temperature of the center of the cake. It should register between 200 and 205 degrees Fahrenheit.

Confetti cake with strawberry buttercream

Makes 3, 8” cakes (or 1, 8” circle cake and 1, 8” square cake)

Ingredients

For the funfetti cake

  • 680 grams (3 1/2 cups) granulated sugar
  • 567 grams (4 3/4 cups) cake flour
  • 20 grams (5 teaspoons) baking powder
  • 6 grams (2 teaspoons) salt
  • 340 grams (1 1/2 cups) Challenge unsalted butter, softened to room temperature
  • 16 fluid ounces (473 grams) buttermilk 
  • 237.5 grams egg whites (from about 7 eggs)
  • 187.5 grams whole eggs (from about 4 eggs)
  • 14 grams (1 Tablespoon) vanilla extract
  • 4 grams (1 teaspoon) almond extract
  • 3/4 cup sprinkles (130g)

For the strawberry buttercream

  • 1 cup (about 25g) freeze-dried strawberries
  • 227 grams (1 cup) Challenge unsalted butter, softened to room temperature
  • 454 grams (4 cups) confectioners’ sugar, sifted
  • 58 grams (1/4 cup) heavy cream
  • 5 grams (1 teaspoon) vanilla extract
  • 2 grams (1/2 teaspoon) salt

Directions

For the funfetti cake

  1. Preheat oven to 350 degrees Fahrenheit. Prepare cake pans by spraying and lining with parchment paper.
  2. Combine sugar, flour, baking powder and salt in large mixing bowl with paddle. Mix on low speed for 2 minutes until aerated.
  3. Add butter in small increments on low speed, scraping down bowl periodically. Once all butter is incorporated, mix on low speed for 2 minutes.
  4. Combine buttermilk, egg whites, eggs, vanilla extract, and almond extract in medium bowl.
  5. Add in 4 stages to dry ingredient / butter mixture at low speed. Scrape sides and bottom of bowl between each addition.
  6. Once all liquid is in mixing bowl, mix at medium speed for 1 minute 
  7. Fold sprinkles into cake batter until evenly distributed.
  8. Divide batter into cake pans.
  9. Bake for 30 to 40 minutes, or until top bounces back, edges start to pull away, and internal temperature registers between 200 and 205 degrees Fahrenheit.
  10. Once cool, remove cakes from pans

For the strawberry frosting

  1. Pulverize freeze-dried strawberries in food processor or blender. Set aside.
  2. Beat butter on medium speed until smooth and creamy, about 2 minutes.
  3. Add confectioners’ sugar, freeze-dried strawberry powder, heavy cream, vanilla extract, and salt. Beat on low speed until ingredients are combined. Then beat on high speed for 2 minutes. If frosting is too thick, add another tablespoon of heavy cream

For #2 cake assembly

  1. Cut small circle from center of circle cake. Remove circle from center.
  2. Cut cake in half. Cut one of the halves in half.
  3. Cut rectangle from square pan that is the same width as the circles.
  4. Put a little dab of frosting on cake board where you plan to place cake pieces.
  5. Place the half circle cut side facing down at the top of the cake board.
  6. Line up the two quarter circle pieces so it resembles the shape of the number two.
  7. Place the rectangle at the end of the second quarter circle. It should look like the number two.
  8. Frost cake and decorate with sprinkles if desired.

Thursday, December 13, 2018

Painting Plaid Christmas Cookies


This is a sponsored post by Challenge Butter, but the text and opinions are all mine. Thank you for supporting brands that make Kylee's Kitchen possible!

I’ve been wanting to try painting cookies for a while now. Some people are really artistic and paint gallery-worthy pictures on their cookies. Considering I haven’t actually painted anything since elementary school, I set expectations low for myself.

Honestly, I just really wanted to make plaid cookies. I think it’s a really classic print, and it symbolizes the holiday season well.

First thing’s first, start with your favorite sugar cookie recipe. I’ve shared my favorite recipe below. I like my cookies nice and thick. A trick to achieving that is to roll your dough out between two sheets of parchment paper before refrigeration. Refrigeration prevents the dough from spreading, and it makes it a heck of a lot easier when it comes time to cutting out your shapes.

Once your cookies are baked and cooled, it’s time to add the icing. I’ve always been a buttercream girl. I love the way it tastes. But these cookies require a flat surface since we’re going to be painting on them, so royal icing is a must.

Like I said, I don’t love royal icing, so I used a variation of the recipe. Also, I discovered another fun trick: buy a can of white frosting (Duncan Hines ranks the highest on taste tests), melt it in the microwave, and dip the cookies in that. You can add a little almond or vanilla extract to the store-bought frosting to spruce it up a bit.

I’m not usually a proponent of store-bought frosting, but this wasn’t bad! I’ll let my co-workers do a taste test, and I’ll update this later with which frosting they preferred.

Once the frosting is dry, prepare your paint colors. All you need is food coloring and lemon extract.

A lot of food coloring goes a long way! I would say start by mixing 1/4 teaspoon lemon extract with 1/8 teaspoon (about 13 drops) of food coloring.

It’s important to use extract because extract is mainly alcohol which evaporates quicker than water. You can use any extract. I just really like the taste of lemon.

Painting a plaid design on the cookies is really quite easy. I’ve broken down the steps below. Drawing straight lines is the trickiest part, but I think it’s easier if you have a very light hand. Also, I recommend painting the first color on a bunch of cookies before painting the second color on top. The colors are less likely to bleed together that way.

The painting will take anywhere from 10 minutes to a half hour to dry.


Holiday Cut-Out Sugar Cookies
Ingredients
For the cookies
  • 3 cups flour (360 grams)
  • 2 teaspoons baking powder
  • 1/2 teaspoon salt
  • 2 sticks Challenge butter, room temperature
  • 1 cup granulated sugar (198 grams)
  • 1 egg
  • 1 teaspoon vanilla extract
  • 1 teaspoon almond extract
For the icing
  • 4 cups powdered sugar
  • 5 tablespoons whole milk
  • 5 tablespoons light corn syrup
  • 1 ½ teaspoons almond extract
For the paint
  • 1/4 teaspoon lemon extract
  • 1/8 teaspoon food coloring of your choice
  • Note: You can increase the amount using this same ratio if you need more paint
Directions
For the cookies
  1. Mix together the flour, baking powder, and salt and set aside.
  2. In a large bowl, cream the butter for one minute; add the sugar and beat on high speed until light and fluffy.
  3. Scrape down sides of bowl as needed and add egg, vanilla extract, and almond extract. Beat until combined.
  4. Add dry mixture to bowl and beat on low until just combined.
  5. Lay a piece of parchment paper on your counter top, place dough on paper, and then put another piece of parchment paper on top of dough.
  6. Use a rolling pin to gently roll out the dough between the two sheets of parchment paper.
  7. Once dough is about 1/3-inch thickness stick it in the refrigerator to chill for about 30 minutes.
  8. After cookie dough is chilled, preheat oven to 350 degrees Fahrenheit.
  9. Use cookie cutter to cut out shapes and transfer to baking sheet.
  10. Bake for about 8 to 10 minutes, or until edges of cookies just barely turn golden.
  11. Repeat with remaining dough; cool completely before frosting.
For the icing
  1. Sift the powdered sugar into bowl.
  2. Add the milk and whisk until it’s smooth.
  3. Add the corn syrup and almond extract and continue whisking until it’s pourable consistency
  4. Using a squeeze bottle or a pastry bag, cover the top surface of the cookie, and let dry before painting.
To paint plaid
  1. Mix the lemon extract with food coloring
  2. Paint a cross
  3. Add a line above and below the cross and to the right and left.
  4. Add one or two little lines in between each of those thick lines.


Tuesday, May 23, 2017

Checkered Flag Racing Cupcakes


This is a sponsored post by Challenge butter, but the text and opinions are all mine. Thank you for supporting brands that make Kylee's Kitchen possible!

I have always wondered how people made dual-flavored swirled frosting, and now that I know, I've been sharing the info with everyone! You can use any two flavors of frosting for your swirls, but since we're just a few days out from the Indianapolis 500, I wanted to use the technique to make checkered flag racing cupcakes.

I started by making a basic vanilla buttercream frosting. I then took half of that frosting and made it chocolate buttercream just by adding cocoa powder and a little more heavy cream.

I then laid out a sheet of plastic wrap and used a spatula to spread the two frostings side by side. I folded one side over the other and stuck the whole thing into a pastry bag fitted with a 1M swirl piping tip. And that's it! To achieve the iconic swirl look, hold your piping bag upright and over the center of the cupcake. Apply pressure and begin circling the outside edge. Continue squeezing and add another layer of frosting working toward the center. Finish the spiral in the very center just by releasing pressure and lifting up!

You can use this frosting technique on any flavor of cupcake or with any flavors of frosting. In fact, you can even use more than two frosting flavors! I recommend piping the frosting onto a plate first though to make sure the flavors are coming out evenly before you put it on a cupcake.


Checkered Flag Racing Cupcakes
Yield: Makes about 12 cupcakes
Ingredients
For the vanilla cupcakes
  • 1 and 2/3 cups all-purpose flour (200 grams)
  • 1/2 teaspoon baking powder
  • 1/4 teaspoon baking soda
  • 1/4 teaspoon salt
  • 1 cup granulated sugar (198 grams)
  • 1/2 cup unsalted Challenge butter, melted
  • 3/4 cup milk
  • 1/4 cup yogurt (57 grams)
  • 2 teaspoons vanilla extract
  • 2 egg whites
For the swirl frosting
  • 1 cup unsalted Challenge butter, room temperature
  • 4 cups powdered sugar (454 grams)
  • 2 teaspoons vanilla extract
  • 1/2 teaspoon salt
  • 4 Tablespoons heavy cream, divided
  • 1/2 cup unsweetened cocoa powder (42 grams)
Directions
For the vanilla cupcakes
  1. Preheat oven to 350 degrees Fahrenheit
  2. Combine flour, baking powder, baking soda, and salt in medium bowl and set aside.
  3. Mix sugar and melted butter in large bowl. Whisk in milk, yogurt, and vanilla extract making sure the butter is not to hot beforehand otherwise the dairy will curdle.
  4. Slowly add flour mixture to wet ingredients and mix just until no lumps remain.
  5. Beat egg whites using whisk or mixer until frothy (about 1 minute of fast whisking by hand or 30 seconds with mixer).
  6. Add egg whites to mixture and slowly mix in.
  7. Divide batter amongst 12 cupcake liners and bake for about 18 to 20 minutes. Let cool.
For the swirl frosting
  1. In large bowl, beat butter at medium speed until smooth.
  2. Add powdered sugar, vanilla extract, salt, and 2 Tablespoons of heavy cream. Beat at low speed until combined, and then beat at high speed for an additional minute.
  3. Scrape away half of vanilla frosting and set aside.
  4. Add remaining 2 Tablespoons heavy cream and cocoa powder to bowl and beat until combined.
  5. Lay sheet of plastic wrap about a foot long onto work surface.
  6. Use spatula to spread chocolate frosting into 3-inch strip in center of plastic wrap. Spread vanilla frosting in 3-inch strip alongside chocolate frosting being careful not to mix the two.
  7. Fold chocolate frosting over vanilla frosting and place into piping bag fitted with 1M swirl piping tip.
  8. Pipe onto cupcakes and serve.
Recipe adapted from Sally's Baking Addiction and Delish


Monday, December 12, 2016

Holiday Cut-Out Sugar Cookies


This is a sponsored post by Challenge Butter, but the text and opinions are all mine. Thank you for supporting brands that make Kylee's Kitchen possible!

It’s undeniable that cut-out sugar cookies are extremely popular during the holiday season. There are so many adorable cookie cutters and Christmas shapes – if there was a cookie of the month for December, this would be it!

Unfortunately, they’re not necessarily the easiest cookie to make. The recipe itself is simple enough to make, and it uses ingredients that you most certainly already have in your pantry. But rolling them out can be a royal pain, and it’s very frustrating when the beautiful tree you were excite to bake just looks like a lumpy circle.

So today, I wanted to share my tips to ensure your cookies turn out picture perfect every time.

Room temperature ingredients
It’s important that all of your ingredients start out at room temperature – the eggs, the butter, the sugar, the flour… everything! This is important because ingredients can react with each other if they’re different temperatures. For example, cold eggs will curdle when combined with dairy.

I always set my refrigerated ingredients out on the counter for an hour before I start baking.

This is ESPECIALLY important with butter. Butter is the foundation for many baked goods. You know your butter is the right temperature if when you touch it, your finger leaves an imprint. It shouldn’t be too soft though that it doesn’t pull away from the wrapper.


Measure ingredients by weight
Unlike cooking, baking is an exact science, and it’s important all of the ingredients are measured properly.

The best way to do this is to measure your ingredients by weight. One of my favorite baking tools ever is the EatSmart Precision Pro Digital Kitchen Scale. I use it to measure everything.

I try to add weight (in grams) to each ingredient listed in my recipes, but when I encounter a recipe where the weight isn’t listed, I used this ingredient weight chart to check.

Do not overmix the dough!
In order to get cut-out sugar cookies to hold their shape, it’s necessary to use a recipe with a higher concentration of flour. Because of this, there is obviously more gluten in recipe.

When you overwork gluten, cookies become tough. So once the dry ingredients are incorporated into the wet ingredients, put those beaters down and stop mixing! This rule applies to all cookies. Cookies are more tender with less mixing.

Roll your dough out before refrigeration
It may seem backwards to roll out your dough before refrigeration, but it actually makes the most sense!

It’s significantly easier to roll out the dough right after you mix it because it’s soft and pliable.  It’s kind of like trying to flatten a rock if you wait until after refrigeration.

Also, a lot of recipes call for you to refrigerate the dough for several hours before baking, but if you roll out the dough first you don’t have to do that because it takes a fraction of a time to chill a sheet of cookie dough than it does to chill a block of dough.

Roll dough between two sheets parchment paper
In my opinion, the worst thing you can do to sugar cookies is to over flour them.  This happens when people put flour the baking surface before rolling out the cookie dough. They do this, of course, so it doesn’t stick to the rolling pin.

But you can avoid using extra flour by rolling out your dough between two sheets of wax or parchment paper.

Refrigerate dough
I guess this goes without saying if you’ve already read the previous steps, but you must refrigerate your dough after rolling it flat. If the dough is warm, the cookies will spread and will look like blobs. No one wants that.

A lot of recipes will recommend that you chill the dough for several hours, but I don’t think that’s necessary. In my opinion, 30 minutes to 1 hour is plenty of time. The dough should be cold enough that when you use a cookie cutter, the shape will lift off of the rest of the dough.

Your cookie dough should feel cold when you put it in the oven. This will prevent spread. In between batches, stick the dough back in the refrigerator.

Use one cookie cutter at a time
Get the most bang for your buck by using one cookie cutter at a time.

For example, the first batch of cookies I make, I will only use the tree shape. You’ll be able to cut more cookies out of the dough and have less scraps. It’s important to not put the cookie cutter too close to the edge because the edges are thinner and that will bake faster than the rest of the cookie.

Also, when you use the same cookie cutter, all of the cookies are the same size and bake evenly.

Do not overbake
Cut-out sugar cookies cook quickly because of all of their different edges. Start checking on them about 4 minutes prior to what the cooking time suggests. Once the edge of the cookie starts to look golden, remove them from the oven immediately.

Buttercream frosting
This is personal preference, but I think buttercream frosting has a lot more flavor than the royal icing that is generally used when frosting sugar cookies.

If you plan to use sprinkles, do this immediately after frosting, otherwise it will harder (or “crust”) and not stick.

I always use a piping bag and piping tip to decorate my cookies. They’re inexpensive and very easy to use. I just make small little dots all over the cookie to achieve the textured look.


Holiday Cut-Out Sugar Cookies
Ingredients
For the cookies
  • 3 cups flour (360 grams)
  • 2 teaspoons baking powder
  • 1/2 teaspoon salt
  • 2 sticks Challenge butter, room temperature
  • 1 cup granulated sugar (198 grams)
  • 1 egg
  • 1 teaspoon vanilla extract
  • 1 teaspoon almond extract
For the frosting
  • 1 stick Challenge butter, room temperature
  • 3 cups powdered sugar
  • 2 teaspoons vanilla
  • 2 teaspoons heavy cream 
Directions
For the cookies
  1. Mix together the flour, baking powder, and salt and set aside.
  2. In a large bowl, cream the butter for one minute; add the sugar and beat on high speed until light and fluffy.
  3. Scrape down sides of bowl as needed and add egg, vanilla extract, and almond extract. Beat until combined.
  4. Add dry mixture to bowl and beat on low until just combined.
  5. Lay a piece of parchment paper on your counter top, place dough on paper, and then put another piece of parchment paper on top of dough.
  6. Use a rolling pin to gently roll out the dough between the two sheets of parchment paper.
  7. Once dough is about 1/3-inch thickness stick it in the refrigerator to chill for about 30 minutes.
  8. After cookie dough is chilled, preheat oven to 350 degrees Fahrenheit.
  9. Use cookie cutter to cut out shapes and transfer to baking sheet.
  10. Bake for about 8 to 10 minutes, or until edges of cookies just barely turn golden.
  11. Repeat with remaining dough; cool completely before frosting.
For the frosting
  1. Beat butter on medium speed for about 2 minutes until smooth and creamy.
  2. Add powdered sugar, vanilla extract, and heavy whipping cream to bowl; increase mixer to high speed and beat for 3 full minutes.
  3. Add more powdered sugar if frosting is too thin or more heavy whipping cream if frosting is too thick.
  4. Frost cooled sugar cookies.


Thursday, December 8, 2016

Reindeer Brownies


This is a sponsored post by Challenge Butter, but the text and opinions are all mine. Thank you for supporting brands that make Kylee's Kitchen possible!

I love holiday-themed treats more than anything. Any holiday – Valentine’s Day, Easter, Fourth of July, Halloween… I just think making holiday treats is so fun. And there’s just something so special about Christmas treats.

Last year, you may remember that I made Christmas tree brownies for National Brownie Day, which is December 8. They were a total crowd pleaser! Everyone wanted one!

This year I wanted to do the same concept except with reindeer instead of Christmas trees! 

The first step in making the treat is of course preparing the brownies! It is very rare that I use a box mix for anything, but in this case you should definitely use a box mix. The reason being is that you’re already going to decorate these brownies so why create even more work for yourself? 

This Ghirardelli mix is my absolute favorite. But I always doctor it up by substituting the water for milk and the oil for Challenge butter.  The brownies will taste so much richer! 

Also, to create the triangle shape of the reindeer, I recommend baking the brownies in a round cake pan. The cake pan I used is 9 inches in diameter. If you do not have a round cake pan, you can certainly use the pan with which you normally bake brownies. You just may have some scraps leftover after cutting the triangles.

Now, let’s talk about decorating the reindeer. For the antlers I used big twist pretzels, snapped in half. The eyes are brown M&Ms, and the nose is a mini vanilla wafer with a red M&M on top.

The “glue” that keeps everything in place is vanilla buttercream frosting.  This was the only way I could think of to adhere the reindeers’ facial features. If you find an easier way, go for it! Also, keep in mind, vanilla buttercream is delicious and you can use leftovers to spread on graham crackers.

So there you have it! That’s all it takes to make the most adorable holiday brownies ever!

Also, remember this month Challenge Dairy has partnered with UNICEF to fight the childhood malnutrition crisis with their campaign called “Pin a Recipe, Feed a Child." Through December 31, 2016, if you pin a recipe from the “2016 Pin a Recipe, Feed a Child” Pinterest board, Challenge will donate a meal to UNICEF for a child in need.


Reindeer Brownies
Yield: Makes 8 brownies
Ingredients
For the brownies
  • 1 (18 ounce) box of brownie mix
  • 1/3 cup Challenge butter, melted
  • 1/3 cup milk
  • 1 egg
For the buttercream frosting
  • 1/2 cup Challenge butter, room temperature
  • 4 cups powdered sugar
  • 1/4 heavy whipping cream
  • 2 teaspoons vanilla extract
  • 1/4 teaspoon salt
For the decorations
  • Large pretzel twists
  • Brown M&Ms (or chocolate chips)
  • Vanilla wafers
  • Red M&Ms
Directions
For the brownies
  1. Preheat oven to 325 degrees Fahrenheit
  2. Line 9-inch cake pan with aluminum foil and spray with nonstick baking spray; set aside.
  3. Mix the milk, butter, and egg in bowl. Add the brownie mix and stir until well blended.
  4. Spread mix into cake pan and bake for 40 minutes.
  5. Remove from oven and let cool completely.
  6. Once cooled, lift aluminum foil out of pan and cut into 8 triangles. 
For the buttercream frosting
  1. Beat softened butter on medium speed for about 2 minutes until smooth and creamy.
  2. Add powdered sugar, cream, vanilla extract, and salt and mix until combined
  3. Increase mixer to high speed and beat for 3 full minutes.
  4. Add more powdered sugar if frosting is too thin or more cream if frosting is too thick.
  5. Decorate brownies by using frosting to adhere the eyes and nose to the brownie. Stick 1/2 pretzel twist into each side of brownie for antlers


      Wednesday, October 5, 2016

      Monster Sandwich Cookies


      This is a sponsored post by Challenge Butter, but the text and opinions are all mine. Thank you for supporting brands that make Kylee's Kitchen possible!

      As I've said before, I love making themed treats! So last week when I made the cookie cake for Kristin, I was trying to figure out how I should use my leftover frosting and cookie dough! (I made a triple batch of each because I wasn't sure how much was needed for the cake)

      I landed on cookie-frosting sandwiches, but then when I saw these goofy candy eyes at the grocery store I got the idea to make monsters!

      I love how they turned out! Adorable! I gave a few to the neighbor kids and they loved them too.

      If you can't find candy eyes, you can just use M&Ms or even marshmallows. I know at my local grocery store, they sell regular white candy eyes all year round in the baking department.

      Also, I ended up making new frosting for these monster sandwich cookies after all because I wanted it a little creamier than the cookie cake frosting. The frosting recipe I used for the cookie cake is really good for that purpose because I needed it to be very dark so that it would stand out and I needed it to harden. But I didn't need that for the cookie sandwich. So I reduced the amount of confectioners' sugar (which makes your frosting stiffer) and I reduced the cocoa powder so it was more milk chocolatey.

      For this frosting recipe, I used European Style Unsalted Challenge butter. It's one of the newest Challenge products and it tastes just like you would imagine if you lived on the farm. It's so rich, and it creams really really well!


      Monster Sandwich Cookies
      Yield: Makes about 10 cookie sandwiches

      Ingredients
      For the chocolate chip cookies

      • 2 and 1/4 cups flour (281.25 grams)
      • 1 teaspoon baking soda
      • 3/4 cup Challenge salted butter, room temperature
      • 1 cup brown sugar (207 grams)
      • 1 (3.4 oz) package instant vanilla pudding
      • 2 eggs
      • 1 teaspoon vanilla
      • 1 cup semi-sweet chocolate chips
      • (Plus candy eyes and white chocolate chips for teeth)

      For the milk chocolate frosting

      • 1 cup (2 sticks) Challenge unsalted butter, softened to room temperature
      • 3 and 1/2 cups (441 grams) confectioners' sugar
      • 1/2 cup (50 grams) unsweetened cocoa powder
      • 1/4 teaspoon salt
      • 2 teaspoons pure vanilla extract
      • 3 Tablespoons milk
      Directions
      For the cookies

      1. Measure flour and baking soda in medium bowl. Combine and set aside.
      2. In large bowl, cream butter and brown sugar together until light and fuffy.
      3. Add instant vanilla pudding package and beat until well blended.
      4. Mix in eggs and vanilla.
      5. Slowly add flour mixture to butter mixture until just incorporated.
      6. Fold in chocolate chips with a spatula.
      7. Cover dough and chill in refrigerator for at least one hour.
      8. Remove dough from refrigerator.
      9. Preheat oven to 350 degrees Fahrenheit.
      10. Roll dough into balls (the size of 2 tablespoons) and place on greased baking sheet or silicone baking mat.
      11. Bake for 8 to 10 minutes.
      12. Remove from oven and cool on cookie sheet for several minutes before moving to a wire rack to cool completely.
       For the frosting

      1. With a handheld or stand mixer fitted with a paddle attachment, beat the butter on medium speed until creamy - about 2 minutes.
      2. Add the confectioners’ sugar, cocoa powder, salt, vanilla extract, and milk, beating on low speed after each addition.
      3. Once everything is added, beat on high speed until creamy for about 2 minutes.
      4. Spoon frosting into resealable plastic bag or piping bag. Cut 1/2 inch off one corner of bag, and pipe and ample amount of frosting on bottom of 1 cookie. 
      5. Place another cookie on top and press down at an angle so cookies look like an open mouth.
      6. Use extra frosting to attach candy eyes and place white chocolate chips in frosting to look like teeth.


      Pin It button on image hover