Showing posts with label halloween. Show all posts

Tuesday, October 10, 2023

Halloween pizzas


I promise the reason this pizza is black isn't because it was in the oven for too long! I purposely made the dough black with a very small amount of charcoal powder.

Food-grade activated charcoal powder is most commonly made by heating coconut shells to extremely high temperatures until they are completely burnt, according to Eater. Then the ash is processed with steam at extremely high temperatures. 

It is odorless and flavorless and was very popular across social media about six years ago because of its ability to turn foods a deep black hue. 

Important: Don't eat activated charcoal powder if you take medications because it can bind with those medications and cause them to be less effective, according to CNN.  Of course, you can skip it if you aren't comfortable using it or if you don't have any.


Some tips for making homemade pizza

  • A pizza stone makes the best crust, but if you don't have one, your next best bet is to use a cast iron skillet.
  • Cook the pizza in an oven as hot as your oven allows. My oven goes up to 500 degrees, but pizza ovens are around 800 degrees.
  • I recommend using bread flour because it has more gluten and protein than AP flour, which results in a denser, chewier crust. Pizza flour also exists, and it works well here, too, but it's a little harder to find.
  • If you can't find pizza yeast, use instant yeast, and allow the dough to rise in a covered bowl for 30 minutes after kneading it.

Halloween pumpkin pizzas

Yield: 4 personal pizzas

Time: About 30 minutes

Ingredients

For the pumpkin pizza sauce

  • 15 ounces pumpkin puree
  • 1/2 cup parmesan cheese, shredded
  • 2 cloves garlic, minced
  • 1 Tablespoon white wine vinegar
  • 1/4 teaspoon kosher salt
  • 1/4 teaspoon fresh ground black pepper

For the pizza dough

  • 2 cups (240 grams) bread flour (plus 1/4 cup reserved in case dough is too sticky)
  • 1 packet Fleischmann's Pizza Crust Yeast
  • 1 1/2 teaspoons sugar
  • 1 teaspoon salt
  • 3/4 teaspoon food-grade activated charcoal powder
  • 2/3 cups warm water (130 degrees Fahrenheit)
  • 3 Tablespoons olive oil

Possible toppings

  • Mozzarella medallions, cut into ghost shapes
  • Capers
  • Mozzarella pearls, cut in half 
  • Black olives, sliced
  • String cheese, pulled apart

Directions 

For the sauce

  1. Combine pumpkin puree, parmesan, garlic, vinegar, salt, and black pepper. Set aside.

For the pizza dough

  1. Preheat oven to 500 degrees Fahrenheit. If using pizza stone, place in oven while oven heats up.
  2. Combine flour, yeast, sugar, salt, and food-grade activated charcoal powder in bowl. Add water and oil and mix until it comes together. Dough should be a slightly sticky. If it's too sticky, add up to 1/4 cup additional bread flour.
  3. Knead dough for about 4 minutes until it is smooth and elastic. I prefer to use my hands.
  4. Divide dough into 4 equal pieces. Flatten and stretch dough with hands until each piece is about 8 inches in diameter. 
  5. Spread pumpkin pizza sauce on dough, place dough on pizza stone or onto baking sheet, and stick in oven. Bake for 5 minutes.
  6. Remove from oven. Place toppings on pizza. Return to oven just until cheese melts.
  7. Remove from oven and allow to cool before slicing.

For the toppings

  1. To make ghosts, place capers on mozzarella medallions to resemble eyes.
  2. To make eyeballs, place halved mozzarella pearls on sauce in pairs. Place black olive slices on center of pearls.
  3. To make spider web, place string cheese pieces in cross and X. Use string cheese pieces to make 2 giant circles on top of the cross and x. Make spiders with olives by using olive slices as the body and halved slices as the legs.


Sunday, October 30, 2022

Halloween hand pies


This is a sponsored post by Challenge butter, but the text and opinions are all mine. Thank you for supporting brands that make Kylee's Kitchen possible! 

I'm talking about hand pies two ways today with both a savory and sweet option. A hand pie is essentially just a mini pie that you can hold in your hand. You can make it with puff pastry or pie dough. The filling can be a homemade pie filling, or you can use store-bought ingredients to make a delicious treat.

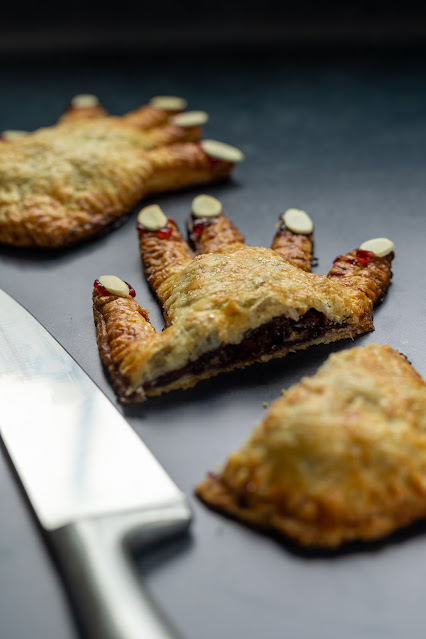
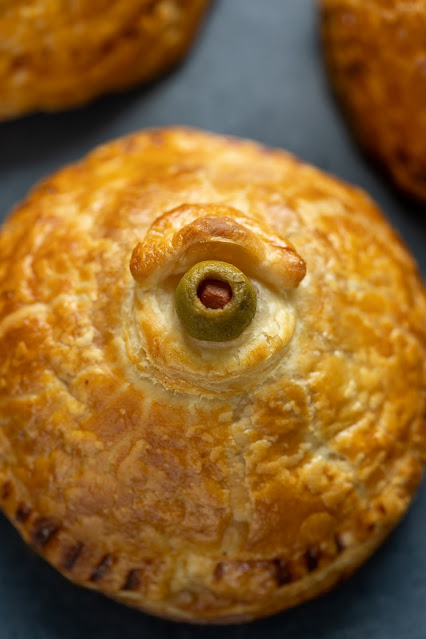
Since we're celebrating Halloween, I thought it would be fun to make hand pies in a super literal sense—pies with eyes (I wanted to spell it p-eyes, but I didn't think it would make sense) and pies shaped like hands!

You can use any type of filling, puff pastry, pie dough that you want. It's kind of like a "choose your own adventure" book. I like to buy my puff pastry and make my pie dough. Trader Joe's carries the best puff pastry, hands down (that's a Halloween hand pie joke)! It's seasonal, and they only carry it in the fall leading up to Christmas. So stock up while you can!


If you make the pie dough, it’s important to use good quality butter. It makes a tremendous difference in your final product. I use Challenge European Style Butter when I make pie dough. It’s churned slower and longer, in the tradition of fine European butters, to produce a more flavorful butter with less moisture and higher butterfat. 

A few more tips:

It's important to roll the pie dough out to 1/8-inch thick. If it’s too thick, the crust will be gummy and chewy, not flaky.

If you're using a fruit filling, you need to make a mealy pie crust. This means the butter pieces in the dough are the size of peas. Mealy pie dough is best for fruit pies because it is good at repelling moisture from liquid fillings. If your filling isn't very juicy, you can make a flaky pie crust. This means the butter pieces in the dough are the size of walnut halves.


Spinach artichoke hand pies

Yield: Makes 3 pies

Time: 1 hour

Ingredients

  • 1 sheet puff pastry
  • 3 slices prosciutto
  • 1/2 cup spinach artichoke dip
  • 3 green olives with pimentos, cut in half
  • Egg wash (1 egg mixed with 1 Tablespoon water)

Directions

  1. Preheat oven to 425 degrees Fahrenheit.
  2. Use circle cookie cutter or jar lid to create 6 large circles on puff pastry. Use end of piping tip or other small circle cutter to create 6 small circles. Fold 3 of the small circles in half.
  3. Place 3 large circles on baking sheet and brush egg wash around the edge. 
  4. Top each large circle with 1 piece prosciutto and add about 2 Tablespoons spinach artichoke dip on top of prosciutto.
  5. Cover with large circle and seal the edge using fork prongs.
  6. Add 1 small circle to center of hand pie. Place half green olive on top. Place folded small circle partly over olive so it looks like an eyelid. 
  7. Brush the pies with egg wash.
  8. Place in oven for 15 to 20 minutes, or until puff pastry is golden brown.
  9. Remove from oven and serve.
  10. Refrigerate leftover pies and eat within 3 days.


Warm-spiced cherry hand pies

Yield: Makes 2 hand pies

Time: About 90 minutes

Ingredients

For the filling

  • 1 cup cherries (thawed if frozen)
  • 2 Tablespoons granulated sugar
  • 1 teaspoon corn starch
  • 1 teaspoon Grand Marnier
  • 1/4 teaspoon ground cinnamon
  • 1/8 ground cloves
  • 1/8 teaspoon ground allspice

For the dough

  • 113 grams (8 tablespoons or 1 stick) Challenge European Style Unsalted Butter
  • 150 grams (1 1/4) cups all-purpose flour
  • 13 grams (1 Tablespoon) granulated sugar
  • 1 gram (1/4 teaspoon) kosher salt
  • 60 grams (1/4 cup ice water)
  • Egg wash (1 egg mixed with 1 Tablespoon water)
  • Optional: 1 Tablespoon cherry jam, 10 almond slices

Directions

For the filling

  1. Mix together all ingredients and set aside.

For the dough

  1. Cut butter into 1/2-inch cubes. Place in freezer for at least 20 minutes or until very cold.
  2. In large bowl, combine flour, sugar, and salt.
  3. Cut butter into flour mixture with pastry blender or food processor until butter is pea-sized.
  4. Make well in flour mixture and add water.
  5. Mix to create shaggy mixture then knead to form dough. If dough is too dry, add up to 2 Tablespoons additional ice water.
  6. Form dough into flat disc and wrap. Refrigerate for at least 30 minutes or up to 2 days.
  7. Once dough is chilled, preheat oven to 425 degrees Fahrenheit.
  8. Roll dough out on floured surface to 1/8-inch thick.
  9. Trace hand on wax paper or parchment paper and cut out with scissors. This will be your stencil.
  10. Place paper hand on pie dough and cut out with knife. Continue three more times so you have a total of 4 hands, gathering and re-rolling dough if necessary.
  11. Place 2 dough hands on baking sheet. Brush edges with egg wash.
  12. Put 1/4 to 1/2 cup cherry filling in center of each palm.
  13. Place a second hand on top of each of the hands. Use a fork to crimp the edges.
  14. Brush the hands with egg wash, sprinkle with additional granulated sugar if desired, and place in oven.
  15. Bake for 15 to 20 minutes, or until pie dough is golden brown. Remove from oven.
  16. Spread small amount of jam onto each fingertip. Place almond slice on jam so it looks like nails.
  17. Serve immediately. Store leftovers at room temperature. Eat hand pies within 3 days.


Tuesday, October 26, 2021

Zombie Brownie Cake


This is a sponsored post by Challenge butter, but the text and opinions are all mine. Thank you for supporting brands that make Kylee's Kitchen possible! 

Halloween-themed food is my absolute favorite because I just think it's so much fun. I've done my fair share of a variety of cute and creepy treats over the years, although some people, like my friends and family who are supposed to support me no matter what, think I take it a little too far (remember that amputated hand appetizer?)

This zombie brownie cake is my compromise--not necessarily cute, but not so creepy that it will haunt you in your sleep. Most importantly though, it's incredibly tasty.

I start with my favorite homemade brownie recipe. Yes, you can use a box mix, but I much prefer the taste of this recipe. It's thick and fudgey with the perfect crackly top. The recipe starts by melting salted Challenge butter in the microwave. Challenge butter is the only butter I will use because it’s churned daily from two natural ingredients: the freshest 100% real pasteurized sweet cream and salt. That’s it. There's nothing artificial or synthetic about it, and you can really taste the difference. The recipe also uses dark chocolate, which I much prefer over cocoa powder. The other key ingredient is a little bit of espresso powder to amplify the chocolate flavor and make it more intense.

To make the moss on top of the brownie, all I did was dye sugar cookie dough green and place the cookies on top. I also crumbled some of the cookies to add to the effect. And the zombie fingers couldn't be easier. They're just Tootsie Rolls!


Zombie Brownie Cake

Yield: 12 servings

Ingredients

For the brownie

  • 2 sticks (8 ounces) salted Challenge butter
  • 10 ounces (283 grams) dark chocolate, chopped
  • 4 large eggs (8 ounces)
  • 2 cups (396 grams) granulated sugar
  • 1 Tablespoon (14 grams) vanilla extract
  • 2 teaspoons (4.5 grams) espresso powder
  • 2 cups (240 grams) all-purpose flour

For the moss

  • 8 ounces sugar cookie dough
  • Green food coloring

For the zombie fingers

  • 5 Tootsie Roll snack size candies
  • 5 almond slivers
  • 5 toothpicks

Directions

For the brownie

  1. Preheat oven to 35o degrees Fahrenheit. Prepare 8-inch cake pan by spraying with nonstick spray, lining with parchment paper circle, and spraying with nonstick spray again.
  2. Melt butter in microwave.
  3. Add chocolate and whisk until melted. If chocolate doesn’t melt all the way, heat in microwave 10 more seconds.
  4. Whisk eggs in separate bowl. Add sugar, vanilla extract, and espresso powder, and whisk until smooth.
  5. Whisk into melted butter-chocolate mixture.
  6. Fold flour into liquid ingredients until just combined.
  7. Bake at 350 for 30 - 35 minutes

For the moss

  1. Mix the sugar cookie dough with green food coloring until dough is uniform in color.
  2. Spread dough in various irregular shapes on baking sheet, making sure to leave room between each cookie.
  3. Bake at 350 for 10 to 12 minutes, or until the edges start to turn golden brown.
  4. Remove from oven and let cool.

For the zombie fingers

  1. Mold and stretch the Tootsie Rolls so they resemble fingers and stick toothpicks at the end of each finger. Remember, each finger / thumb is a different size.
  2. Place one almond sliver at the end of each Tootsie Roll so it resembles a nail

Assembly

  1. Remove brownie from cake pan and place on serving platter.
  2. Stick zombie fingers in brownie with toothpicks so it looks like a hand is coming out of the ground.
  3. Arrange green sugar cookies bottom side up around fingers on top of brownie. Once you have enough cookies covering the brownie, crumble a few of the remaining cookies and sprinkle on top to resemble moss.


Tuesday, October 27, 2020

Spaghetti and meatball eyeballs


About a year ago, I saw squid ink pasta for sale at Trader Joe’s, and I thought to myself, “This would be perfect for Halloween!” I didn’t know what I was going to do with the pasta, but I knew I needed to find a use for it. 

Finally, it’s making its debut as the perfect accompaniment to meatball eyeballs.

This super simple and spooky dinner would be perfect to serve on Halloween night. Of course, if you prefer to use your favorite meatball or spaghetti recipe, that’s perfectly fine! 


Spaghetti and meatball eyeballs

Yield: Makes about 12 meatballs

Ingredients

For the sauce

  • 2 Tablespoons olive oil
  • 4 ounces onion, small dice
  • 2 garlic cloves, minced
  • 56 ounces crushed tomatoes
  • 1 bay leaf
  • 1 teaspoon salt
  • 1 teaspoon oregano
  • 1/2 teaspoon black pepper

For the meatballs

  • 1 egg
  • 1/4 cup parmesan cheese, grated
  • 1 garlic clove, minced
  • 1 teaspoon salt
  • 1/2 teaspoon black pepper
  • 1/2 teaspoon red pepper flakes
  • 1 pound ground beef
  • 1/4 cup bread crumbs
  • 12 slices mozzarella cheese
  • 12 olive slices
  • 12 candy eyes

Other Ingredients

  • 1 pound squid ink pasta (or spaghetti), cooked

Directions

For the sauce

  1. Heat oil in saucepan over medium heat and add onion. 
  2. Cook, stirring often, until onion begins to brown slightly, or about 5 minutes.
  3. Add garlic and cook about 1 minute.
  4. Add tomatoes, bay leaf, salt, oregano, and black pepper.
  5. Bring to boil and reduce to simmer, stirring often, until sauce reduces slightly, about 30 minutes.
  6. Make meatballs while sauce simmers.

For the meatballs

  1. Preheat oven to 400 degrees Fahrenheit. Line baking sheet that has raised edges with aluminum foil and set aside.
  2. Combine egg, parmesan cheese, garlic, salt, black pepper, and red pepper flakes in medium-sized bowl.
  3. Add ground beef to bowl and use hands to mix ingredients.
  4. Add breadcrumbs to beef mixture and mix until just combined.
  5. Use hands to form 1 1/2-inch meatballs and place onto baking sheet.
  6. Bake until cooked through, about 18-22 minutes. 
  7. Remove baking sheet from oven and place cheese slice on top of each meatball.
  8. Return to oven for 2 to 3 minutes, or until cheese slice is melted.
  9. Remove from oven and place olive slice on top of each cheese slice.
  10. Place candy eye in center of each olive slice.

Assemble

  1. Plate desired amount of pasta with about 1/2 cup sauce and 2 meatballs.


Monday, October 26, 2020

Bloodshot Eyeball S'mores Bars

This is a sponsored post by Challenge, but the text and opinions are all mine. Thank you for supporting brands that make Kylee's Kitchen possible!

These s'mores bars may very well be the easiest dessert I've ever made. The graham cracker crust requires one bowl and a spoon for mixing; everything else gets layered in an 8-inch square pan.

S'mores bars would be a delicious dessert for any time of year, but they are especially fun to turn into a spooky treat for Halloween. I'm not sure what made me think to turn marshmallows into bloodshot eyes, but I guess that's where my mind is right now.

I used Wilton Red Sparkle Gel to create the squiggly bloodshot lines, and then I stuck colored candy eyeballs on top. If you can't find the gel, use any type of red icing. You can find candy eyeballs in the baking section of most grocery stores this time of year, but if you have issues finding them, use an M&M or a Spree and draw a little black pupil on the candy with an edible marker.

You could also adapt this recipe for winter and draw snowman faces on the marshmallows.

Because this recipe has so few ingredients, it's important to make sure everything you use is of the best quality. For example, I used Challenge butter because they use fresh, hormone-free milk, and they don't add any unnatural additives which results in a superior product.

Bloodshot Eyeball S'mores Bars

Yield: One 8 x 8-inch dish, about 20 bars

Ingredients

  • 1/2 cup (1 stick) unsalted Challenge butter, melted
  • 3/4 cup (150 grams) brown sugar
  • 1 egg
  • 1 teaspoon vanilla extract
  • 1 1/4 cup (150 grams) all-purpose flour 
  • 1 cup (100 grams) graham cracker crumbs 
  • 1 teaspoon baking powder
  • 1/2 teaspoon salt
  • 2 king size chocolate bars (milk or dark chocolate, 7 ounces each)
  • 20 marshmallows or 10 jumbo marshmallows cut in half
  • Wilton Red Sparkle Gel or other cookie icing
  • Candy eyes

Directions 

  1. Preheat oven to 350 degrees Fahrenheit; butter 8 x 8-inch pan and line with parchment paper. Butter parchment paper.
  2. Mix butter with brown sugar, egg, and vanilla extract. Stir in flour, graham cracker crumbs, baking powder, and salt.
  3. Spread evenly into prepared pan and smooth top. Bake for 18 to 20 minutes on middle rack.
  4. Cover top with chocolate bars and return to oven for about 1 to 2 minutes, or until chocolate just starts to melt.
  5. Remove from oven and top with marshmallows.
  6. Set oven to low broil. Return pan to oven for 1 to 2 minutes or until marshmallows start to turn golden brown. Watch marshmallows carefully to ensure they don't burn.
  7. Remove from oven and cool.
  8. Decorate marshmallows with red gel in squiggly lines to resemble bloodshot eyes. Place candy eyes in center. Allow icing to set before removing from pan. 
  9. Cut into bars and serve.


Saturday, October 26, 2019

"Bloody Finger" Hot Dogs for Halloween


I recently did a "finger foods" segment on FOX59. Even though it incorporated foods you can eat with your fingers, it was actually a play on words because all the food looked like fingers. I thought it would be so funny for Halloween! I think my coworkers were a little weirded out at first, but I thought it was hilarious!

I knew hot dogs turned into "bloody fingers" would be the perfect addition to the segment.

I've actually been creating hot dog "art" for years. When I was in high school, I babysat for a family with four young children. To be honest, I'm not entirely sure why they trusted me with so many young children—probably because I was cheap. Anyway, they requested hot dogs for dinner every time I was there babysitter. One time, I decided to cut the ends of the hot dogs so it looked like an octopus' tentacles, and they thought it was the funniest thing! Then they started to request more complex animals like giraffes and elephants. I tried my best, and even though they didn't turn out great, the kids still loved them.

I channeled my inner hot dog artist skills for these fingers. They're very easy to make (much simpler than giraffes and elephants)--just cut a square sliver near the top for the nail bed and several arced slits for your finger joints. Make sure you do this before cooking the hot dogs because once you boil them the slits will open up.

Bloody finger hot dogs
Ingredients
  • Hot dogs
  • Hot dog buns
  • Ketchup
Directions
  1. Make the finger beds by using a sharp paring knife to slice the two sides straight down and the top and bottom with a slight arc. The carefully cut the tiny piece off.
  2. Make the knuckles by cutting arced slits, directly above and below each other, about a third of the way down the hot dog. Do the same thing in the middle of the hot dog and a third of the way from the bottom of the hot dog.
  3. Boil the hot dogs for 2 to 3 minutes.
  4. Load a hot dog bun up with lots of ketchup and place a hot dog inside the bun. Add more ketchup on top of the bottom of the finger. Repeat with remaining hot dogs.


Thursday, October 24, 2019

Amputated hand appetizer is really a tomato basil and prosciutto cheese ball


This is a sponsored post by Challenge butter, but the text and opinions are all mine. Thank you for supporting brands that make Kylee's Kitchen possible!

I love the way this cheese ball turned out! It looks so freaky, but also, it’s still really delicious.
I cut up a rubber hand prop to use as a mold (this is the exact one), but if that’s unavailable to you, you can just mold the mixture into a hand shape.

Amputated hand cheese ball
Ingredients
  • 8 ounces Challenge cream cheese, softened
  • 1 cup shredded mozzarella cheese
  • 1/2 cup shredded parmesan cheese
  • 1/4 cup sundried tomatoes, chopped
  • 2 teaspoons basil, dried or fresh
  • 1 1/2 teaspoons garlic powder
  • 4 ounces prosciutto
Directions
  1. Combine cream cheese, mozzarella cheese, and parmesan cheese.
  2. Mix in sundried tomatoes, basil, and garlic powder.
  3. Cut a rubber hand Halloween prop in half to use as a mold. Wash the prop and spray with nonstick cooking spray.
  4. Carefully spread the cheese ball mixture in the hand mold. When the hand is full, gently pack down the mixture. There should be some mixture leftover. Save it!
  5. Place in freezer for 10 to 20 minutes to firm the cheese ball.
  6. Gently peel the rubber hand mold away from the cheese ball and place on plate.
  7. Use leftover cheese mixture to fix any fingers that may have become detached from the hand.
  8. Cover the hand with prosciutto.
  9. Serve with crackers and a cheese knife through the middle of the hand for an added freaky effect.


Thursday, October 3, 2019

Cheesy Graveyard Taco Dip


This is a sponsored post by Challenge butter, but the text and opinions are all mine. Thank you for supporting brands that make Kylee's Kitchen possible!

Cheesy Graveyard Taco Dip
Ingredients
  • 8 ounces Challenge cream cheese, softened
  • 1 cup shredded Mexican cheese
  • 1 (1 ounce) envelope of taco seasoning 
  • 1 pound ground beef, cooked and fat drained
  • 1 (10 ounce) can diced tomatoes, drained
  • 1 (15 ounce) can black beans, drained and rinsed
  • 2 cups salsa
  • 1/4 cup green onions, chopped (optional) 
  • 1/4 cup cilantro, chopped (optional)
  • Tortillas
  • Black edible marker (like this one)
Directions
  1. Mix together cream cheese, Mexican cheese, and taco seasoning
  2. Stir in ground beef, diced tomatoes, and black beans
  3. Prepare 8×8-inch baking dish with nonstick cooking spray. Transfer mixture to dish and smooth the surface
  4. Evenly spread salsa on top. 
  5. Bake at 350 degrees Fahrenheit for 20 minutes
  6. While dip is baking, cut tortillas into tombstones, ghosts, and trees
  7. Place shapes onto baking sheet and bake at 350 degrees Fahrenheit for 5 minutes
  8. Remove dip from oven and sprinkle with green onions and cilantro.
  9. Use black edible marker to write on tortilla tombstones and stick them upright into dip so it looks like a graveyard.
  10. Serve with tortilla chips.
Idea for graveyard dip inspired by The Chickabug Blog


Tuesday, October 30, 2018

Bloody Zombie Guts (cinnamon rolls + cherry pie filling) are a gore-met dessert


This is a sponsored post by Challenge Butter, but the text and opinions are all mine. Thank you for supporting brands that make Kylee's Kitchen possible!

Is there zombodie who you would truly like to frighten? Serve up these gore-met Zombie Guts! This dessert is so easy to make, it's ghoulproof!

Bloody Zombie Guts
Ingredients
  • 1 (21 ounce) can cherry pie filling
  • 2 cans jumbo cinnamon rolls (save icing for later)
  • 3 Tablespoons Challenge butter, melted
  • Red food coloring
Directions
  1. Preheat oven to 350 degrees Fahrenheit.
  2. Spoon half of your can of cherry pie filling into the bottom of a 13 x 9-inch pan 
  3. Remove cinnamon rolls from can. Unravel each of the cinnamon rolls so they resemble a long rope.
  4. Bend the unraveled dough around each other in the pan so they resemble intestines.
  5. Brush melted butter on top of rolls and bake for 16 minutes or until the rolls start to turn golden brown.
  6. While it’s baking, mix together icing from cinnamon roll packs, the remaining cherry pie filling, and a few drops of red food coloring.
  7. Remove cinnamon rolls from oven and spoon icing mixture on top before serving.


Thursday, October 25, 2018

Halloween treats to die for!


This week I was planning on creating another fun Halloween recipe, but instead I went on vacation, had too much fun, and didn't do any school work. So I had a LOT to catch up on when I returned home. I regret nothing though! I went to Mackinac Island to plan my wedding! I'm getting married there in June! Mackinac Island is very near and dear to my heart. I'm actually planning on making a travel guide soon. In the meantime, I want to share an "engagement photo" taken on the top of Arch Rock by my dad. It's one of my favorite places on the island!


Now back to Halloween... I'm still planning on sharing one more recipe before the big day next week, but until then here are a few of my favorites from years past!

Red Velvet Brain Dip


Pumpkin Macarons


Monster Sandwich Cookies


Mummy Pumpkin Cheesecake Truffles


Shattered Glass Cupcakes


Shrunken Head Punch

Tuesday, October 16, 2018

Red Velvet "Cauldron Cookies"


This is a sponsored post by Challenge Butter, but the text and opinions are all mine. Thank you for supporting brands that make Kylee's Kitchen possible!

I'm honestly not sure why I love Halloween so much. Maybe because it was so much fun for me when I was a child. My neighbor Melanie would make handmade matching costumes for me and her two sons, and we would spend hours walking to every single house in the neighborhood. It was my favorite night of the year. I don’t think we had specific trick-or-treating hours like most cities in Indiana have now. We had to put together a list of trick-or-treating times for our FOX59 and CBS4 websites last week, and some of the towns only allow trick-or-treating for and hour and a half. That’s ridiculous! I feel bad for those kids!

I currently don’t live in a neighborhood where I can hand out candy, and I don’t know any young children who would allow me to follow along while they trick-or-treat. But that doesn’t make Halloween any less exciting for me. Halloween encompasses a lot of different themes: goofy, scary, cute, etc. And it’s all about having fun!

Each year, I try to make my Halloween treats some of my most creative recipes! A few weeks ago I had an idea to make cookies that were black on the outside and red on the inside. I came up with the idea after seeing this recipe for “Brimstone Bread.” It looks so cool, right?! I love how the black cracks so you see little peeks of red on the inside. I thought about how to do the same thing with a cookie for about a week before the idea came to me just in the nick of time: crinkle cookies rolled in black powdered sugar!

I’m sure many of you are familiar with crinkle cookies. They’re very popular around Christmas time. Essentially, it’s a cookie rolled in powdered sugar, but it gets it’s name because it cracks on top.

I started out by making red velvet cookies using red velvet cake mix. If you have a favorite “made-from-scratch” red velvet crinkle cookie recipe, by all means use that! But I use a box mix because it’s a heck of a lot easier, and we’re going to be rolling them in powdered sugar anyway.

So here’s the deal: as mentioned before, we’re going to roll the dough balls in powdered sugar before baking them, but before we do that, I recommend first rolling them in granulated sugar. The reason being is that the black powdered sugar is an essential part of how the cookie looks at the end, so we want as much of it to stay on the outside of the cookie as possible. The problem is a lot off the time the powdered sugar is soaked up by the fat in the cookie when it bakes, so it disappears for the most part. By rolling the dough in the granulated sugar first, we are creating a barrier between the cookie and the powdered sugar which will help it stay on the outside of the cookie better. I even took it one step further, and I rolled my cookies in black sanding sugar (it looks like black sprinkles) to ensure the effect I wanted was achieved.

After rolling the dough in granulated sugar comes the powdered sugar, of course. But not just any powdered sugar, black powdered sugar. It’s very easy to make! Just blend about a half cup of powdered sugar with gel black food coloring in a food process until it starts to turn black. If it won’t get any blacker, add a little cocoa powder if you want to enhance the effect. Don’t add too much cocoa powder, though, because you don’t want to change the taste of the cookie!

That’s all there is to it! Bake about 10 to 12 minutes until the cookies are just barely set. The black powdered sugar does get your fingers a little messy, but it’s totally worth it!

Also, in case you’re curious, I’m calling them cauldron cookies because I think they look like hot coals burning under a cauldron!

Red Velvet “Cauldron Cookies”
Yield: Makes about 2 dozen cookies
Ingredients
  • 1 (15.25 ounce) box red velvet cake mix
  • 6 tablespoons Challenge butter, melted
  • 2 eggs
  • 1 teaspoon vanilla extract
  • 2/3 cup powdered sugar
  • Black gel food coloring
  • 1/3 cup granulated sugar (or black sanding sugar)
Directions
  1. Preheat oven to 350 degrees Fahrenheit
  2. In a large bowl, combine red velvet cake mix, butter, eggs, and vanilla extract. Put in the refrigerator for about 10 minutes so the dough is easier to work with.
Add powdered sugar and black food coloring to food processor and pulse until the powdered sugar starts to turn black. It will probably turn more gray than black, but that’s okay. You can add cocoa powder in 1 Tablespoon increments if you want the color to be a little deeper.
  3. Place the powder sugar and granulated sugar in separate, shallow dishes.
  4. Scoop out a 1-inch diameter ball of dough. Roll it in the sugar to coat before transferring it to the powdered sugar and rolling to coat. 
  5. Place dough on baking sheet and bake 10 to 12 minutes until cookies are just barely set. 
  6. Remove cookies from oven and let cool before serving.


Pin It button on image hover