Showing posts with label Cheesecake. Show all posts

Thursday, August 8, 2024

Triple Chocolate No-Bake Cheesecake

This is a sponsored post by Challenge Butter, but the text and opinions are all mine. Thank you for supporting brands that make Kylee's Kitchen possible! 

Cheesecake isn't a complicated dessert, but sometimes it's just a little more effort than I care to make.

No-bake cheesecake has entered the chat.

So what's the difference between standard cheesecake and no-bake cheesecake? 

Regular cheesecake is firm and can be quite dense. It's a custard that uses eggs to help set it when it's baked in the oven. No-bake cheesecake is more of a mousse with a lighter, almost whipped texture. There are no eggs, so it uses other means to help set it, like gelatin or whipped cream.

Another bonus: Because we're not baking the cheesecake, it's pretty much foolproof. We don't have to worry about a water bath or over-baking it or under-baking it or it cracking in the middle.

This particular cheesecake recipe is for ultimate chocolate fans. It starts with a chocolate Oreo crust; the filling includes both black cocoa powder and melted dark chocolate; and I top it all off with a dark chocolate ganache.


Let's talk about the crust...

There are two ingredients: regular Oreos and butter. The Oreo filling plus the butter allow for the crust to stick together without baking. If you use cookies without cream filling, you will have to increase the amount of butter in the recipe. The texture should be comparable to wet sand and stick together in your hands. I use Challenge Unsalted Butter in my crust recipe. Using high-quality butter, like Challenge, has a big impact on the crust flavor. 

Now for the filling...

The first thing we want to do is make the cream cheese ultra smooth. The best way to do this is to beat it with granulated sugar. The granules in the sugar break down the cream cheese. 

Then we add the next three ingredients: sour cream, back cocoa powder, and vanilla bean paste. Sour cream contributes to tanginess; black cocoa powder adds extra depth to the chocolate flavor, but you can omit or substitute with Dutch-processed cocoa powder; and vanilla extract balances the flavors.

The dark chocolate is next. You want to heat it in short increments to prevent it from burning. If it's really hot, let it cool off for a few minutes before adding it to the filling. Don't let it cool to room temperature though because then it may harden once it's mixed with the other ingredients.

The last ingredient is heavy cream. Some recipes will advise you to whip the heavy cream first and then fold it into the filling, but in my experience, that isn't necessary. Save yourself from cleaning an extra bowl and add it straight to the mixer.

Last is the topping...

I went all in on chocolate and topped the cheesecake with a chocolate ganache. The recipe is as simple as chopping chocolate, pouring heated cream over the chocolate, letting the mixture sit for 5 minutes, and stirring it.


The hardest part of the recipe...

Waiting for the cheesecake to set up is without a doubt the hardest part of the recipe! It would probably be ready to slice into after four hours, but I prefer to wait six hours to be extra sure.

When you cut into it, I recommend running your knife under hot water and wiping the knife clean after every cut to ensure clean slices.


Triple Chocolate No-Bake Cheesecake

Yield: About 12 servings (9-inch cheesecake)

Prep time: About 30 minutes

Chill time: At least 4 hours

Ingredients

For the crust

For the cheesecake filling

  • 24 ounces (681 grams) cream cheese, full fat
  • 1 cup (200 grams) granulated sugar
  • 1/2 cup (120 grams) sour cream, full fat
  • 2 Tablespoons (10 grams) black cocoa powder
  • 2 teaspoons vanilla extract
  • 10 ounces (300 grams) dark chocolate, chopped (preferably around 60% cacao)
  • 1/2 cup (120 milliliters) heavy cream

For the ganache topping

  • 4 ounces (114 grams) dark chocolate, chopped (preferably around 60% cacao)
  • 4 ounces (120 milliliters) heavy cream

Directions

For the crust

  1. Line bottom of 9-inch springform pan with parchment paper. Set aside.
  2. Add Oreos to food processor and pulse until cookies are fine crumbs.
  3. Melt butter in microwave and add to food processor. Pulse until mixture resembles wet sand.
  4. Press crust mixture evenly into bottom and 1 inch up sides of springform pan.
  5. Use bottom of cup to smooth and pack down crust into even layer.
  6. Place crust in freezer while preparing filling.

For the cheesecake filling

  1. In large bowl with mixer, beat cream cheese and sugar on medium speed until smooth and creamy, about 2-3 minutes.
  2. Add sour cream, black cocoa powder, and vanilla extract. Beat another 2-3 minutes on medium-high speed until smooth. Set aside.
  3. Add chocolate to heatproof bowl and microwave 1 minute. Stir chocolate and return to microwave for 30 seconds. Stir again. If chocolate is mostly melted, set aside for several minutes to cool. If not, repeat process until chocolate is smooth.
  4. Pour chocolate into mixing bowl and beat on medium-high speed until filling is light and fluffy, about 1-2 minutes.
  5. Add heavy cream to bowl and beat on low speed until filling is well mixed, about 1 minute.
  6. Pour filling into crust and smooth into even layer.
  7. Cover cheesecake with plastic wrap or aluminum foil and refrigerate at least 4 hours but preferably overnight.

For tha ganache

  1. Place chocolate in heatproof bowl.
  2. Heat cream in microwave in 30-second intervals until it starts to steam and you see a few bubbles around the edge.
  3. Pour cream over chocolate and let sit 5-10 minutes. 
  4. Stir cream and chocolate together until smooth.
  5. Starting in center, pour ganache over cheesecake and use spatula to carefully spread ganache over cheesecake.
  6. Place cheesecake back in refrigerator for at least 10 minutes to allow ganache to set.
  7. When ready to serve, run knife under really hot water and dry before slicing. Repeat the process with every slice.
  8. Cover and store leftover cheesecake in refrigerator for up to 4 days.


Monday, April 3, 2023

Strawberry cheesecake-filled bunnies


I filled hollow chocolate bunnies with delicious strawberry cheesecake. I used both fresh and freeze-dried strawberries for maximum flavor. Everything goes in the blender which makes it super easy. You can fill the bunnies by cutting off the ears or by making a small hole on its underside. I like cutting the ears so guests can see the filling. 

Strawberry cheesecake-filled bunnies

Yield: Makes enough filling for 7 (3.5 ounce) chocolate bunnies

Time: 10 minutes active, 3 hours waiting

Ingredients

  • Hollow chocolate bunnies
  • 0.5 pounds strawberries, hulled
  • 60 grams (1/2 cup) confectioners' sugar
  • 0.5 ounces freeze-dried strawberries
  • 4 ounces cream cheese, softened
  • 4 ounces coconut cream
  • 4 ounces sour cream
  • 3.5 grams (1/2 packet) unflavored gelatin
  • 2 Tablespoons cold water

Directions

  1. Heat sharp paring knife under warm water. Cut off bunnies' ears as close to top as possible.
  2. Add strawberries to blender and puree until smooth. Pour puree into another bowl and set aside.
  3. Blend confectioners' sugar and freeze-dried strawberries. Add cream cheese and blend until smooth, scraping sides as needed.
  4. Add coconut cream and blend several minutes on high speed until fluffy. Reduce speed to low and add sour cream. Return strawberry puree to blender and mix just until combined.
  5. Sprinkle gelatin over water and bloom for 5 minutes, or until gelatin has absorbed all water.
  6. Microwave gelatin for 30 seconds, stirring every 10 seconds. It should look like clear liquid. Slowly add into blender mixture on low speed.
  7. Use funnel to pour cheesecake mixture into cavity of hollow chocolate bunnies.
  8. Transfer bunnies to refrigerator in upright position. Allow cheesecake mixture to set for several hours before serving.


Monday, November 21, 2022

Golden sweet potato cheesecake


This is a sponsored post by Challenge butter, but the text and opinions are all mine. Thank you for supporting brands that make Kylee's Kitchen possible! 

If we are what we eat, I yam a sweet potato. I would be perfectly content eating sweet potatoes every single day. In fact, I did that after I graduated while I was trying to save money. And I still love them! I could eat them in any way, shape or form. But I have to say this sweet potato cheesecake tops the list.


For some reason, everything tastes better to me when someone else makes it. I never get as much satisfaction eating something I've created. This cheesecake is the exception. I was blown away the moment I sampled the filling. It's so incredibly flavorful. And the sour cream topping adds the perfect tang to balance out the sweetness. Also, the turmeric gives it a really beautiful golden color.


The crust couldn't be easier to make. The combination of gingersnap cookies, butter, sugar, and salt comes together quickly in the food processor. It's important to use good quality butter in your crust. I use Challenge unsalted butter because it's 100% real cream butter. It doesn't have any artificial or synthetic ingredients. You may wonder why I use unsalted butter since salt is on the ingredients list, but I always use unsalted butter so I have greater control over the flavor.


You can make this cheesecake up to three days in advance/ I recommend making it ASAP so you don't have to worry about trying to fit it in on Thanksgiving. You can also freeze it up to a month ahead of time.


Golden Sweet Potato Cheesecake

Yield: Makes 1, 9" cheesecake
Time: About 1 hour 15 minutes

Ingredients
For the crust
  • 255 grams (9 oz) gingersnap cookies
  • 114 grams (1 stick) Challenge unsalted butter, melted
  • 25 grams (2 tablespoons) granulated sugar
  • 1/2 teaspoon kosher salt
For the filling
  • 1 (8-ounce) block cream cheese, softened
  • 133 grams (2/3 cup) white sugar
  • 71 grams (1/3 cup) brown sugar
  • 14 grams (1 Tablespoon) fresh ginger, grated
  • 1 1/2 teaspoons ground cinnamon
  • 1/2 teaspoon ground cardamom
  • 1/2 teaspoon kosher salt
  • 1/2 teaspoon vanilla extract
  • 16 ounces sweet potato flesh (no skin)
  • 2 large eggs
For the topping
  • 1 cup sour cream
  • 50 grams (1/4 cup) granulated sugar
  • 1/4 teaspoon ground turmeric
  • Optional: Candied pecans, crystallized ginger for topping
Directions
For the crust
  1. Preheat oven to 350 degrees Fahrenheit. Spray 9 1/2-inch pie dish with nonstick spray. Set aside.
  2. Pulse gingersnap cookies in food processor. Add butter, sugar, and salt and pulse until it resembles wet sand.
  3. Dump into pie plate and spread in even layer, making sure to press up sides. Bake until firm to touch, about 12 minutes.
  4. Remove from oven and turn heat to 325 degrees Fahrenheit.
For the filling
  1. Beat cream cheese and both sugars with electric mixer until no lumps remain.
  2. Scrape bowl and add ginger, cinnamon, cardamom, salt, and vanilla extract. Beat until smooth, scraping sides of bowl as needed.
  3. Add sweet potato and beat until smooth.
  4. Add eggs and beat until just combined.
  5. Pour filling into crust and spread in even layer. Bake until edges are set but center is still a bit jiggly, about 45 to 50 minutes. Remove from oven.
For the topping
  1. While cheesecake is baking, mix sour cream, sugar, and turmeric.
  2. Spread topping over baked cheesecake while it's still hot, Return to oven for 5 minutes.
  3. Cool cheesecake on wire rack and refrigerate for at least 2 hours before serving.
  4. Top with candied pecan pieces and slices of crystallized ginger before serving.

Friday, April 22, 2022

Earth Day Parfaits


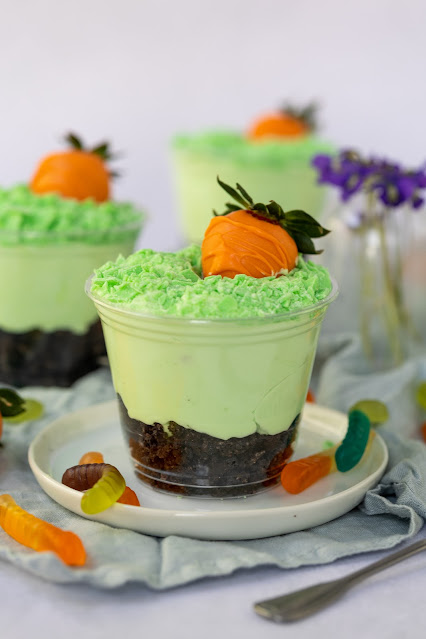
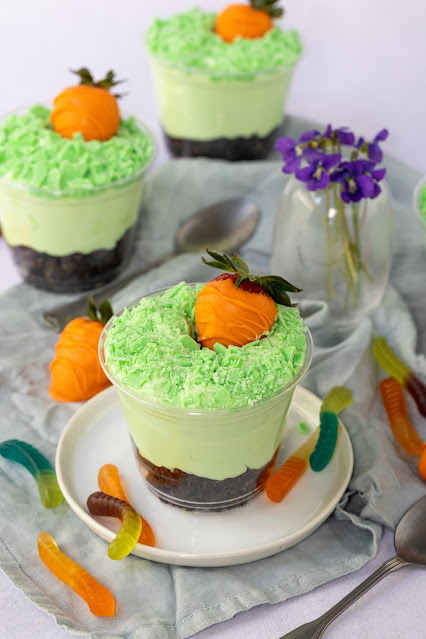
I like to call these Earth Day parfaits the grownup version of dirt pudding. It has a chocolate cookie crust, pistachio cheesecake filling, and tasty decorations like white chocolate shavings, sprinkles, chocolate-covered strawberries, and gummy worms.


It's a simple, no-bake recipe, which of course I'm a big fan of. However, I want to point out the importance of following the directions with the heavy whipping cream. If you try to incorporate it without first whipping it, your cheesecake filling will be the consistency of toothpaste, which is especially gross in this recipe since the mixture is already green. 


But when you whip the heavy cream, you incorporate air into the mixture, and it will ultimately become whipped cream. That makes our result light and creamy. You could, of course, substitute store-bought whipped topping, but I guarantee it won't taste nearly as good. 


The decorations can be as elaborate or as simple as you want. I dyed white chocolate green and broke it up into little pieces for grass in the examples pictured in this post. I also dipped strawberries into orange candy melts so they looked like carrots. But if you want to do the bare minimum, you can just top your pistachio cheesecake filling with gummy worms.

Earth Day Parfaits

Yield: Makes about 8 parfaits

Time: About 1 hour

Ingredients

For the chocolate cookie crust

  • 1 (14.3 ounce) package chocolate sandwich cookies
  • 4 ounces butter, melted

For the pistachio cheesecake filling

  • 1/2 cup (240 milliliters) heavy cream
  • 8 ounces cream cheese, room temperature
  • 1 (3.4 ounce) package instant pistachio pudding mix
  • 1/2 cup (57 grams) confectioners sugar
  • 1/4 cup (50 grams) granulated sugar
  • 1 teaspoons vanilla extract
  • 1/4 teaspoon kosher salt
  • Optional: Gummy worms, orange chocolate-dipped strawberries, green sprinkles, green dyed white chocolate shavings, shredded coconut dyed green

Directions 

For the chocolate cookie crust

  1. Crush chocolate sandwich cookies in food processor or sealed bag.
  2. Mix with melted butter.
  3. Evenly distribute mixture amongst 8 cups.

For the pistachio cheesecake filling

  1. Whip heavy cream into stiff peaks on high speed, about 2 - 3 minutes. Set aside.
  2. Cream cream cheese on medium speed with pudding mix, both sugars, vanilla extract, and salt until smooth.
  3. Use spatula to slowly and gently fold whipped cream into pistachio mixture.
  4. Spoon pistachio cheesecake mix over chocolate cookie crumbs.
  5. Decorate tops of parfaits with gummy worms, orange chocolate-dipped strawberries, green sprinkles, white chocolate shavings, etc.


Monday, July 29, 2019

Goat Cheese Cheesecake


This is a sponsored post by Challenge butter, but the text and opinions are all mine. Thank you for supporting brands that make Kylee's Kitchen possible!

I love goat cheese with everything. Until this point, I’ve only used it in salads and as an appetizer with crackers, but I’ve been dreaming about pairing it with something sweet. 

I imagined a light, creamy dessert with fruit, and thus this no-bake goat cheese cheesecake was born.

I understand that the goat cheese can be a huge turnoff for people, and it’s not likely that I will convince you otherwise in this post. But at least let me tell you why goat cheese works in cheesecake.

First, the composition of goat cheese differs slightly from cheese from cows. Goat cheese has a lower concentration of milk protein which gives it a smoother, creamier texture, and it has a higher composition of fatty acids which makes it slightly tangy. 

The subtle tang and acidity from the goat cheese takes this cheesecake from sugary sweet to mildly sweet with some savory notes. It’s the perfect base for fruit topping, if you go that route.

Second, why not goat cheese? We’ve already had regular cheesecake. We know it’s delicious. People experiment with toppings and mix-ins all the time. So why not experiment with the type of cheese?

As you’ll see, this is a no-bake recipe. I went this route because I wanted the creaminess and lightness of the goat cheese to shine through. 

I made it in a tart pan because I thought it would look pretty, but you can use an 8-inch spring-form pan instead. Also, I spread the mixture into the pan using a piping bag. Once again, my only reason for going that route is I thought it would look pretty.

I will include the recipe for raspberry sauce, but I want to emphasize that you can top it however you please! Even a drizzle of honey would be tasty.

Goat cheese cheesecake
Ingredients
For the crust
  • 2 cups graham cracker crumbs
  • 1 stick (8 Tablespoons) Challenge butter, melted
  • 1/4 cup brown sugar
For the filling
  • 8 ounces Challenge cream cheese, softened
  • 8 ounces plain Greek yogurt
  • 4 ounces goat cheese in a log (not crumbles)
  • 1/4 cup powdered sugar
  • 1 Tbsp lemon juice
  • Zest from 1 lemon
  • 1 teaspoon vanilla extract
For the raspberry sauce
  • 12 ounces raspberries (fresh or frozen)
  • 1/4 cup granulated sugar
  • 1 Tablespoon lemon juice
  • 1 Tablespoon water
Directions
For the crust
  1. Combine graham cracker crumbs, butter, and brown sugar in bowl until you have a sand-like consistency.
  2. Prepare your tart pan with nonstick spray and distribute the graham cracker crumbs into the pan, pressing it down firmly and evenly on the bottom and up the sides.
  3. Refrigerate while you prepare the filling.
For the filling
  1. In a large bowl beat cream cheese until smooth. 
  2. Add Greek yogurt and goat cheese and beat until smooth again.
  3. Add powdered sugar, lemon juice, lemon zest, and vanilla, and mix until everything is incorporated.
  4. Remove crust from refrigerator, and spread mixture into pan, either using a spatula or a piping bag.
  5. Refrigerate until ready to serve.
For the raspberry sauce
  1. Combine raspberries, sugar, lemon juice, and water in a saucepan over medium heat.
  2. Stir mixture until it comes to a boil, about 5 minutes.
  3. Remove from heat and press sauce through a fine-mesh strainer to remove seeds. 
  4. Refrigerate until ready to serve with cheesecake.


Monday, April 15, 2019

Easter Garden Chocolate Cheesecake


This is a sponsored post by Challenge butter, but the text and opinions are all mine. Thank you for supporting brands that make Kylee's Kitchen possible!

Easter dessert may be my favorite dessert. I love incorporating spring themes like eggs, pastels, and bunnies. I also love using Easter candy! It's one of the many great things about this no-bake cheesecake.

The chocolate cheesecake acts as the canvas for your Easter garden made with Oreo "dirt," shredded coconut "grass," and chocolate "bird nests." I love the idea of getting kids involved and seeing what design they create.

Easter Garden Chocolate Cheesecake
Yield: Serves about 6 people
Ingredients
  • 2 (8-ounce) blocks Challenge cream cheese, softened
  • 1 cup powdered sugar
  • 1/2 cup sour cream
  • 1/2 cup heavy cream
  • 1 teaspoon vanilla extract
  • 8 ounces dark chocolate, melted and cooled to room temperature
  • 1 Oreo or chocolate graham cracker pie crust
  • 12 Oreo cookies, crushed
  • 1 cup sweetened shredded coconut
  • 3 drops green food coloring
  • Other Easter candies like chocolate eggs and peeps for decoration
Directions
  1. Use mixer to beat cream cheese several minutes or until smooth.
  2. Add powdered sugar, sour cream, heavy cream, and vanilla extract. Mix until smooth.
  3. Stir in melted chocolate.
  4. Add cheesecake mixture to pie crust and smooth top with spatula.
  5. Sprinkle crushed Oreos on top of pie. This will be the "dirt."
  6. Mix coconut with food coloring and sprinkle on top of pie. This will be the "grass."
  7. Refrigerate until ready to serve. Once you're ready to serve, decorate with chocolate eggs, peeps, and other Easter candies.


Wednesday, February 13, 2019

Raspberry cheesecake for 2 people


I'm continuing my tradition of baking small(er) desserts for Valentine's Day once again! In years past, I made chocolate and peanut butter lava cakes and a red velvet cookie skillet. This year I'm serving up cheesecake!

Now, I'm not one to deny cheesecake--the more the merrier--but there's something special about sharing a smaller portion with your significant other.

If you prefer, you can always swap out the raspberry jam for another fruit, or go with chocolate or caramel instead!

Raspberry cheesecake for 2 people
Ingredients
For the crust
  • 1 and 1/3 cups graham cracker crumbs (about 8 graham cracker sheets)
  • 4 Tablespoons Challenge butter, melted
  • 1 Tablespoon sugar
  • 1/2 teaspoon cinnamon
  • 1/2 teaspoon salt
For the cheesecake
  • 2 (8-ounce blocks) Challenge cream cheese, softened to room temperature
  • 1/2 cup  powdered sugar
  • 1 egg, room temperature
  • 1 teaspoon vanilla extract
  • 1/3 cup seedless raspberry jam
  • 1 Tablespoon lemon juice
Directions
For the crust
  1. Preheat oven to 325 degrees Fahrenheit and line a 9x5 inch loaf pan with parchment paper; set aside.
  2. Combine graham cracker crumbs with butter, sugar, cinnamon, and salt. Press mixture into bottom of loaf pan so it's packed firmly. Bake for 15 minutes.
For the cheesecake
  1. While crust is baking prepare cheesecake filling. Beat cream cheese until smooth. Add sugar, egg, and vanilla extract, and beat again until completely smooth.
  2. Remove crust from oven and pour cheesecake filling on top of crust.
  3. Microwave raspberry jam and lemon juice together for about 30 to 45 seconds or until mixture is smooth when stirred together.
  4. Use a teaspoon to dollop sauce onto surface of cheesecake batter. Swirl the sauce on the surface of the cheesecake batter with a toothpick or sharp knife so it looks marbled.
  5. Bake cheesecake for about 40 minutes, or until the edges start to turn golden brown and a toothpick inserted in the center comes out mostly clean. 
  6. Remove cheesecake from oven and allow to cool completely. Refrigerate cheesecake until ready to serve.


Monday, March 26, 2018

Chocolate Cheesecake Easter Eggs


This is a sponsored post by Challenge Butter, but the text and opinions are all mine. Thank you for supporting brands that make Kylee's Kitchen possible!

I'm celebrating Easter with these cheesecake-filled chocolate Easter eggs! I initially wanted to buy chocolate eggs and cut the tops off, but I couldn't find chocolate eggs in stores. Well, I should say I couldn't find them for under $5 which is ridiculous, and you should absolutely not pay that much money for a hollow egg.

So I made the chocolate egg all by myself using a balloon because I'm an I-N-D-E-P-E-N-D-E-N-T woman. It is incredibly easy to do, all you need is a water balloon and melted chocolate. But before you move onto the recipe I have a very important tip! And if you're tired of my rambling and you've already move onto the recipe PLEASE COME BACK! What I'm about to say is very important for the well-being of the state of your kitchen, your clothes, and your sanity. You absolutely must wait for the chocolate to cool completely before you dip these balloons! If you don't wait, the balloons will pop causing the melted chocolate to fly everywhere. Each time you heat up the chocolate, you should wait until the bowl is not warm to the touch, or about 10 minutes. You may only get a few dips out of it before it starts to harden again, so you'll need to reheat it and wait until it cools again. But that's okay. Do what I do while I'm waiting and "rest your eyes."

Also, if you don't like the way one of your bowls turned out, you can always remelt it and try again. There will be no wasted chocolate in the making of these Easter eggs!

Another tip: If you find that the water balloon is sticking to the inside of the chocolate egg, it's because you didn't let it cool off long enough. Refrigerate your eggs a little longer and try again.


Chocolate Cheesecake Easter Eggs
Yield: Makes about 6 chocolate eggs
Ingredients
  • 8 ounces chocolate, melted and cooled
  • 8 ounces Challenge cream cheese
  • 1/2 cup powdered sugar
  • 1/4 cup heavy whipping cream
  • 1 teaspoon vanilla
  • About 1/2 cup lemon curd or lemon pie filling, just enough to make yolks
  • Also: Water balloons
Directions
  1. Dip balloons in chocolate so bottom portion and part of sides are completely covered. Set on baking sheet covered in wax paper and refrigerate for 20 minutes.
  2. Meanwhile, make cheesecake filling by beating together cream cheese, powdered sugar, heavy whipping cream, and vanilla.
  3. Pull balloons out of refrigerator and pop balloons. Peel balloon away from inside of egg.
  4. Fill eggs with cheesecake filling. I recommend putting the filling in a large plastic bag, cutting off one corner, and piping it in.
  5. Add a dollop of the lemon curd to look like a yolk. Refrigerate until ready to serve.


Tuesday, November 21, 2017

Butter Pecan Pumpkin Cheesecake


This is a sponsored post by Challenge butter, but the text and opinions are all mine. Thank you for supporting brands that make Kylee's Kitchen possible!

Pecan pie is good. Pumpkin pie is good. Cheesecake is good. All three together? The trifecta! Last year I made a version of the 3-in-1 dessert, and it was definitely delicious, but it was quite time consuming. This year I wanted to tackle it again, no-bake style. It was actually really simple, and I was pleasantly surprised that you could taste all of the individual flavors.

I started by toasting the pecans with a little butter on the stove for just a few minutes. Do not skip this step! It really does make all the difference in the taste.

Then I used two bars of cream cheese. Most people use just one bar with no bake pies, but I really wanted this pie to be nice and thick. One thing I need to point out — it’s important to always use the best ingredients available. I used Challenge cream cheese because I know there are no hormones, additives, or fillers in their products, and the taste is also superior to other brands because they use real cream.

As with most no-bake pies, I did add whipped topping, but definitely don’t add the whole container. Maybe just half the tub, or even just a quarter of it. Like I said, I didn’t want the pie to be fluffy like a mousse—I wanted it thick like a cheesecake.

I recommend topping it all off with a caramel drizzle and some more pecans!

If you’re not a fan of no-bake pies, check out this recipe from last year: Pumpkin Cheesecake Pecan Pie.

Butter Pecan Pumpkin Cheesecake
Yield: Serves about 8 people
Ingredients
  • 1 1/2 cup pecans
  • 1 Tablespoon Challenge butter
  • 2 (8 ounce) packages Challenge cream cheese
  • 1 cup powdered sugar
  • 1 cup brown sugar
  • 1 cup pumpkin puree
  • 1 Tablespoon pumpkin pie spice
  • 2 teaspoons vanilla extract
  • 4 ounces whipped topping
  • 1 graham cracker crust
Directions
  1. Melt butter in large skillet over medium heat. Add pecans and cook for several minutes, stirring frequently. Set aside and let cool.
  2. Beat cream cheese, powdered sugar, and brown sugar in large bowl on medium speed until smooth.
  3. Add pumpkin puree, pumpkin pie spice, and vanilla and beat until thoroughly combined. 
  4. Stir in whipped topping and toasted pecans and spread mixture evenly into graham cracker crust.
  5. Refrigerate for at least 4 hours before serving. Garnish with caramel and more pecans if desired.


Monday, November 21, 2016

Pumpkin Cheesecake Pecan Pie


This is a sponsored post by Challenge Butter, but the text and opinions are all mine. Thank you for supporting brands that make Kylee's Kitchen possible!

This is the first of three blog posts I'm sharing this week ahead of Thanksgiving, so of course it only makes sense for me to talk about pie first. Because even as we're wading our way through the stuffing and the green bean casserole, we're just really thinking about the grand finale--the pie!

So what makes pie so special? I think it's the fact that we tend to only eat it around the holidays. Cookies, cake, ice cream... I can eat that year round. But not many people bring pie to a gathering outside of the months of November and December. And I'm not exactly sure why because they're not difficult to make!

I think maybe a lot of people get intimidated by the crust. Really, that's unnecessary though. You know why? Because they make these things called frozen pie crusts! I know it sounds too good to be true, but they exist in pretty much every single grocery store.

I love using frozen pie crusts because they're extremely easy to use, and also, I highly highly doubt your guests will notice much of a difference between a frozen pie crust and a pie crust you spent hours making. In my opinion, the main event is the pie's filling. People don't call it a crust pie with pumpkin. They call it a pumpkin pie!

Personally, I use Wick's frozen pie crusts. Wick's is made in Indiana and you can find it in most stores in the state (I'm not sure about outside of Indiana). It's less than $5 for two pie crusts, so you can't beat that.

In most cases, before you use a frozen pie crust, you should just let it thaw about 15 minutes. But make sure to always follow the instructions on the package.

Also, it's important for me to emphasize that I'm talking about frozen pie crusts and not refrigerated pie crusts. Personally, I'm not a fan of refrigerated pie crusts because I think the taste is significantly inferior to frozen pie crusts, but that's just my opinion.


Okay, pie crust rant over. Now let's talk about this delicious pie.

Pumpkin Cheesecake Pecan Pie is the ultimate pie for indecisive people. It has a little bit of everything for everyone. It's like the turducken of desserts! The first layer is a delicious pumpkin cheesecake, and then it's topped with gooey pecan pie filling. I dare you to find a dessert that does a better job of encompassing all of the flavors of fall. It's a total flavor explosion, and your guests will be so impressed! You don't have to tell them how easy it was to make. That can be our secret!

If it's your first time baking a pie, no worries! Follow these easy tips for a perfect pie on the first try!

  • Make a “shield” for your crust. What I mean by this is when you’re baking your pie and you notice the edges start to turn brown shield the crust from the oven with aluminum foil. Do this by folding a square of aluminum foil into quarters and then cutting out the center of the foil so you can place it on top of the pie edges. I suggest putting the shield on the crust in the last 10 minutes of baking, but it's always best to just keep an eye on it.
  • Bake pies on the lowest oven of the rack. This is because you want the crust to cook well on the bottom but you don’t want the top of the pie to burn.
  • Place your pie on a cookie sheet before putting it in the oven. Pies are very delicate and hard to transport. If you put the pie on a baking sheet first, it’s easier to remove the pie from the oven.

If you missed my first post about Challenge Dairy's partnership with UNICEF to fight the childhood malnutrition crisis with their campaign called “Pin a Recipe, Feed a Child" check it out now! Through December 31, 2016, if you pin a recipe from the “2016 Pin a Recipe, Feed a Child” Pinterest board, Challenge will donate a meal to UNICEF for a child in need.


Pumpkin Cheesecake Pecan Pie
Yield: Serves about 8 people

Ingredients
For the pumpkin cheesecake layer

  • 1 (8 ounce package) Challenge cream cheese
  • 1/4 cup sugar
  • 1/2 cup pumpkin puree
  • 1 teaspoon vanilla
  • 1 teaspoon pumpkin pie spice
  • 1/2 teaspoon cinnamon
  • 1 egg

For the pecan pie layer

  • 2/3 cup dark corn syrup
  • 2/3 cup sugar
  • 2 eggs
  • 1 Tablespoon Challenge butter, melted
  • 1 teaspoon vanilla 
  • 1 cup pecans
  • 1 frozen pie crust, thawed (or your favorite pie crust recipe)

Directions
For the pumpkin cheesecake layer

  1. Preheat oven to 350 degrees Fahrenheit
  2. Beat the cream cheese for 1 minute until smooth and creamy
  3. Add sugar and beat for another minute
  4. Add pumpkin puree, vanilla, pumpkin pie spice, and cinnamon and beat well
  5. Add egg and beat until just combined; set aside

For the pecan pie layer

  1. Combine dark corn syrup, sugar, 2 eggs, butter, and vanilla; mix in pecans
  2. Add pumpkin cheesecake mixture to bottom of pie crust and spread until layer is even
  3. Spoon pecan pie mixture on top of pumpkin cheesecake
  4. Bake for about 50 minutes or until center of pie crust is set and toothpick comes out clean
  5. Let pie cool on wire rack for at least one hour and then refrigerate until served

Idea for recipe adapted from Inside Bru Crew Life


Thursday, October 13, 2016

Cinnamon cheesecake-stuffed apples


This is a sponsored post by Challenge Butter, but the text and opinions are all mine. Thank you for supporting brands that make Kylee's Kitchen possible!

Okay I’m getting personal on the blog today. I am going to tell you the weirdest thing about me.

Crunchy apples give me goosebumps. That’s right. I said it. I cannot stand the sound of a crunchy apple. The sound of someone biting into an apple or someone cutting an apple is like nails on a chalkboard for me. I’ve felt that way ever since I can remember. In fact, it’s so extreme that just the thought of it makes me cringe.

However, I still like the taste of apples, and I love cooked apples.

And this is where the problem lies – there is no way for me to indulge in a baked apple without being tortured by the sound of a crunchy apple.

There are so many delicious apple desserts this year that it’s such a shame.

I was especially tempted by a recipe I saw on Pinterest for cheesecake-stuffed apples. Like what?! How has that existed without me knowing about it?!

So over the weekend, I decided to bite the bullet and go for it!

No joke guys, thinking about cutting the apples and scooping out the insides is giving me goosebumps right now just thinking about! Yes, yes, I realize I’m weird!

But I have to tell you, it was totally worth it! These apples were delicious!

When making this dessert, it’s very important to choose the right apple. As you all know, there are thousands of varieties of apples – 7,500 to be exact! And certain apples are better for certain things than others.

For this dessert, you want to use an apple that is sturdy enough to hold its shape when it’s cooking.  I used Gala apples, but honey crisp apples would also be a good choice. If you were to use McIntosh or Jonathan apples, they would be too mushy. Those are better for applesauce. In this recipe, some people may also want to use granny smith apples. Totally fine! I’m just not a big fan of the taste.

Also, the quality of cream cheese you use in this recipe really makes a big difference. I used Challenge cream cheese because it’s very tangy and really makes the flavor of the cheesecake stand out. Also, it’s made with real milk and cream from cows that aren’t injected with synthetic hormones so you don’t have to be concerned with what you’re putting in your body.


Cinnamon cheesecake-stuffed apples
Yield: Makes 6 stuffed apples

Ingredients
  • 4 apples
  • 4 tablespoons Challenge butter, melted
  • 2 tablespoons brown sugar
  • 1 teaspoon cinnamon
  • 8 ounces Challenge cream cheese
  • 1 egg
  • 1/4 cup sugar
  • 1 teaspoon vanilla
  • 1 teaspoon cinnamon
Directions
  1. Preheat oven to 375 degrees Fahrenheit
  2. Slice the top off the apples and use a paring knife and a spoon to scoop out the insides; place apples in baking dish
  3. Mix the butter, brown sugar, and cinnamon together
  4. Brush mixture on inside of apples
  5. Bake apples for 30 minutes
  6. While apples are baking, mix cream cheese, egg, sugar, vanilla, cinnamon together until smooth
  7. Remove apples from oven and fill 2/3 full with cheesecake mixture
  8. Place apples back in oven for 25 minutes​ or until cheesecake filling is set
  9. Remove apples from baking dish and top with caramel and graham crackers if desired
  10. Let apples cool for about 30 minutes before serving
Idea for apples adapted from Creme de la Crumb 


Pin It button on image hover