Showing posts with label strawberry. Show all posts

Monday, April 3, 2023

Strawberry cheesecake-filled bunnies


I filled hollow chocolate bunnies with delicious strawberry cheesecake. I used both fresh and freeze-dried strawberries for maximum flavor. Everything goes in the blender which makes it super easy. You can fill the bunnies by cutting off the ears or by making a small hole on its underside. I like cutting the ears so guests can see the filling. 

Strawberry cheesecake-filled bunnies

Yield: Makes enough filling for 7 (3.5 ounce) chocolate bunnies

Time: 10 minutes active, 3 hours waiting

Ingredients

  • Hollow chocolate bunnies
  • 0.5 pounds strawberries, hulled
  • 60 grams (1/2 cup) confectioners' sugar
  • 0.5 ounces freeze-dried strawberries
  • 4 ounces cream cheese, softened
  • 4 ounces coconut cream
  • 4 ounces sour cream
  • 3.5 grams (1/2 packet) unflavored gelatin
  • 2 Tablespoons cold water

Directions

  1. Heat sharp paring knife under warm water. Cut off bunnies' ears as close to top as possible.
  2. Add strawberries to blender and puree until smooth. Pour puree into another bowl and set aside.
  3. Blend confectioners' sugar and freeze-dried strawberries. Add cream cheese and blend until smooth, scraping sides as needed.
  4. Add coconut cream and blend several minutes on high speed until fluffy. Reduce speed to low and add sour cream. Return strawberry puree to blender and mix just until combined.
  5. Sprinkle gelatin over water and bloom for 5 minutes, or until gelatin has absorbed all water.
  6. Microwave gelatin for 30 seconds, stirring every 10 seconds. It should look like clear liquid. Slowly add into blender mixture on low speed.
  7. Use funnel to pour cheesecake mixture into cavity of hollow chocolate bunnies.
  8. Transfer bunnies to refrigerator in upright position. Allow cheesecake mixture to set for several hours before serving.


Thursday, July 9, 2020

Ice Cream Pizza


This is a sponsored post by Hudsonville, but the text and opinions are all mine. Thank you for supporting brands that make Kylee's Kitchen possible!

For me, summer is synonymous with family time. I have sweet memories of vacations to Michigan, long bike rides around Mackinac Island, and cooling off with a scoop of ice cream from Sadie's Ice Cream Parlor.

Sadie's serves Hudsonville Ice Cream, which is a family-owned business that operates out of Michigan. They have more than 50 flavors, and I love sampling the wide variety. Plus, it's always very rich and creamy.

As I was thinking of cool treats to make this summer, I knew I wanted to incorporate Hudsonville Ice Cream, and I thought it would be fun to create an ice cream pizza that actually looks like a pizza.

I found Hudsonville Strawberry Cheesecake ice cream at Meijer, and I knew the tangy ice cream with tart strawberry swirls would complement a brown sugar cookie crust perfectly.

When I was ready to make my ice cream pizza, the first thing I did was move the ice cream carton from the freezer to the refrigerator. You want the ice cream to soften in the refrigerator for about 30 to 60 minutes before using it.

Then I prepared the cookie dough and pressed it into my favorite deep dish pizza pan. Forewarning: the pan I use is 14 inches in diameter and 1.5 inches deep, so it makes a very large ice cream pizza. If you prefer, you can use a regular pizza pan instead or make a "personal pan pizza" using a cake pan. You'll probably have leftover dough, but you can just freeze it to use on another occasion.

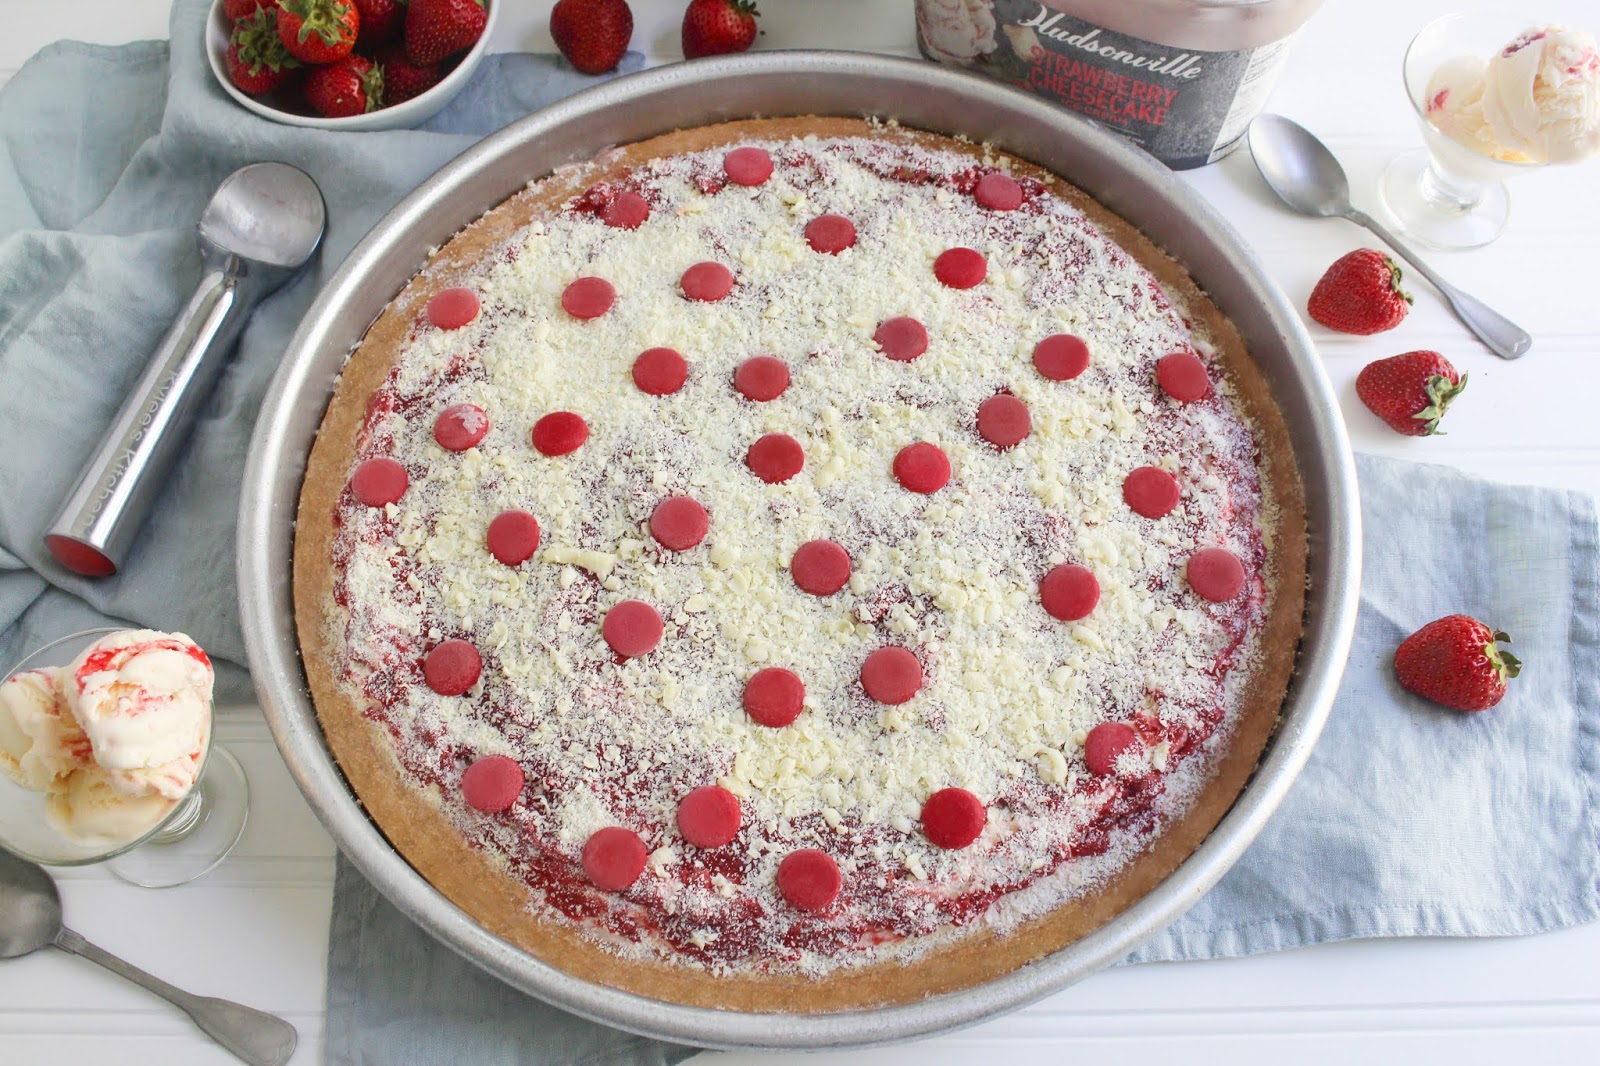
Once I baked the cookie crust and let it cool, the ice cream was soft enough to spread on top. I used the entire 48-ounce carton, but you may use less if your cookie crust is smaller. Then I stuck the ice cream pizza in the freezer while I prepared a strawberry topping.

I love how the strawberry topping on top of the ice cream looks like pizza sauce. To play up the pizza theme even more, I used a box grater on a bar of white chocolate, and the end result really looked like parmesan cheese. I recommend grating the white chocolate while the strawberry topping is cooling because you need to sprinkle it on top right after you spread on the topping.

Now for the final touch—pepperoni! Of course, I didn't use actual pepperoni; I used red candy melts!

You can use this same ice cream pizza recipe with any cookie and ice cream flavor combination. For example, it might be fun to try this with a brownie crust and Hudsonville's Traverse City Cherry Fudge ice cream or Hudsonville's Creamery Blend Vanilla ice cream. Or try it with a peanut butter cookie crust and Hudsonville's Bananas Foster ice cream!

I think one of the best parts about this dessert is it's meant to be shared with others, so no matter what your summer plans entail, you'll surely create sweet moments and memories serving up slices of ice cream pizza.

Use this Scoop Locator tool to find which Hudsonville flavors are available at your local grocery stores, and click here for the Sweetest Summer Ever coupon to get a discount on any flavor.

Ice Cream Pizza
Ingredients
Pizza toppings
For the brown sugar cookie crust
  • 1 cup butter, softened
  • 1 1/2 cups light brown sugar
  • 2  eggs
  • 4 teaspoons vanilla extract
  • 2 1/2 cups flour
  • 1/2 teaspoon baking powder
  • 1/2 teaspoon salt
For the strawberry topping
  • 1 pound strawberries, hulled and chopped
  • 1/3 cup granulated sugar
  • 1 Tablespoon lemon juice
  • 1 Tablespoon cornstarch
Directions
For the brown sugar cookie crust
  1. Remove ice cream from freezer and place in refrigerator between 30 to 60 minutes before cookie crust will be done
  2. Preheat oven to 350 degrees Fahrenheit and spray pizza pan with nonstick spray
  3. In large bowl, cream butter and brown sugar together until light and fluffy
  4. Mix in eggs and vanilla extract
  5. In separate bowl, stir together the flour, baking powder, and salt
  6. Slowly add flour mixture to butter mixture until just combined
  7. Press dough into prepared deep dish pizza pan and bake for 18 to 22 minutes, or until the edges turn golden brown
  8. Remove from oven and let cool for 10 minutes
  9. Spread ice cream in even layer on top of cookie crust and place in freezer
For the strawberry topping
  1. Combine strawberries, sugar, lemon juice, and cornstarch in saucepan, and cook over medium-high heat 
  2. Bring mixture to a simmer and allow it to simmer for 10 minutes, stirring constantly. Mash the strawberries as you stir
  3. Remove it from heat and allow it to cool
  4. While it's cooling, grate the white chocolate using a fine box grater so it resembles parmesan cheese
  5. Remove the ice cream pizza from the freezer and spread the strawberry topping on the ice cream
  6. Immediately sprinkle the white chocolate on top and place the red candy melts on the pizza so it resembles pepperoni
  7. Cover and store in freezer until you're ready to serve it


Wednesday, June 14, 2017

Strawberry Shortcake Skillet


This is a sponsored post by Challenge butter, but the text and opinions are all mine. Thank you for supporting brands that make Kylee's Kitchen possible!

Nothing says summer quite like strawberry shortcake, and the recipe I’m sharing today may be the easiest version yet!

At any given moment in your life, you are 20 minutes away from eating this delicious summer dessert. Reducing preparation time is the key.

As you already know, there are a variety of ways to make strawberry shortcake. And guess what – they’re all delicious. You can either make the shortcake by sifting together flour and other dry ingredients and cutting the butter into it with a pastry blender.

Or you can use biscuit mix and melted butter.

Like I said, both are delicious.

Also, you can form the dough into biscuits or just dump everything into a skillet.

Once again, both ways are delicious, but the latter is significantly easier. 

Even better, don’t bother to plate it. Just eat it straight out of the skillet.

Strawberry Shortcake Skillet
Ingredients
  • 1 pound strawberries, hulled and quartered
  • 1/4 cup sugar
  • 3 cups biscuit mix
  • 1 cup buttermilk*
  • 2 eggs
  • 1/2 cup sugar
  • 4 Tablespoons Challenge butter
  • 2 teaspoons vanilla
  • Optional: More strawberries and whipped cream for garnish
Directions
  1. Preheat oven to 425 degrees Fahrenheit and prepare cast iron skillet
  2. Combine strawberries and sugar and set aside to macerate
  3. Whisk together biscuit mix, buttermilk, eggs, sugar, butter, and vanilla in a large bowl until just combined
  4. Spoon 1/2 of biscuit batter into bottom of skillet
  5. Dump strawberries over batter and dollop remaining biscuit batter on top of strawberries
  6. Bake for 10 to 12 minutes or until top turns golden brown and let cool
  7. Serve with more strawberries and whipped cream if desired

*You can use any milk you have on hand, but I like the texture buttermilk creates. You can make buttermilk by combining 1 Tablespoon lemon juice or white vinegar with 1 cup milk.


Monday, April 10, 2017

Strawberry Pie Bites


Strawberry Pie Bites
Ingredients
For the pie bites
  • 1 tube refrigerated crescent roll dough
  • 4 Tablespoons Challenge butter, melted
  • 1/2 cup granulated sugar
  • 1 Tablespoon cinnamon
  • 1 cup strawberries, sliced (about 4 strawberries)
For the glaze
  • 1/2 cup powdered sugar
  • 1 Tablespoon milk
Directions
For the pie bites
  1. Preheat oven to 375 degrees Fahrenheit and line baking sheet with parchment paper, set aside
  2. Remove crescent roll dough from tube; separate each of the triangles and lay flat on baking sheet
  3. Brush each triangle of dough with butter; combine sugar and cinnamon and sprinkle teaspoon of mixture onto each triangle
  4. Lay several strawberry slices at the wide end of each piece of dough and carefully roll it up like you would do for a regular crescent roll
  5. Brush remaining butter on top of each crescent roll and sprinkle remaining cinnamon and sugar on top
  6. Bake for about 12 to 14 minutes or until golden brown
For the icing
  1. Add milk to powdered sugar and stir until combined; mixture should be thick but runny enough to drizzle
  2. Drizzle icing over pie bites and serve once icing hardens
This is a sponsored post by Challenge butter, but the text and opinions are all mine. Thank you for supporting brands that make Kylee's Kitchen possible!


Tuesday, June 14, 2016

Strawberry Shortcake Ice Cream Bars


This is a sponsored post by Challenge Butter, but the text and opinions are all mine. Thank you for supporting brands that make Kylee's Kitchen possible!

When I was little, I loved the ice cream man. The neighbor boys and I would chase after it whenever we heard his siren coming down our street. And my favorite item to purchase was the Good Humor Strawberry Shortcake Ice Cream Bar. I remember it being the most delicious thing I had ever tasted in my life on a hot summer day.

I hadn’t had one of those delicious treats in years until recently when I saw it at the grocery store. I don’t normally peruse the ice cream aisle, so I was shocked to discover that you can just buy them at the store and you don’t need to chase down an ice cream truck to get one (pretty silly of me to think otherwise – I realize that now). So of course I bought a box. And it was just as delicious as I remember.

I wanted to recreate my own version of the strawberry shortcake bar because sometimes I feel adventurous. But I still wanted to make it as easy as possible.

After some experimentation, I decided to use strawberry cheesecake ice cream as the base because it has elements of both strawberry and vanilla ice cream. I wanted to try to make my bars by layering vanilla ice cream with strawberry sorbet to be more authentic, but the strawberry sorbet was nowhere to be found. And strawberry cheesecake ice cream is delicious. If you can't find strawberry cheesecake ice cream, you can just use strawberry ice cream, but as with any recipe, when you make a substitution it won't taste the exact same.

For the coating I combined vanilla sandwich cookies with freeze-dried strawberries and a little bit of butter to help it all stick together. The crumble coating is my favorite part so this had to be perfect!
At first I tried making these in my new popsicle maker, but the ice cream didn’t seem to work well in the molds. Maybe I’m not doing something right. I don’t know. But anyway, I just decided to layer it in a pan instead. It worked out really well! And since not everyone owns popsicle molds, this was probably the best option anyway.

After you cut the ice cream bars, I recommend rolling them in the crumble mixture again because extra coating is always better!

The best part about these bars is that you don’t even need to chase after an ice cream truck to get one!

Strawberry Shortcake Ice Cream Bars
Ingredients
  • 20 vanilla crème sandwich cookies
  • 1/4 cup freeze-dried strawberries
  • 3 tablespoons Challenge butter, melted
  • 1/2 gallon strawberry cheesecake ice cream (take out of freezer 20 minutes before making recipe so it softens)
Directions
  1. Line an 8 x 8 pan with aluminum foil or wax paper; set aside
  2. Pulverize sandwich cookies in food processor; add freeze-dried strawberries and butter and pulverize again.
  3. Add half of your crumble mixture to the bottom of the pan. Spread the ice cream on top of the crumble mixture. Add the remaining crumble mixture to the top.
  4. Freeze for 4 hours or overnight.
  5. Use the overhang from the aluminum foil to lift the ice cream out of the pan.
  6. Cut into bars and serve right away before if melts! You can serve them on popsicle sticks so it’s more authentic if you like.


Thursday, May 19, 2016

Oreo cheesecake-stuffed strawberries


This is a sponsored post by Challenge Butter, but the text and opinions are all mine. Thank you for supporting brands that make Kylee's Kitchen possible!

Cheesecake and strawberries make the perfect pair. The tanginess of the cream cheese combines perfectly with the natural sweetness of the strawberries.

So with today being the first day of strawberry season in Indiana and with it being National Pick A Strawberry Day, I thought cheesecake-stuffed strawberries would be the perfect treat to showcase.

Cheesecake-stuffed strawberries are an extremely simple, no-bake dessert that looks very fancy. They’re the perfect little treat for graduation parties and summer cookouts.

And while I was thinking about cheesecake I thought, ”Well, Oreo cheesecake is better than regular cheesecake!” So I decided to add crushed Oreos to the mix and make Oreo cheesecake-stuffed strawberries!

A lot of people cut off the tops of the strawberries and then scoop out the inside of the strawberries, but I discovered that it was easier to turn the strawberries upside down, cut the pointy side crosswise and then pipe the filling in the center.  And this way, you don’t waste any part of the strawberry!

Oreo Cheesecake-Stuffed Strawberries
Ingredients
  • About 2 pounds strawberries (about 24 strawberries)
  • 18 regular Oreo cookies (this is 1/2 of a 14.3 ounce package)
  • 1 (8 ounce) package Challenge cream cheese, room temperature
  • 1/2 cup powdered sugar
  • 1 teaspoon vanilla extract
 Directions

  1. Cut the stems off the top of the strawberries, so the strawberries sit wide-side down.
  2. Cut a deep cross starting at the tip of the strawberry down, being very careful not to cut all of the way through. Set strawberries aside.
  3. Crush the Oreo cookies with a food processor.
  4. Mix the crushed cookies with the cream cheese and powdered sugar and vanilla until it’s completely combined.
  5. Gently open up each strawberry and pipe the cheesecake mixture into each strawberry using a pastry bag (or Ziploc bag) with a star piping tip.
  6. Top with a mini Oreo, if desired.
  7. Store chilled in an airtight container for up to three days.


Pin It button on image hover