Showing posts with label No Bake. Show all posts

Friday, April 22, 2022

Earth Day Parfaits


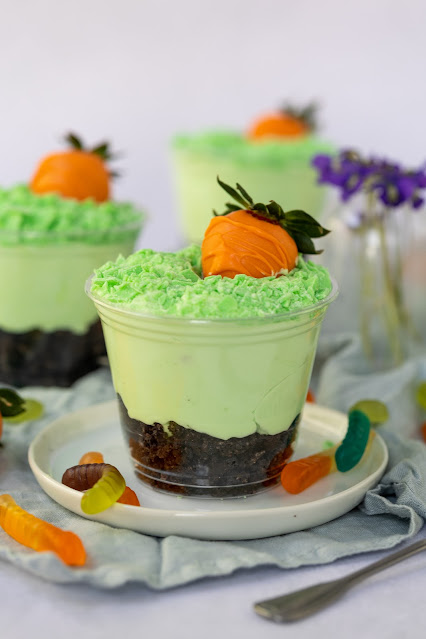
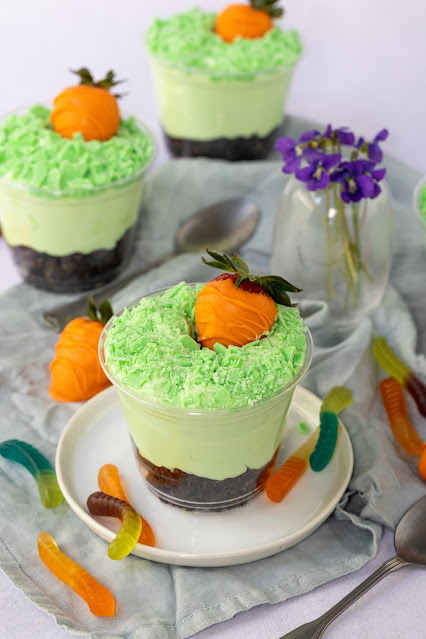
I like to call these Earth Day parfaits the grownup version of dirt pudding. It has a chocolate cookie crust, pistachio cheesecake filling, and tasty decorations like white chocolate shavings, sprinkles, chocolate-covered strawberries, and gummy worms.


It's a simple, no-bake recipe, which of course I'm a big fan of. However, I want to point out the importance of following the directions with the heavy whipping cream. If you try to incorporate it without first whipping it, your cheesecake filling will be the consistency of toothpaste, which is especially gross in this recipe since the mixture is already green. 


But when you whip the heavy cream, you incorporate air into the mixture, and it will ultimately become whipped cream. That makes our result light and creamy. You could, of course, substitute store-bought whipped topping, but I guarantee it won't taste nearly as good. 


The decorations can be as elaborate or as simple as you want. I dyed white chocolate green and broke it up into little pieces for grass in the examples pictured in this post. I also dipped strawberries into orange candy melts so they looked like carrots. But if you want to do the bare minimum, you can just top your pistachio cheesecake filling with gummy worms.

Earth Day Parfaits

Yield: Makes about 8 parfaits

Time: About 1 hour

Ingredients

For the chocolate cookie crust

  • 1 (14.3 ounce) package chocolate sandwich cookies
  • 4 ounces butter, melted

For the pistachio cheesecake filling

  • 1/2 cup (240 milliliters) heavy cream
  • 8 ounces cream cheese, room temperature
  • 1 (3.4 ounce) package instant pistachio pudding mix
  • 1/2 cup (57 grams) confectioners sugar
  • 1/4 cup (50 grams) granulated sugar
  • 1 teaspoons vanilla extract
  • 1/4 teaspoon kosher salt
  • Optional: Gummy worms, orange chocolate-dipped strawberries, green sprinkles, green dyed white chocolate shavings, shredded coconut dyed green

Directions 

For the chocolate cookie crust

  1. Crush chocolate sandwich cookies in food processor or sealed bag.
  2. Mix with melted butter.
  3. Evenly distribute mixture amongst 8 cups.

For the pistachio cheesecake filling

  1. Whip heavy cream into stiff peaks on high speed, about 2 - 3 minutes. Set aside.
  2. Cream cream cheese on medium speed with pudding mix, both sugars, vanilla extract, and salt until smooth.
  3. Use spatula to slowly and gently fold whipped cream into pistachio mixture.
  4. Spoon pistachio cheesecake mix over chocolate cookie crumbs.
  5. Decorate tops of parfaits with gummy worms, orange chocolate-dipped strawberries, green sprinkles, white chocolate shavings, etc.


Tuesday, November 21, 2017

Butter Pecan Pumpkin Cheesecake


This is a sponsored post by Challenge butter, but the text and opinions are all mine. Thank you for supporting brands that make Kylee's Kitchen possible!

Pecan pie is good. Pumpkin pie is good. Cheesecake is good. All three together? The trifecta! Last year I made a version of the 3-in-1 dessert, and it was definitely delicious, but it was quite time consuming. This year I wanted to tackle it again, no-bake style. It was actually really simple, and I was pleasantly surprised that you could taste all of the individual flavors.

I started by toasting the pecans with a little butter on the stove for just a few minutes. Do not skip this step! It really does make all the difference in the taste.

Then I used two bars of cream cheese. Most people use just one bar with no bake pies, but I really wanted this pie to be nice and thick. One thing I need to point out — it’s important to always use the best ingredients available. I used Challenge cream cheese because I know there are no hormones, additives, or fillers in their products, and the taste is also superior to other brands because they use real cream.

As with most no-bake pies, I did add whipped topping, but definitely don’t add the whole container. Maybe just half the tub, or even just a quarter of it. Like I said, I didn’t want the pie to be fluffy like a mousse—I wanted it thick like a cheesecake.

I recommend topping it all off with a caramel drizzle and some more pecans!

If you’re not a fan of no-bake pies, check out this recipe from last year: Pumpkin Cheesecake Pecan Pie.

Butter Pecan Pumpkin Cheesecake
Yield: Serves about 8 people
Ingredients
  • 1 1/2 cup pecans
  • 1 Tablespoon Challenge butter
  • 2 (8 ounce) packages Challenge cream cheese
  • 1 cup powdered sugar
  • 1 cup brown sugar
  • 1 cup pumpkin puree
  • 1 Tablespoon pumpkin pie spice
  • 2 teaspoons vanilla extract
  • 4 ounces whipped topping
  • 1 graham cracker crust
Directions
  1. Melt butter in large skillet over medium heat. Add pecans and cook for several minutes, stirring frequently. Set aside and let cool.
  2. Beat cream cheese, powdered sugar, and brown sugar in large bowl on medium speed until smooth.
  3. Add pumpkin puree, pumpkin pie spice, and vanilla and beat until thoroughly combined. 
  4. Stir in whipped topping and toasted pecans and spread mixture evenly into graham cracker crust.
  5. Refrigerate for at least 4 hours before serving. Garnish with caramel and more pecans if desired.


Thursday, November 16, 2017

Marshmallow Pumpkin Pie


This is a sponsored post by Challenge butter, but the text and opinions are all mine. Thank you for supporting brands that make Kylee's Kitchen possible!

You can find everything on the internet. Which is great for blogging because it’s easy to see what other people are baking and bounce ideas off of them. But sometimes it makes it really hard to create “original” content. You all would not believe the amount of time I spend each week trying to come up with something that’s never been done.

For example, this week I wanted my focus to be on no-bake desserts, specifically a no-bake pie. I’ve already made no-bake pumpkin cheesecake, but I knew I wanted to do something with pumpkin. As I was browsing ideas online, I came across a no-bake s’mores pie with marshmallow creme, and I thought I could adapt it to make a marshmallow pumpkin pie.

Guess what. Someone on this extremely large and vast planet has already created a marshmallow pumpkin pie. Imagine that. I was disappointed at first, but then I realized that was silly. The recipes aren’t the exact same. So what if two people have the same idea? Great minds think alike, right?

In fact, I think it’s a good idea to compare different recipes because everyone does things a little differently!

Before you skip straight to the recipe, give me one moment of your time to talk about why you need this Marshmallow Pumpkin Pie in your life. First of all, this is not pumpkin pie. It’s much lighter, and the pumpkin flavor isn’t quite as strong. So people who say they don’t like pumpkin pie will like this.

Secondly, it’s not pumpkin cheesecake either, although I realize it kind of looks like it. I think the marshmallow creme makes the pie sweeter, and the texture is smoother. So once again, people who say they don’t like pumpkin pie will like this pie.

Marshmallow Pumpkin Pie
Yield: Serves about 8 people
Ingredients
  • 8 ounces Challenge cream cheese, softened
  • 1/2 cup powdered sugar
  • 2 teaspoons vanilla
  • 1 cup pumpkin puree
  • 1 (13 ounce) container marshmallow creme
  • 1 Tablespoon pumpkin pie spice
  • 8 ounces whipped topping
  • Graham cracker crust (homemade or store-bought)
Directions
  1. Cream together the cream cheese, powdered sugar and vanilla until smooth
  2. Add pumpkin puree, marshmallow creme, and pumpkin pie spice and mix until smooth
  3. Fold in whipped topping until just combined and spread mixture evenly into graham cracker crust
  4. Refrigerate at least 4 hours before serving. Garnish with whipped cream or whatever else you desire.


Tuesday, January 24, 2017

Peanut Butter Dessert Lasagna


This is a sponsored post by Challenge Butter, but the text and opinions are all mine. Thank you for supporting brands that make Kylee's Kitchen possible!

I spent the past week in our nation’s capital with nine co-workers to cover the inauguration. It was such a big deal for our news station this year because our former Indiana governor Mike Pence is now the vice president.

It was an exhausting trip with no time to sleep or eat, but I know I will cherish the experience and memories of the trip forever.

That being said, I am very, very glad to be back to a normal routine.

Today is National Peanut Butter Day, and I’ve been thinking for a while about a unique treat to make on this special day. So I’m came up with this recipe for peanut butter lasagna. Now when I told people what I was making I got a lot of really confused looks.

As I’m sure you’ve realized by now, this isn’t a traditional savory lasagna—it’s a dessert lasagna. Essentially, it’s just a layered dessert like lasagna is a layered dish. Dessert lasagnas have become really popular in the past year, and I’ve seen a lot of recipes for chocolate lasagna. So I decided to create a lasagna based around my love for peanut butter.

What makes this dish so wonderful is that it’s no-bake, it’s easy to put together, and there are just a handful of ingredients.

The end result is almost like an icebox cake with layers of chocolate and peanut butter. So good!


Peanut Butter Dessert Lasagna
Yield: Makes about 9 servings
Ingredients
  • 12 ounces Challenge cream cheese, softened
  • 1 1/2 cup peanut butter
  • 1 1/2 cup powdered sugar
  • 12 ounces whipped topping
  • 1 (14 ounce) box chocolate graham crackers
  • 1/2 cup peanut butter cups, chopped 
  • 1/2 cup peanuts (if desired)
Directions
  1. In medium bowl, mix together cream cheese, peanut butter, and powdered sugar. Stir in whipped topping and set peanut butter filling aside.
  2. Line bottom of 8x8 pan with graham crackers and spread 1/2 of peanut butter filling on top with spatula.
  3. Sprinkle 1/2 cup chopped peanut butter cups on top of filling.
  4. Add another layer of chocolate graham crackers, remaining peanut butter filling, and chopped peanut butter cups.
  5. Sprinkle top with peanuts if desired.
  6. Chill peanut butter lasagna for at least 4 to 6 hours before serving.


Wednesday, September 21, 2016

Mummy Pumpkin Cheesecake Truffles


This is a sponsored post by Challenge Butter, but the text and opinions are all mine. Thank you for supporting brands that make Kylee's Kitchen possible!

Halloween desserts are probably my favorite themed desserts. Each year I find dozens of cute ideas on Pinterest and then I put them on my Halloween board and then on October 30 I decide I want to make all of them. But that never happens.

So this year I’m starting early! Today is the very first day of autumn and I’m kicking the season off with a Halloween pumpkin treat because it doesn’t get more seasonal than that!

After my peanut butter chocolate acorn Oreo truffles went over well last week (aren’t they adorable), I wanted to make more truffles!

Initially, I was going to make truffles that look like ghosts. But then I realized that if I make mummies I won’t have to worry about making sure the chocolate coating is perfectly smooth because ultimately I’ll drizzle white chocolate on top of the truffles for a “wrapped” effect.

The flavor of these truffles is absolutely outstanding. If you love pumpkin, you’ll love them. If you don’t love pumpkin, you’ll still love them. I must say, I was even impressed with the flavor!

Because of the addition of pumpkin puree to these truffles, they’re very moist, and I recommend keeping them cool as much as possible.

Also, if you don’t have red food coloring, you can absolutely use chocolate chips instead for the eyes or a red icing pen would work well too!

And if you plan on transporting these little mummies, try putting them in a clean egg carton!


Mummy Pumpkin Cheesecake Truffles
Yield: Makes about 24 truffles

Ingredients
  • 36 golden Oreos
  • 8 ounces Challenge cream cheese, room temperature
  • 3 tablespoons pumpkin puree
  • 1 teaspoon cinnamon
  • 1 teaspoon pumpkin pie spice
  • 16 ounces white chocolate
  • Red food coloring
Directions
  1. Put Oreos into a food processor and pulse until the Oreos are fine crumbs.
  2. Mix Oreo crumbs, cream cheese, pumpkin puree, cinnamon, and pumpkin pie spice together until they're completely combined. Refrigerate mixture for 15 minutes.
  3. Form mixture into tablespoon-sized balls and freeze for 30 minutes.
  4. Melt white chocolate and dip each ball into chocolate with toothpick; set on parchment paper to harden.
  5. Drizzle leftover white chocolate onto balls and let harden.
  6. Stick a Q-Tip into bottle of red food coloring and dot onto truffles to make to red eyes. Be careful not to touch red food coloring until it dries.
  7. Store leftovers in an airtight container in the refrigerator for up to one week.


Tuesday, October 20, 2015

Skinny No-Bake Pumpkin Cheesecake


By now you should all know I’m a big fan of no-bake desserts! Remember the No-Bake Mason Jar Cheesecakes I made for the Fourth of July? Or what about the No-Bake Snicker’s Bar Pie I made for Pi Day?

So it’s almost mandatory that I make No-Bake Pumpkin Cheesecake for National Pumpkin Cheesecake Day!

I love this recipe because it’s really creamy and light. And I like to use low-fat cream cheese and cool-whip to make it super low in calories in fat. So not only is it delicious, but it’s also guilt-free!

And even better -- it takes less than 10 minutes to put together!

Also, if you decide you want to make it into an appetizer, you can serve it as a dip in a bowl with graham crackers or vanilla wafers.

You could also layer the filling in a mason jar with graham cracker crumbs and make cute little personalized mason jar cheesecakes.

Bottom line: This is a very quick, low fat, and versatile dessert that would make a great addition to your next fall dinner.


Skinny No-Bake Pumpkin Cheesecake

Ingredients
  • 8 ounces 1/3 low fat cream cheese
  • 1/2 cup pureed pumpkin
  • 1 teaspoon vanilla
  • 1 teaspoon cinnamon
  • 1 teaspoon pumpkin pie spice
  • 1/4 cup brown sugar (51 grams)
  • 4 ounces reduced fat Cool Whip, thawed
  • 9-inch reduced-fat graham cracker crust
Directions
  1. In a large bowl, whip cream cheese, pumpkin, vanilla, cinnamon, pumpkin pie spice, and brown sugar together until fluffy.
  2. Add Cool Whip and stir until combined.
  3. Spoon mixture into pie crust and chill until firm, or about 3 hours.
Recipe adapted from Gina's Skinny Recipes.


Friday, July 3, 2015

No-Bake Mason Jar Cheesecakes


Today on Fox59 morning news I talked about last minute Fourth of July dessert recipes and made these adorable No-Bake Mason Jar Cheesecakes! 

I wanted to make a really light dessert because during the summer it’s hot and people are typically running around playing outside. And I know when I eat something really heavy like pie or cake I just feel sluggish.


These little cheesecakes are very low in fat and calories, but they still satisfy your sweet tooth.

You can whip up the filling in a matter of minutes, and you don’t have to worry about heating up your oven!

Additionally, You can use this same cheesecake filling to make a cheesecake or a fruit dip, as you'll see in my segment!

No-Bake Mason Jar Cheesecakes
Servings: This recipe makes enough for about 12 mason jars
Calories: 188 calories per mason jar

Ingredients
  • 15 low-fat graham crackers (8 ounces)
  • 2 bars (8 ounces each) non-fat cream cheese, room temperature
  • 1 cup non-fat Greek yogurt
  • 1 cup confectioners' sugar
  • 2 teaspoons pure vanilla extract
  • 1 teaspoon salt
  • 2 cups non-fat Cool Whip
  • 2 cups fresh berries


Directions
  1. In a food processor, pulse graham crackers until finely ground and set aside.
  2. In a large bowl, beat cream cheese until fluffy, or about 3 minutes.
  3. Add confectioners' sugar, yogurt, vanilla, and salt; beat until smooth.
  4. With a rubber spatula, fold in whipped cream.
  5. Fill mason jar 1/3 of the way with graham cracker crumbs
  6. Spoon or pipe in cheesecake filling so that the jar is 2/3 of the way full
  7. Top cheesecake filling with fresh berries and serve


Saturday, May 23, 2015

Two-Step No Bake Energy Bites


As of recently, I've noticed that “make your own” granola bar recipes have been very popular. I never made them because I liked store-bought granola bars just fine so I figured why bother to make my own. But recently a co-worker’s wife made homemade No Bake Energy Bars and they were amazing!  They were much better than any granola bar I've ever gotten from the store, and they were significantly more filling.

So of course I had to have the recipe. And I made a batch the very next day.

The great thing about this recipe is that the ingredients listed here can be substituted. Instead of chocolate chips, you could substitute Craisins. Instead of peanut butter, you could substitute almond butter. Instead of ground flax seed, you could substitute chia seeds. You get the idea.

No Bake Energy Bites
Servings: Makes about 24 balls
Calories per serving: 103
  • 1 cup Quick Oats
  • 2/3 cups Toasted Coconut
  • 1/2 cup Peanut Butter
  • 1/2 cup Ground Flaxseed
  • 1/3 cup Honey
  • 1/2 cup Mini Chocolate Chips
  • 1 teaspoon Vanilla

 Directions
  1. Mix all ingredients in medium-sized bowl
  2. Refrigerate bowl for at least an hour before rolling into balls*

Keep balls refrigerated for up to one week.

*As a variation, you can also just press the mixture into a square pan, refrigerate, and cut into bars.


Saturday, March 14, 2015

No-Bake Snickers Bar Pie


Happy Pi Day! In case you’re not aware, every year math enthusiasts like myself celebrate Pi Day on March 14th because the date 03/14 is also the first three digits of pi (3.14), or Ï€.

But today is not just any Pi Day. Oh no. This year Pi Day is extra special because it’s the first time in a century that the date is 3/14/15, which describes the first FIVE digits of pi, 3.1415. Excitement will peak at 9.26:53am when the date and time will describe pi to 10 digits.

Anyway, there’s your math lesson for today.

My mother is a math teacher, and for as long as I can remember we’ve celebrated Pi Day in the Wierks household by making pie of course.

So today I’m carrying on that tradition by sharing one of my favorite pie recipes – No-Bake Snickers Bar Pie. It’s very simple and you can whip it up within a matter of minutes. The pie tastes like a rich chocolate peanut butter mousse layered with Snickers pieces. Delicious!

I got to make the pie on live TV at Fox59 this morning, and as you can see by the video we all had way too much fun!


No-Bake Snickers Bar Pie
Yield: Makes about 16 servings

Ingredients
  • 8 ounces cream cheese, softened
  • 1 cup powdered sugar
  • 1 cup chunky or creamy peanut butter
  • 1 1/2 cup Snickers bars chopped (or about 3-regular sized snickers)
  • 8 ounces whipped topping (I use Cool Whip)
  • 1 prepared graham cracker pie crusts or chocolate cookie pie crusts


Directions
  1. In a large mixing bowl, beat cream cheese, powdered sugar and peanut butter until creamy.
  2. Stir in chopped Snickers.
  3. Add the whipped topping just and stir until just mixed.
  4. Gently add the filling to the pie crust and smooth with a spatula
  5. If you want, drizzle chocolate and caramel syrup on top and sprinkle with additional Snickers.
  6. Refrigerate at least two hours before serving.


Friday, June 13, 2014

HAPPY FATHER'S DAY!


Today’s post is dedicated to all of the fathers out there! Well actually it may be more appropriate to say this post is directed toward everyone who doesn't know what to get for their dad for Father’s Day.

Everyone always says the way to a man’s heart is through his stomach. Although a new sports car or brand new set of golf clubs would have your dad drooling, the perfect gift is usually found right at home. Personally, nothing says Father’s Day quite like BBQ ribs. For as long as I can remember, we’ve always eaten ribs on my dad’s special day. Usually we make the trek out to Texas Roadhouse, but last year I decided I wanted to make them for my dad all by myself.

My mother was very skeptical of the idea and suggested that we just buy cooked ribs instead. I think a big part of her skepticism was due to the fact that I had never used a grill before. But you know what I learned? YOU DON’T NEED A GRILL TO COOK DELICIOUS RIBS! You can make mouth-watering ribs right in the oven. This is a big deal for anyone like me who wants to make barbecue but doesn’t own a big fancy grill or smoker.

So after plenty of research and countless trials, I have discovered the best method for making tender, juicy, fall-off-the bone barbecue ribs in the oven. I plan on making these ribs for my dad on Sunday, and I suggest you do the same!

Also, since this is a post dedicated to dads, I thought I would share the recipe for one of my dad’s favorite cookies: Chocolate Peanut Butter No Bake Cookies. 

Since they’re “no bake” it seems like they would be super easy, but I’m forewarning you now there’s one step that can be tricky if you don’t pay attention. The most important part of this recipe is bringing the mixture to a boil. As you’ll see  in the directions below, I talk about bringing the first four ingredients to a rolling boil for a minute and a half. Do not start timing the minute and a half right when you turn the heat on the stove. Do not start timing the minute and a half when it starts to simmer. Wait until you start seeing big rolling bubbles, and then starting timing the minute and a half.

If you take the mixture off the heat too early, the ingredients won’t bind together. And when that happens, the cookies won’t set and you’re left with globs of oats and chocolate stuck to wax paper (been there, done that). If you let the mixture boil too long, it will burn. So take out your stopwatch and time it!

Other than that, it’s a pretty easy recipe to make. And I have yet to meet anyone who will turn down this chocolatey, peanut butter delight.


FALL-OFF-THE-BONE BARBECUE RIBS

INGREDIENTS
For the rub
  • 6 tablespoons firmly packed brown sugar
  • 6 tablespoons cup white sugar
  • 2 tablespoons chili powder
  • 2 tablespoons cumin
  • 2 tablespoons garlic powder garlic powder
  • 1 tablespoon ground black pepper
  • 1 tablespoon ground ginger powder
  • 1 tablespoon onion powder
  • 1 teaspoon rosemary powder
For the ribs
  • Slab of ribs
  • Salt
  • Vegetable oil
  • Your favorite barbecue sauce!

DIRECTIONS
For the rub
  1. Mix all of the ingredients together
  2. Save any leftover rub in a sealed bag for next time
For The ribs
  1. Preheat oven to 250 degrees Fahrenheit
  2. Remove slab of ribs from packaging and rinse off in cold water 
  3. Pat ribs dry with a paper towel
  4. Sprinkle salt over both sides of the slab, and if you have time, let it absorb into the meat for an hour
  5. Coat the meat with a thin layer of vegetable oil. The oil will help make the bark, the desired crust on the top. 
  6. Take your rub and sprinkle it over the slab so the entire surface is coated
  7. Massage the rub into the ribs with your fingers
  8. Repeat on the other side of the slab
  9. Lay two layers of aluminum foil on a baking sheet
  10. Go ahead and spray the aluminum foil with non-stick cooking spray, just in case
  11. Place the slab on the aluminum foil, meaty side down
  12. Lay two layers of aluminum foil on top of the slab
  13. Roll and crimp the edges of the aluminum foil tightly, edges facing up to seal
  14. Put the ribs in the oven for four hours
  15. Remove ribs from oven
  16. Preheat oven to 350 degrees Fahrenheit
  17. Take off the top layer of aluminum foil. At this point you'll see that the ribs are sitting a pool of fatty red juices. Drain the juices the easiest way you can. I personally tip the ribs over the sink and let it drain that way.
  18. Once the juices are drained, flip the slab over so it's now meaty side up
  19. Smother the ribs in barbecue sauce
  20. Stick the slab of ribs back in the oven for 30 minutes. The purpose of this step is to let the sauce bake onto the ribs.
  21. Take ribs back out of the oven
  22. Let them cool off, find a stack of napkins, and enjoy!

Pat the ribs dry

Salt the ribs, and if you have time let the salt soak into the meat for an hour.

The ingredients for your dry rub.

Massage the dry rub into the meat.

Place ribs on aluminum foil, meaty side down.

Wrap up the slab in aluminum foil

Pull the ribs out of the oven after about 4 hours.

Drain the juices

Smother ribs in barbecue sauce

Enjoy! P.S. It's very difficult to take good pictures of ribs, but trust me, they're delicious!

CHOCOLATE PEANUT BUTTER NO BAKE COOKIES

INGREDIENTS
  • 2 cups sugar
  • 1/2 cup (1 stick) butter
  • 1/2 cup milk
  • 1/4 cup unsweetened cocoa powder
  • 1/2 heaping cup creamy peanut butter
  • 2 teaspoons vanilla
  • 3 cups quick-cooking oats (make sure you use quick-cooking!)
DIRECTIONS
  1. Dump the sugar, butter, milk, and unsweetened cocoa powder into a large saucepan
  2. Heat the mixture on medium high heat and wait until it comes to a rolling boil (not simmer!)
  3. Once it starts the rolling boil, time it for one and a half minutes
  4. When the time is up, remove the mixture from the heat
  5. Add the peanut butter to the mixture and stir until it's completely combined
  6. Add the vanilla to the mixture and stir
  7. Add the oats to the mixture and stir until combined
  8. Roll out a sheet of wax paper, and drop the mixture by tablespoons onto the wax paper
  9. Let the cookies cool until they've set

Dump the first four ingredients into the saucepan.

This is not a rolling boil, this is a simmer. Do not start timing yet.

THIS is what a rolling boil looks like. Start timing as soon as you see this!

Mix in the peanut butter and vanilla

Mix in the oats

Let the cookies cool until they're set

Pin It button on image hover