Showing posts with label zucchini. Show all posts

Monday, August 8, 2022

Zapple Crisp


This is a sponsored post by Challenge butter, but the text and opinions are all mine. Thank you for supporting brands that make Kylee's Kitchen possible!

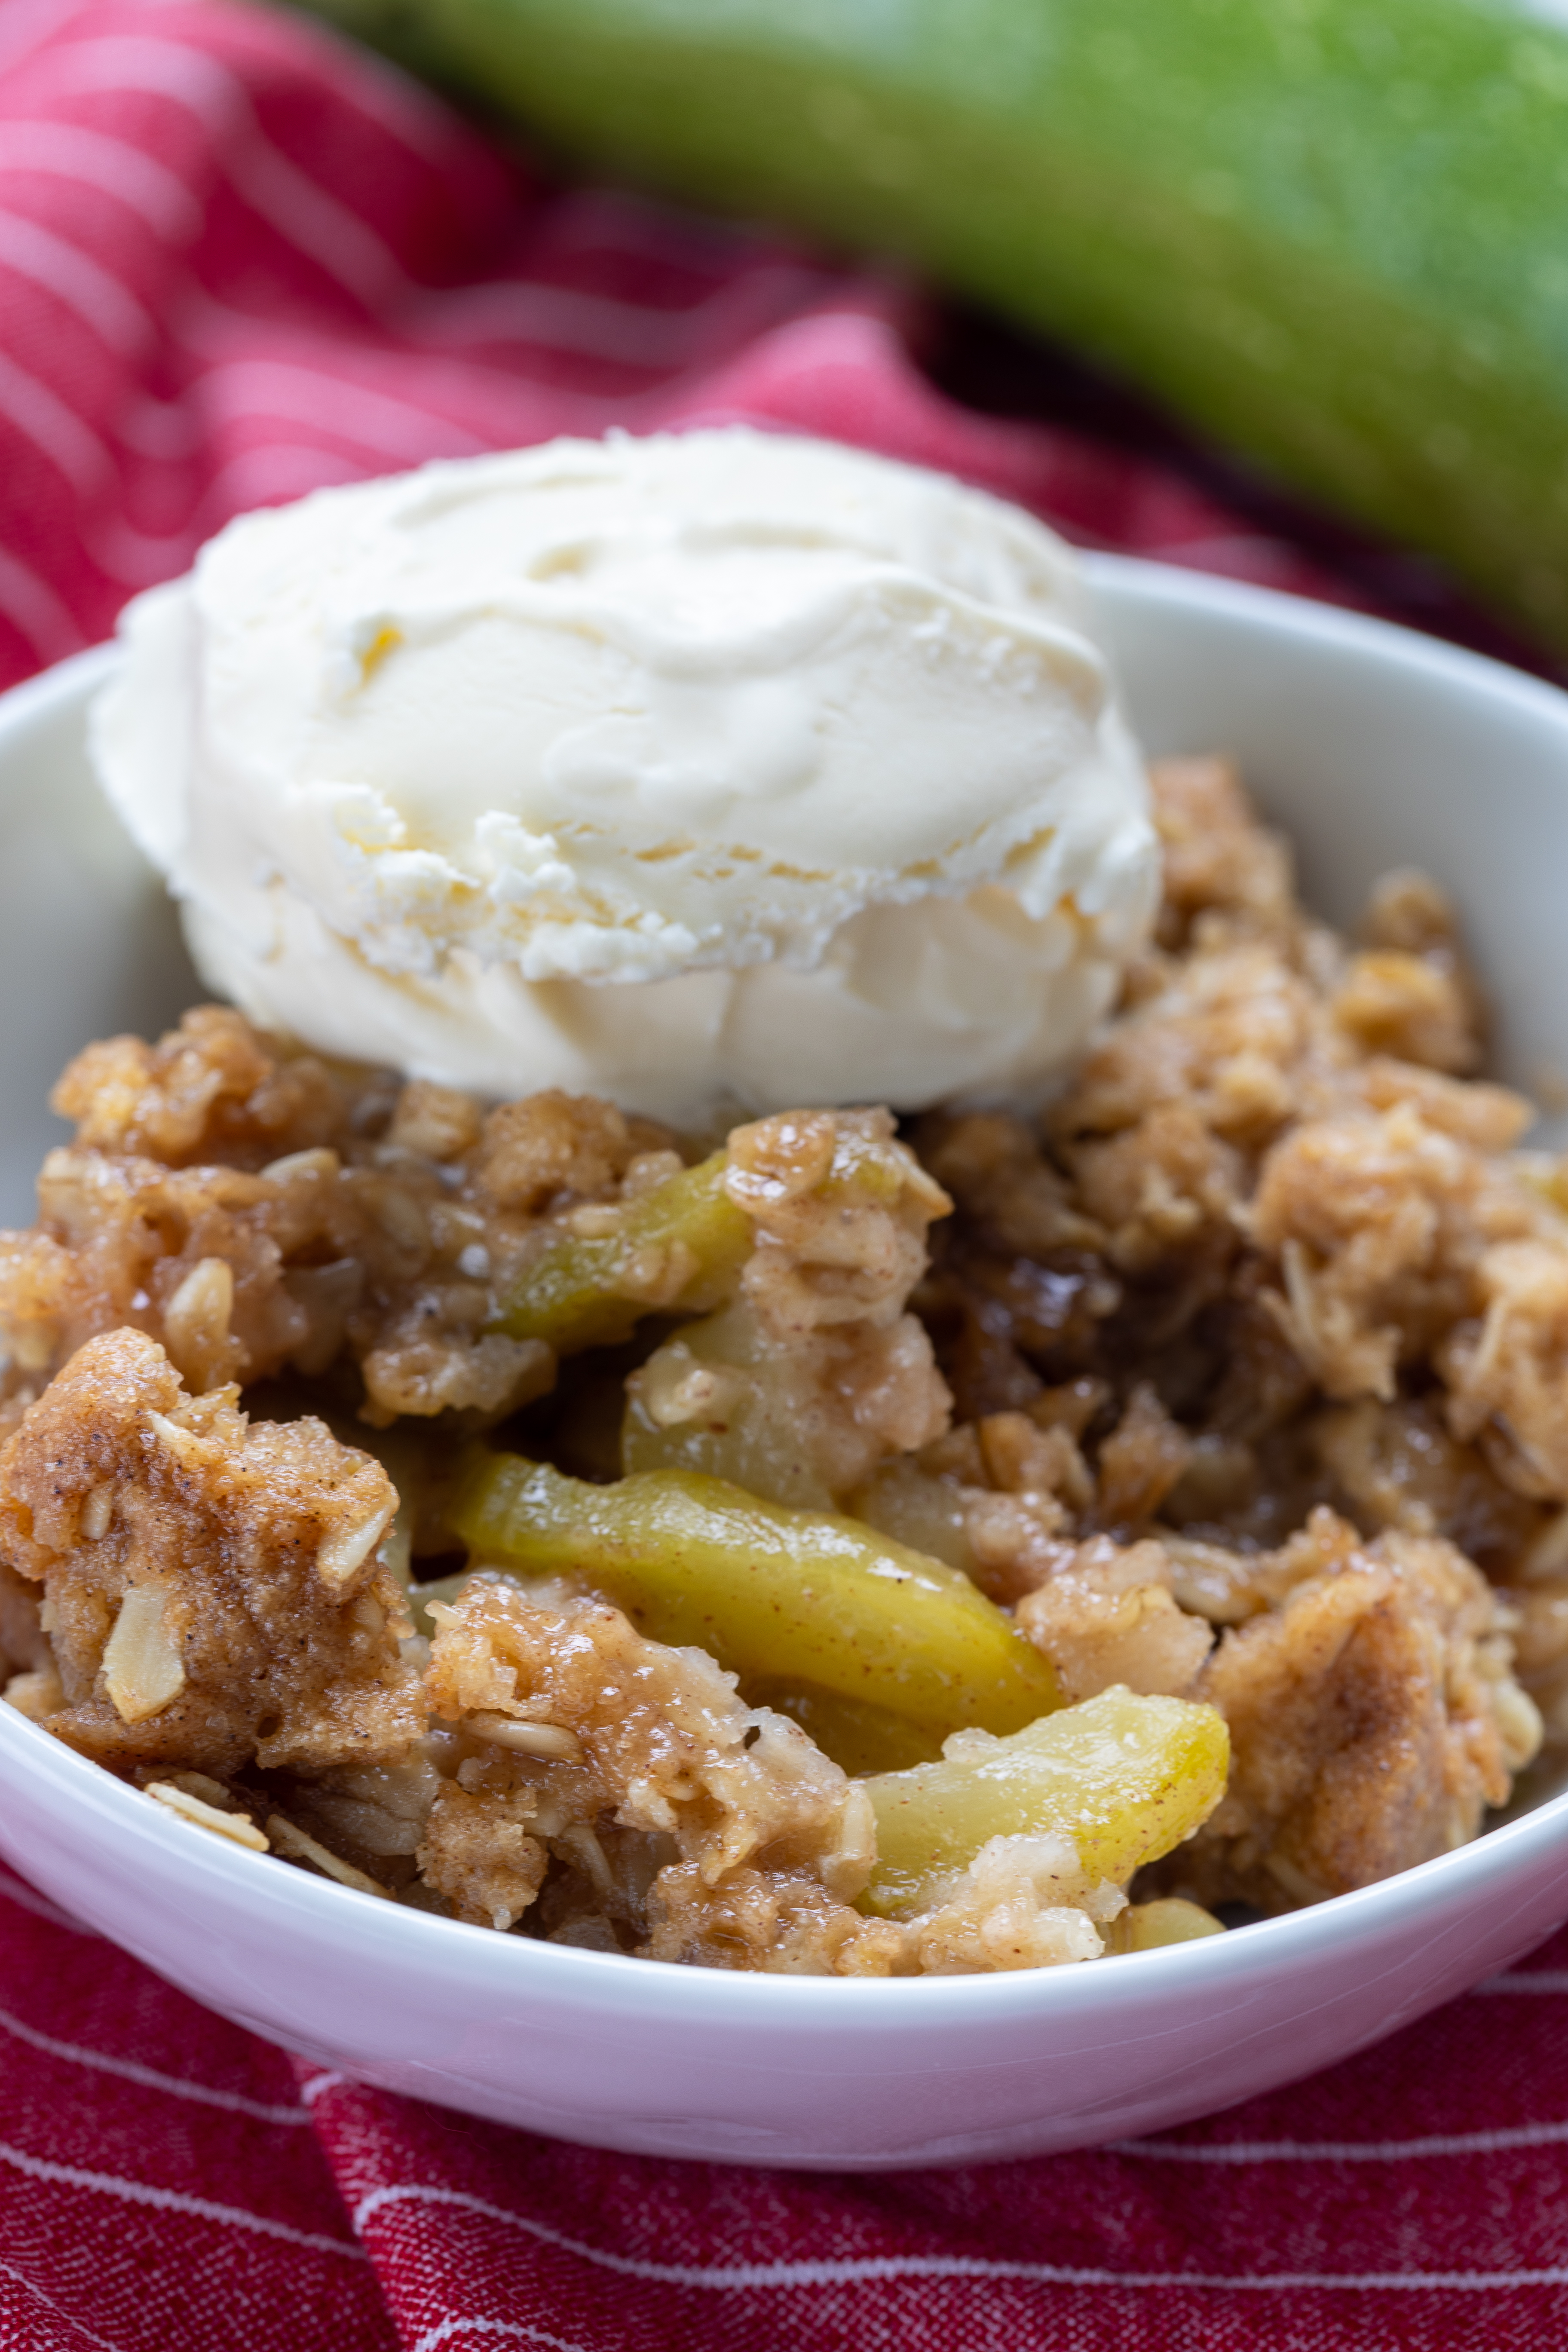
It’s zucchini season and you or someone you know is probably overloaded with zucchini. Fortunately, it is an incredibly versatile ingredient. So versatile, in fact, that it makes a great apple substitute in apple crisp. I first saw “zapple crisp” on TikTok and thought “No way!” But it actually works really well. I can almost guarantee no one would notice the substitution (I tricked my own family). Zucchini slices even look like apple slices once the seeds are removed!


I don’t recommend doing a straight substitute of zucchini using your favorite apple crisp recipe. There are a few changes you need to make in order for it to taste more like apple. You definitely need to use lemon juice to make it a little tart. Additionally, I used a little cream of tartar, which is an acidic ingredient and it gives baked goods a slightly sour, tangy taste (that’s what gives snickerdoodles their unique flavor).

Additionally, how you slice the zucchini is very important. You have to remove the peel and the seeds.. When you do those two things, the zucchini slices really look like apple slices.


One more thing I want to point out—I baked this in an 11 x 7-inch baking dish. It would certainly fit in an 8x8 or 9x9, but you get a better crisp topping to zucchini filling ratio when you spread it out in a larger dish.

I also want to point out that I used melted butter in the crisp topping. If you use cold butter pieces crumbled into the oats and flour, the topping won't crisp and the texture isn't as good. It's called zapple CRISP for a reason! But if you start with melted butter, the topping will brown and crisp better on top of the filling. I use Challenge unsalted butter in this recipe because it's churned daily from the freshest 100% real pasteurized sweet cream.


Zapple Crisp

Yield: 8 servings

Ingredients

For the zucchini filling

  • 2 pounds zucchini
  • 105 grams (1/2 cup) brown sugar
  • 3 Tablespoons lemon juice
  • 8 grams (1 Tablespoon) all-purpose flour 
  • 1 1/2 teaspoons ground cinnamon
  • 1 teaspoon cream of tartar
  • 1/2 teaspoon ground nutmeg
  • 1/4 teaspoon kosher salt

For the crisp topping

  • 210 grams (1 cup) brown sugar
  • 120 grams (1 cup) all-purpose flour 
  • 90 grams (1 cup) rolled oats
  • 8 Tablespoons (1/2 cup) Challenge unsalted butter, melted
  • 1 teaspoon baking powder
  • 1 teaspoon ground cinnamon
  • 1/4 teaspoon kosher salt

Directions

For the zucchini filling

  1. Preheat oven to 350 degrees Fahrenheit. Spray 11x7-inch baking dish with nonstick cooking spray. Set aside.
  2. Peel zucchini and slice in half lengthwise. Remove seeds from center of zucchini and slice into 1/8-inch pieces. They should resemble apple slices. Place in large bowl.
  3. Mix remaining filling ingredients and add to bowl with zucchini slices. Mix until slices are evenly coated. Spread evenly in baking dish.

For the crisp topping

  1. Mix all topping ingredients and spread evenly over zucchini filling.
  2. Bake for 40 - 45 minutes or until filling is bubbly and crisp topping is golden brown.
  3. Zapple crisp is best served hot with vanilla ice cream.


Monday, August 7, 2017

Double Chocolate Zucchini Brownies


This is a sponsored post by Challenge butter, but the text and opinions are all mine. Thank you for supporting brands that make Kylee's Kitchen possible!

I only just recently discovered the benefits of including zucchini in recipes. I always thought people just added it in because they either couldn't get their kids to eat anything green or they had too much of it. But as it turns out, there are real benefits to adding zucchini to recipes, especially recipes with chocolate.

You see, cocoa powder can significantly dry out a recipe, far more than flour. So it's important to try to add as much moisture as possible. And that's where zucchini comes in. 

Zucchini is basically flavorless moisture. You really can't taste it at all. There are two ways to add it to baked goods: you can either shred it or puree it.


To shred a zucchini, all you do is cut off the ends and rub it against a grater. You'll get small, stringy pieces of zucchini and green flecks will still be visible. In most cases, this method is best for anyone who isn't bothered by the fact that there's a vegetable in their dessert. But that may cause some people to freak out.

So personally, I recommend pureeing your zucchini when adding it to a baked good, as you'll see in the recipe below. In fact, while you're at it, you can just blend all of the wet ingredients in a food processor so you don't have to worry about using a mixer.

Before you make these brownies, let me forewarn you, these babies are rich! You'll need to grab a glass of milk before diving in. And one of the things I love most about them is they get more moist as time goes on.


Double Chocolate Zucchini Brownies
Yield: Makes about 16 brownies
Ingredients
For the brownies
  • 8 ounces zucchini, cut into chunks
  • 3/4 cup brown sugar (155 grams)
  • 3 Tablespoons Challenge butter, melted
  • 2 eggs
  • 2 teaspoon vanilla extract
  • 2/3 cup cocoa powder (56 grams)
  • 1/2 cup flour (60 grams)
  • 1/2 teaspoon baking soda
  • 1/4 teaspoon salt
  • 1/2 cup chocolate chips
For the frosting
  • 3/4 cup chocolate chips
  • 3 Tablespoons milk or heavy cream
Directions
For the brownies
  1. Preheat oven to 350 degrees Fahrenheit and prepare 9x9 pan with nonstick cooking spray and / or parchment paper.
  2. Add zucchini, brown sugar, butter, eggs, and vanilla extract to food processor and puree until no zucchini chunks remain
  3. In medium mixing bowl, combine cocoa powder, flour, baking soda, and salt. Add wet ingredients to bowl and stir until just combined.
  4. For the frosting
  5. Gently stir in chocolate chips.
  6. Pour batter into baking pan and bake for 22 to 26 minutes, or until toothpick comes out clean. Let brownies cool for at least a half hour.
For the frosting
  1. Combine chocolate chips and milk in small bowl; heat for 30 seconds and stir until smooth.
  2. Pour frosting over brownies and let set in refrigerator for 1 hour.
  3. Store in airtight container for up to 5 days.
Recipe adapted from King Arthur  Flour Company


Sunday, April 24, 2016

Extra Chocolate Zucchini Bread


This is a sponsored post by Challenge Butter, but the text and opinions are all mine. Thank you for supporting brands that make Kylee's Kitchen possible!

If you’re from the Midwest, you know that zucchinis are abundant in the summer. Most everyone I knew grew them in their gardens. They start popping up in June and they keep on coming until late August and even September. My family would eat zucchini every which way, but my favorite way to eat them was in zucchini bread.

For anyone who has never had zucchini bread, I just want to let you know that zucchini's role in the bread is a functional role. It helps keep the bread moist for days after baking without contributing much flavor. Minus the green flecks in the bread, you wouldn’t even know that there was zucchini in it.

Zucchini bread falls into the “quick bread” family. Quick bread is bread that is made with a leavening agent other than yeast. Yeast breads can take hours to rise and they can sometimes be finicky and tricky to make. On the other hand, quick breads are made with chemical leavening agents (baking soda and/or baking powder). Chemical leavening agents are very reliable and quick and yield uniform results.

But it is very important to note that chemical leavening agents start reacting immediately once they are mixed with liquid and because of this you cannot make the batter ahead of time. You must bake the batter immediately after mixing it.

The recipe below is a chocolatey version of the recipe my mom has been making for years. However, as you take a look at the ingredients, you'll notice that there really isn't much extra-added sugar and fat. That's because I cut the amount of sugar in half from the original recipe and I replaced half of the butter with applesauce. You could also replace half of the white flour with whole wheat flour, but I wouldn’t recommend substituting more than half because it could significantly change the taste.

Feel free to add mix-ins like chocolate chips, nuts, raisins, dried pineapple, or coconut to the batter as well! And of course, I recommend spreading a thick layer of Challenge butter on the bread. Challenge butter is 100% natural, without the use of the synthetic hormone rbST.


Extra Chocolate Zucchini Bread
Yield: 1 large loaf (9in x 5in) or 2 small loaves (5.75in x 3in) or 12 regular-sized muffins

Ingredients
  • 1 cup flour (125 grams)
  • 1/2 cup unsweetened cocoa powder (60 grams)
  • 1/2 teaspoon baking soda
  • 1/2 teaspoon baking powder
  • 1/2 teaspoon salt
  • 2 large eggs
  • 1/2 cup brown sugar (103 grams)
  • 1/2 stick Challenge butter, melted
  • 1/4 cup applesauce (62 grams)
  • 2 teaspoons vanilla extract
  • 1 cup shredded zucchini (about 1 medium-large zucchini, 150 grams)
  • 1/2 cup chocolate chips
Directions
  1. Preheat oven to 325 degrees Fahrenheit; prepare loaf pan with non-stick spray
  2. Combine flour, unsweetened cocoa powder, baking soda, baking powder, and salt in medium-seized bowl; set aside
  3. Combine eggs, brown sugar, butter, applesauce, and vanilla extract in large bowl; fold in shredded zucchini
  4. Pour dry ingredients into bowl of wet ingredients; stir until just combined
  5. Fold in the chocolate chips
  6. Pour batter into prepared loaf pan
  7. Bake for about 45 minutes for large loaf pan (Or about 35 minutes for small loaf pan; or about 15 minutes for muffins)
  8. Store leftovers in airtight container for up to 5 days


Wednesday, April 29, 2015

Easy Homemade Pesto with Gluten Free Zoodles


This post is dedicated to everyone who is gluten intolerant and will never know what it’s like to be in a carbo-loaded coma. My heart goes out to you, really.

Personally, I crave carbs. There is nothing more satisfying than eating a big bowl of pasta and then curling up for a nap. And don’t even get me started on the free bread baskets at restaurants. I could go through the whole thing by myself, and I typically do.

The only problem is, my clothing likes to punish me for binging on carbs. My pants won’t let me fit into them the next day, which is a serious problem because pants are necessary for going out in public.

So I am making a big effort to say “no!” to (most) carbs. We can all admit though that sometimes saying “no!” can be really hard. My solution: the Veggetti!

I’m sure you’ve seen the commercials by now. “The Veggetti is the fun, easy and extremely fast way to turn veggies into delicious spaghetti in just seconds!” My mom bought a Veggetti, so I tried it out last week. I have to admit it is really freaking awesome!

I used a zucchini to make “zoodles.” It was super easy to twist, and it didn’t take much effort at all. In just about a minute or two I had a full plate of the zoodles. I sautéed the zoodlesfor just a few minutes, and then I tossed it with a homemade pesto sauce.

It was seriously delicious.  My biggest concern was that the zoodles would be mushy and have a different texture than real noodles, but that wasn’t the case at all. I was very impressed. In fact, I didn’t miss real spaghetti at all! I am not exaggerating! It was that good!

The homemade pesto was also superb, and I’m so excited to share that recipe with you today! It is sooooo much better than the store-bought version (as most things are). 

So all of you gluten-free folks, rejoice! This zoodles with pesto recipe is the answer to your prayers!


Easy Homemade Pesto with Gluten Free Zoodles
Yield: Makes about 8, two tablespoon servings

Ingredients
For the Pesto
  • 1 cup fresh basil leaves
  • 3 tablespoons pine nuts
  • 1 tablespoon minced garlic
  • 1/3 cup grated Parmesan
  • 1/3 cup olive oil
  • Kosher salt and freshly ground black pepper, to taste


For the Zoodles
  • 1 zucchini


Directions
For the Pesto
  1. Add basil, pine nuts, garlic, and Parmesan to a food processor. Turn the machine on and blend for about 20 seconds.
  2. Add the olive oil to the food processor and blend again until completely combined, or about 1 minute. Add salt and pepper to taste.
  3. Store the pesto in an airtight container in the refrigerator for up to 1 week.


For the Zoodles
  1. Use a Veggetti to make zucchini noodles.
  2. Sauté the zucchini noodles in pan with non-stick cooking spray for 4 – 6 minutes.
  3. Combine with 2 tablespoons pesto. 


Recipe adapted from Damn Delicious. This post was in no way sponsored by the Veggetti. I just really enjoy the product!


Pin It button on image hover