Showing posts with label brownie. Show all posts

Tuesday, October 26, 2021

Zombie Brownie Cake


This is a sponsored post by Challenge butter, but the text and opinions are all mine. Thank you for supporting brands that make Kylee's Kitchen possible! 

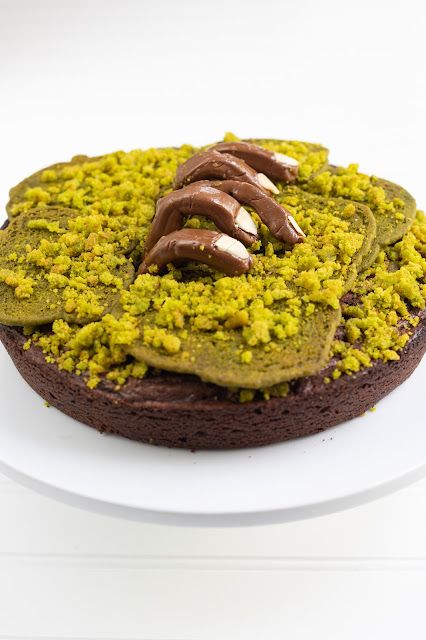
Halloween-themed food is my absolute favorite because I just think it's so much fun. I've done my fair share of a variety of cute and creepy treats over the years, although some people, like my friends and family who are supposed to support me no matter what, think I take it a little too far (remember that amputated hand appetizer?)

This zombie brownie cake is my compromise--not necessarily cute, but not so creepy that it will haunt you in your sleep. Most importantly though, it's incredibly tasty.

I start with my favorite homemade brownie recipe. Yes, you can use a box mix, but I much prefer the taste of this recipe. It's thick and fudgey with the perfect crackly top. The recipe starts by melting salted Challenge butter in the microwave. Challenge butter is the only butter I will use because it’s churned daily from two natural ingredients: the freshest 100% real pasteurized sweet cream and salt. That’s it. There's nothing artificial or synthetic about it, and you can really taste the difference. The recipe also uses dark chocolate, which I much prefer over cocoa powder. The other key ingredient is a little bit of espresso powder to amplify the chocolate flavor and make it more intense.

To make the moss on top of the brownie, all I did was dye sugar cookie dough green and place the cookies on top. I also crumbled some of the cookies to add to the effect. And the zombie fingers couldn't be easier. They're just Tootsie Rolls!


Zombie Brownie Cake

Yield: 12 servings

Ingredients

For the brownie

  • 2 sticks (8 ounces) salted Challenge butter
  • 10 ounces (283 grams) dark chocolate, chopped
  • 4 large eggs (8 ounces)
  • 2 cups (396 grams) granulated sugar
  • 1 Tablespoon (14 grams) vanilla extract
  • 2 teaspoons (4.5 grams) espresso powder
  • 2 cups (240 grams) all-purpose flour

For the moss

  • 8 ounces sugar cookie dough
  • Green food coloring

For the zombie fingers

  • 5 Tootsie Roll snack size candies
  • 5 almond slivers
  • 5 toothpicks

Directions

For the brownie

  1. Preheat oven to 35o degrees Fahrenheit. Prepare 8-inch cake pan by spraying with nonstick spray, lining with parchment paper circle, and spraying with nonstick spray again.
  2. Melt butter in microwave.
  3. Add chocolate and whisk until melted. If chocolate doesn’t melt all the way, heat in microwave 10 more seconds.
  4. Whisk eggs in separate bowl. Add sugar, vanilla extract, and espresso powder, and whisk until smooth.
  5. Whisk into melted butter-chocolate mixture.
  6. Fold flour into liquid ingredients until just combined.
  7. Bake at 350 for 30 - 35 minutes

For the moss

  1. Mix the sugar cookie dough with green food coloring until dough is uniform in color.
  2. Spread dough in various irregular shapes on baking sheet, making sure to leave room between each cookie.
  3. Bake at 350 for 10 to 12 minutes, or until the edges start to turn golden brown.
  4. Remove from oven and let cool.

For the zombie fingers

  1. Mold and stretch the Tootsie Rolls so they resemble fingers and stick toothpicks at the end of each finger. Remember, each finger / thumb is a different size.
  2. Place one almond sliver at the end of each Tootsie Roll so it resembles a nail

Assembly

  1. Remove brownie from cake pan and place on serving platter.
  2. Stick zombie fingers in brownie with toothpicks so it looks like a hand is coming out of the ground.
  3. Arrange green sugar cookies bottom side up around fingers on top of brownie. Once you have enough cookies covering the brownie, crumble a few of the remaining cookies and sprinkle on top to resemble moss.


Thursday, December 3, 2020

Peppermint Brownie Ice Cream Cake


This is a sponsored post by Hudsonville Ice Cream, but the text and opinions are all mine. Thank you for supporting brands that make Kylee's Kitchen possible!

Ice cream cake is my favorite cake. In fact, I always request it for my birthday, which happens to be exactly one week before Christmas. That’s why I believe it’s the perfect dessert all year round, especially when it’s made with seasonal flavors like Hudsonville’s Limited Edition Peppermint Stick.


My family used to always buy my birthday ice cream cake, but (as with everything) it tastes so much better when it’s homemade. Fortunately, I’ve learned a few tips and tricks throughout the years, and I’m excited to share them with you all.


First, it’s very important to use high-quality, premium ice cream because it stays firmer longer than ice cream made with a lot of artificial flavors and additives. I’ve tested a lot of different peppermint ice creams, and Hudsonville’s is my favorite. The mint flavor tastes very natural, and it has the perfect amount of peppermint stick crunch. 


The Limited Edition Peppermint Stick ice cream is delightful on its own, but it’s truly heavenly when sandwiched between layers of chocolate cake. Mint-chocolate is one of my favorite flavor combos. After testing several chocolate cakes, I decided my favorite is actually a brownie recipe. Brownies retain their fudginess and chew better than other frozen cakes because the high fat and sugar content lowers the freezing point.


One of my favorite parts of an ice cream cake is the crunchy fudge layer. I love the contrast in textures it provides. I’ve tried making the cake with store-bought fudge sauce and homemade fudge sauce. I honestly can’t taste a difference between the two, so I just buy fudge sauce. As for the chocolate cookies, I prefer to break them apart by hand instead of using a food processor. I think when the pieces are too small the texture becomes gritty instead of crunchy.


You’ll notice I used homemade whipped cream for the topping, but if you prefer, you can use store-bought whipped topping instead. It will freeze just as well! 


And of course, you can make whatever design you want on top of the cake, but I must say I really love the starlight mint pattern. I used a toothpick to draw the design on top of the cake, and I filled it in with crushed candy canes.


I recommend making this cake at least one day before you plan to serve it. You want to make sure all of the layers have time to freeze together.


This peppermint brownie ice cream cake looks incredibly impressive, and it will certainly be the highlight of your holiday table. Hudsonville’s Limited Edition Peppermint Stick ice cream is proof that sometimes the sweetest packages aren't under the tree—they’re in the freezer.


Use this Scoop Locator tool to find Peppermint Stick ice cream near you—it’s at Meijer in Indy-area stores! Also, click here for a coupon to save $2 on any carton of Hudsonville Ice Cream and get an ebook filled with ice cream recipes! 


Peppermint Brownie Ice Cream Cake

Ingredients

For the brownie layer

  • 7 ounces (397 grams) bittersweet chocolate, chopped
  • 6 ounces (3 sticks) unsalted butter
  • 4 large eggs
  • 2 cups (400 grams) granulated sugar
  • 1 teaspoon vanilla extract
  • 1/2 teaspoons salt
  • 1 2/3 cup flour (200 grams) all-purpose flour

For the ice cream layer

For the fudge crunch layer

  • 1 cup (100 grams) chocolate cookies, crushed
  • 10 ounces fudge sauce

For the whipped cream layer

  • 8 ounces heavy whipping cream, chilled
  • 1/4 cup (30 grams) powdered sugar
  • 1/2 teaspoon vanilla extract

For the peppermint swirl design

  • 5 candy canes, crushed

Directions

For the brownie layer

  1. Line two 9-inch cake pans with parchment paper, spray with nonstick cooking spray, and set aside.
  2. Place chopped chocolate and butter in bowl and melt in microwave until smooth. Set aside to cool.
  3. Whip eggs, sugar, vanilla, and salt with electric mixer for 3 to 5 minutes, or until mixture is pale and thick.
  4. Fold in melted chocolate and butter until smooth.
  5. Fold flour into mixture until just combined.
  6. Divide batter between cake pans and bake at 325 degrees Fahrenheit for 40 minutes.
  7. Once done, remove from oven and cool completely.
  8. Once brownie layer is cool, use serrated knife to cut through brownie so you have two equal layers. Set aside until ready to assemble cake.

For the ice cream layer

  1. Line 9-inch cake pan with plastic wrap and scoop ice cream into cake pan.
  2. Cover with more plastic wrap and smooth ice cream layer by pressing down with hands
  3. Return to freezer to harden until ready for assembly.

For the whipped cream

  1. Using a mixer with a whisk attachment, whip heavy whipping cream, powdered sugar, and vanilla extract until soft peaks form and it holds its shape when the whisk is withdrawn, about 3 to 5 minutes

For assembly

  1. Place one brownie layer on plate or cake stand—whatever you plan to serve it on.
  2. Evenly spread half of fudge sauce and half of cookie crumbs on top of brownie layer.
  3. Remove ice cream layer from freezer and place on top of fudge crunch layer. Spread remaining fudge sauce and cookie crumbs on top of ice cream.
  4. Place second brownie layer on top.
  5. Cover top of cake in whipped cream and return to freezer to harden.
  6. Before serving, remove cake from freezer and use toothpick to draw starlight mint pattern on top of cake. Sprinkle crushed candy cane over cake to create red and white swirl pattern.
  7. When it’s time to cut cake, run your knife under hot water and dry it with a towel. Repeat between every slice. A warm knife makes the cleanest cuts.


Pin It button on image hover