Showing posts with label Gifts. Show all posts

Friday, December 6, 2019

3 easy holiday snacks you can make in the microwave


This is a sponsored post by Challenge butter, but the text and opinions are all mine. Thank you for supporting brands that make Kylee's Kitchen possible!

Cookie plates are everywhere this time of year, but I've always preferred holiday snacks. Obviously, there are many things I love about snacks, but one of my favorite things is that it's harder to measure how much I've eaten so I feel less guilty about myself. Is that nuts? (lame snack joke)

The following three snack recipes are incredibly easy. I made them in the microwave for heaven's sake!

When I first made the nut mixture, I didn't brown the butter, and it was definitely tasty. But it was INCREDIBLE when I tried it with brown butter, and I knew there was no going back. I can't believe how much brown butter can elevate a recipe.

I used Challenge butter for the brown butter in this recipe. Challenge products are my favorite because they use fresh milk and cream from local dairies, and they're put in the dairy case in just 24 hours, as opposed to 5-7 days, which is the case for most other brands.

I want to point out one very important thing: It is imperative that you use a large microwave-safe bowl and a cover when browning the butter. The butter will explode everywhere in your microwave if you try to use a tupperware container. Yes, I know from personal experience.

Toasted Brown Butter Rosemary Nuts
Ingredients
  • 3 cups unsalted raw mixed nuts
  • 3 Tablespoons Challenge unsalted butter
  • 3 Tablespoons brown sugar
  • 2 Tablespoons fresh rosemary, chopped
  • 3 teaspoons salt
  • 1/2 teaspoons cayenne pepper (add 1/4 teaspoon more if you like spice)
  • 1/2 teaspoon cumin powder
  • 1/2 teaspoon black pepper
Directions
  1. Place mixed nuts in a microwave-safe bowl and microwave for 2 minutes to toast the nuts.
  2. Put butter in large microwave-safe bowl and cover bowl. Microwave for 2 minutes. Remove from bowl and stir. Continue to microwave in 30-second intervals until the butter is amber in color and there are brown flakes of butter at the bottom of the bowl.
  3. Remove butter from microwave. Stir in brown sugar, rosemary,  salt, cayenne pepper, cumin, and black pepper.
  4. Add nuts to bowl and mix to combine.
  5. Microwave in 30-second increments for 4 minutes, stirring each time.
  6. Spread out nuts in single layer on parchment paper and let cool before serving.
Recipe adapted from No Spoon Necessary


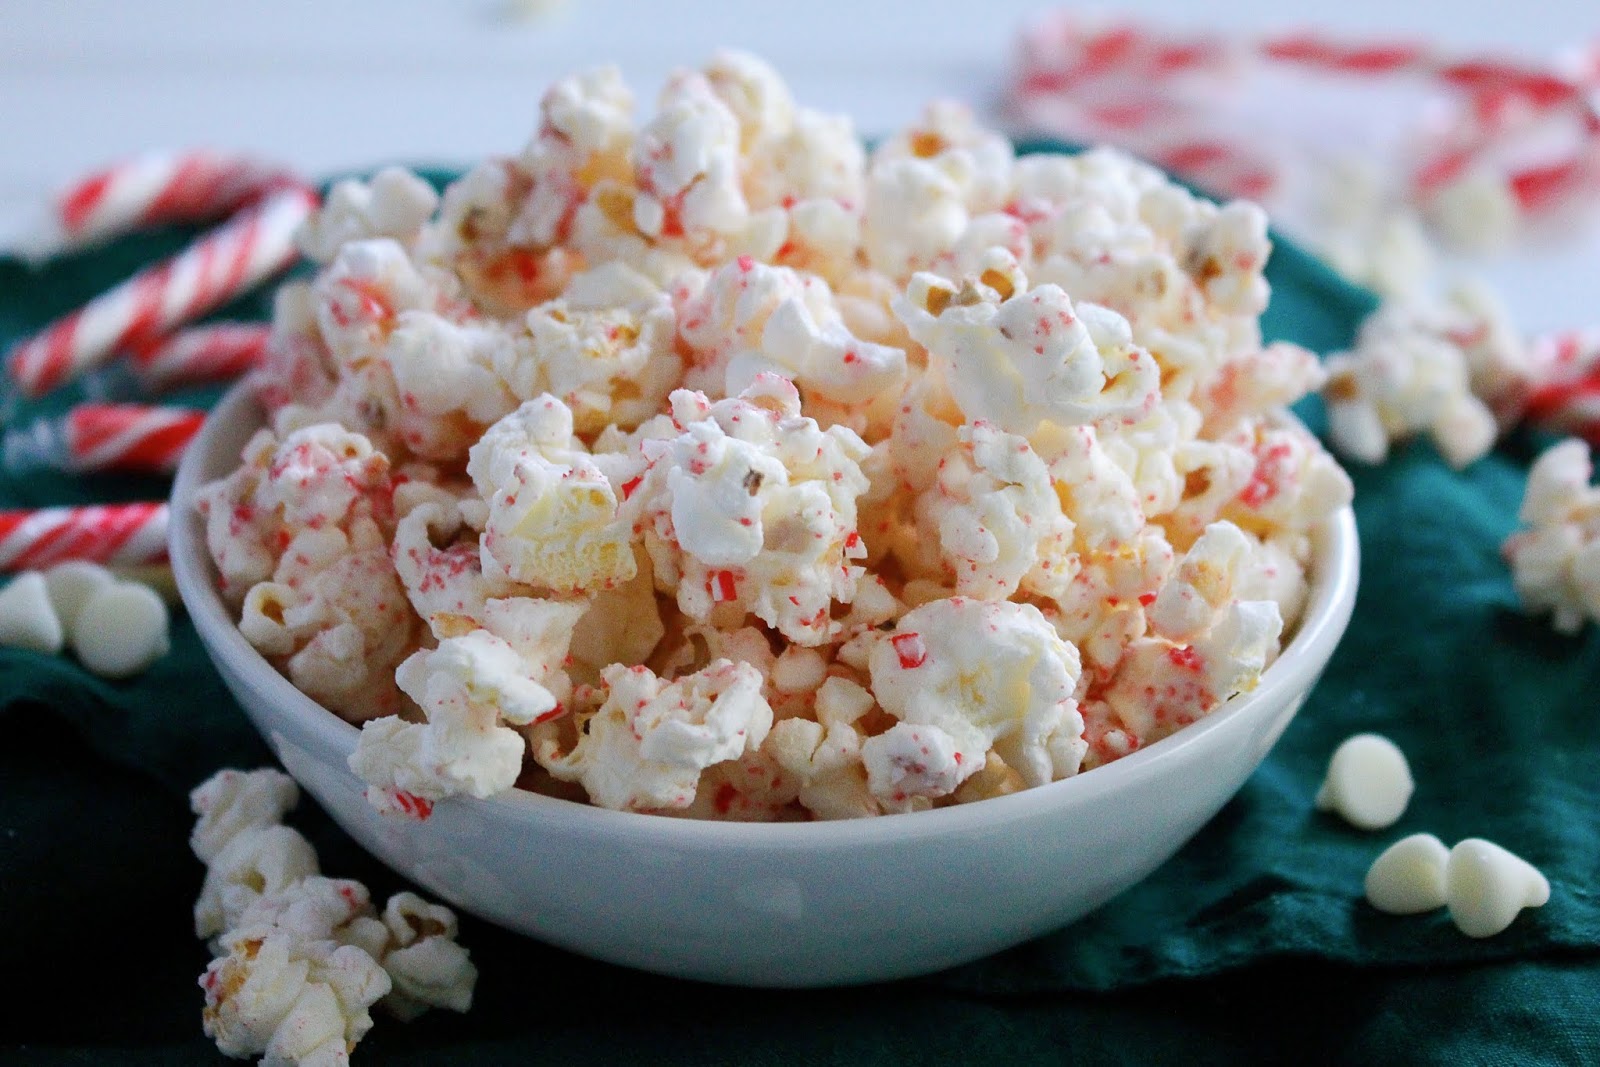
White Chocolate Peppermint Popcorn
Ingredients
  • 24 cups (about 2 microwave bags) popped plain popcorn (sea salt is fine, but not buttered popcorn)
  • 12 ounces white chocolate or white candy coating
  • 1/2 cup peppermint candies (about 8 candy canes)
  • Red sprinkles (optional)
Directions
  1. Spread out popcorn in a single layer on a baking sheet lined with parchment paper
  2. Crush candy canes by placing them in bag and smashing them with rolling pin
  3. Melt white chocolate in microwave in 30-second intervals until smooth, stirring each time. It should take about 2 minutes.
  4. Drizzle white chocolate over popcorn and sprinkle with crushed peppermint candies and sprinkles.
  5. Allow white chocolate to harden before breaking into pieces and serving.
Recipe adapted from Taste of Home


Chai-spiced granola
Ingredients
  • 4 cups rolled oats
  • 1 1/2 cups mixed nuts
  • 1/2 cups unsweetened coconut
  • 1/2 cup maple syrup
  • 1/4 cup coconut oil, melted, or olive oil
  • 1/4 cup brown sugar
  • 1 Tablespoon cinnamon
  • 2 teaspoons vanilla extract
  • 2 teaspoons ground cloves
  • 1/2 teaspoon ground cardamom
  • 1/2 teaspoon salt
Directions
  1. Microwave just the granola in microwave safe bowl for 2 minutes, stirring at the 1-minute mark.
  2. Combine all other ingredients with the oats and microwave on high for 4 minutes, stirring after every minute. The oats should start to brown.
  3. Cool granola on parchment paper before serving. 

Thursday, December 1, 2016

Easy and Inexpensive Edible Gifts for the Holidays


This is a sponsored post by Challenge Butter, but the text and opinions are all mine. Thank you for supporting brands that make Kylee's Kitchen possible!

‘Tis the season of giving. And depending on your situation, all of the giving can really add up. It can become pretty pricey once you start to buy gifts for teachers, co-workers, friends, etc. That's why I recommend making edible treats for your family and friends. Not only will they be impressed but you'll actually save some money.

I understand why you may be hesitant to go that route. It may seem like too much work or you may be worried that everyone is already drowning in too many sweets. But the treats I want to show you are incredibly easy and quick, plus they have a long shelf life and that's important because everyone likes to indulge at a different pace.

And while you're in the giving spirit, you should help Challenge Dairy provide meals to children in need through UNICEF. Challenge has partnered with UNICEF to fight the childhood malnutrition crisis with their campaign called “Pin a Recipe, Feed a Child" check it out now! Through December 31, 2016, if you pin a recipe from the “2016 Pin a Recipe, Feed a Child” Pinterest board, Challenge will donate a meal to UNICEF for a child in need.


One of my favorite favorite favorite gifts to give is cinnamon candied pecans! First of all, I NEED to give them all away right away because they are so addictive that if I don't I eat them all myself. In general, I think nuts are a great gift idea because they do provide some nutritional value and they are a little more on the pricey side so they provide an element of "luxury." Your house will smell so good after making these pecans! It's just like those stands at malls during the holidays, only without the crowds and all of the judgy teenagers walking around.

Cinnamon Candied Pecans
Yield: Makes 4 cups
Ingredients
  • 1/2 cup brown sugar
  • 1/4 cup white sugar
  • 1 tablespoon ground cinnamon
  • 1 teaspoon salt
  • 1 egg white
  • 1 teaspoon vanilla extract
  • 16 ounces (about 4 cups) unsalted pecans halves
Directions
  1. Preheat oven to 300 degrees Fahrenheit. Line large baking sheet with parchment paper and set aside.
  2. In medium bowl, add sugars, cinnamon, and salt. Whisk until combined. Set aside.
  3. In large bowl, whisk egg white and vanilla together until frothy. Add pecans and gently toss until they're well-coated. Add cinnamon sugar mixture and toss until pecans are covered.
  4. Spread pecans out in single layer on prepared baking sheet. Bake for about 30 minutes, stirring after 15 minutes. 
  5. Remove from oven and let cool on baking sheet. When completely cool, store in airtight container.


    In addition to pecans, I really love these Mexican Hot Chocolate Coated Almonds! I bet you'll be the first person to give this give. They're unique and delicious. They satisfy a chocolate craving while sill providing some protein. Also, you don't even have to bake them, and they come together in just a few minutes! In case you're curious, they're called "Mexican Hot Chocolate" almonds because I've added a little cinnamon and a dash of cayenne to the recipe--just like Mexican Hot Chocolate! I think they add a nice kick to the treat! But if it makes you too nervous to add the spices, you can just omit them. 

    Mexican Hot Chocolate Coated Almonds 
    Yield: Makes 2 cups 
    Ingredients
    • 2 cups almonds
    • 1 Tablespoon Challenge butter
    • 2 ounces chocolate (milk or dark)
    • 4 Tablespoons cocoa powder + 1 Tablespoon for dusting
    • 2 Tablespoons cinnamon
    • 1 teaspoon salt
    • 1/2 teaspoon cayenne pepper 
    Directions
    1. Melt butter in a medium saucepan on low heat. Add chocolate and stir frequently until just melted.
    2. Add almonds and stir to coat evenly; remove from heat.
    3. Combine cocoa powder, cinnamon, salt, and cayenne in bowl.
    4. Dump almonds and powder mixture into container with lid. Vigorously shake until almonds are coated with powder.
    5. Pour almonds onto baking sheet and sprinkle with cocoa powder to ensure all almonds are evenly coated.
    6. Let cool and then store in airtight container. 
    Recipe adapted from Physical Kitchness


    Speaking of hot chocolate, I love these little hot chocolates on a stick. Melted chocolate is so much richer in taste than the powdery mixes. My dad actually said "Wow!" after trying one. Once again, it's a very unique treat that's easy to make. Just melt good quality chocolate and add a little powdered sugar and cocoa powder to make it more soluble in liquid. I used a silicone mini muffin mold to make these and it worked out really well. But if you don't have a silicone mold, you can put the melted chocolate mixture into a regular mini muffin pan with liners or spoon it into mini disposable cups. Just make sure to peel away the liner or cup before gifting! 

    Hot Chocolate on a Stick 
    Yield: Makes about 12 servings
    Ingredients 
    • 16 ounces good quality milk or dark chocolate
    • 1/2 cup powdered sugar
    • 1/2 cup unsweetened cocoa powder
    • 1/8 teaspoon salt
    • Mini marshmallows
    Directions
    1. In a microwave-safe bowl, melt chocolate in 30-second intervals.
    2. Stir in powdered sugar, cocoa powder, and salt.
    3. Spoon mixture into silicone baking cups and top with mini marshmallows
    4. Press plastic spoon into center of each cup and let set for several hours.
    5. Serve by heating up 8 ounces of milk and letting hot chocolate stick sit in milk for several minutes before serving.
    Recipe adapted from In Katrina's Kitchen


    Another one of my favorite gifts that I know I love to receive is caramel corn! Lots of people buy popcorn gift baskets for the holidays, but those are really pricey--especially when you're gifting it to several people! It is significantly cheaper to make it at home. And, even better, you can make it in the microwave! 

    Microwave Caramel Corn 
    Yield: Makes about 8 servings 
    Ingredients
    • 16 cups popped popcorn (microwave, stove-popped or store-bought)
    • 1 cup brown sugar
    • 1/2 cup Challenge butter
    • 1/4 cup light corn syrup
    • 1/2 teaspoon baking soda

    Directions
    1. Place popped popcorn in large microwave-safe bowl.
    2. Combine brown sugar, butter, and corn syrup in microwave-safe bowl and microwave-covered bowl on high for 2 minutes.
    3. Remove from microwave and stir for 30 seconds
    4. Put covered container back in microwave and cook for an additional 3 minutes
    5. Remove from microwave, add baking soda and stir for 30 seconds. Mixture will thicken.
    6. Pour mixture over popped popcorn and shake bowl of popcorn.
    7. Put bowl of popcorn in microwave for 1 minute; remove bowl and shake.
    8. Put bowl of popcorn back in microwave and heat for an additional 45 seconds; remove bowl and shake.
    9. Put bowl of popcorn back in microwave and heat for an additional 30 seconds; remove bowl and shake.
    10. Pour popcorn on baking sheet covered in wax paper to cool for half hour. Store in airtight container.


    Salty and sweet make the perfect treat! And that's exactly what you'll get with these cute little M&M Pretzel Hugs Bites! Everyone loves these, and if you know how to turn on an oven, you can make them. The beauty of these treats is their simplicity, and I have yet to meet anyone who dislikes them. 

    M&M Pretzel Hugs Bites 
    Ingredients
    • 1 bag of waffle pretzels
    • 1 (12 ounce) bag of Hershey's Hugs
    • 1 (9.9 ounce) bag of M&Ms 
    Directions
    1. Preheat oven to 200 degrees Fahrenheit.
    2. Line a baking sheet with parchment paper or a silicone baking mat.
    3. Align pretzels on baking sheet.
    4. Place a Hershey candy on each of the pretzels.
    5. Put baking sheet in oven for 4 minutes or until candies just start to melt.
    6. Remove baking sheet from oven.
    7. Carefully place a candy in the center of each soft Hershey and press down to spread the chocolate
    8. Place the baking sheet in the refrigerator until the chocolate has set (about 15 minutes).
    9. Store in an airtight container.
      Pin It button on image hover