Friday, September 29, 2023

Coffee-flavored coffee cake


This is a sponsored post by Challenge Butter, but the text and opinions are all mine. Thank you for supporting brands that make Kylee's Kitchen possible! 

Coffee cake is not typically flavored with coffee—it gets its name from the fact that it's meant to be eaten with coffee. But on honor of National Coffee Day, I was inspired to make a coffee-flavored coffee cake so you can have your coffee and eat it, too! 

I incorporated coffee into each of the three parts of this cake: the crumble, the filling, and the cake itself.


There are a few things I want to point out about this recipe. 

Many coffee-flavored baked goods use espresso powder, but I used finely ground coffee instead. We purchase coffee beans from local Indianapolis roasters (primarily Helm, Blue Mind, and Tinker). These locally roasted beans have an incredible amount of flavor. So I ground about 20 grams of beans at the finest setting on our grinder, and I used the ground beans instead of espresso powder. If you don't have access to a grinder, you can use espresso powder instead.

Coffee concentrate is highly concentrated coffee. My husband and I make coffee concentrate using beans from our local roasters, and then we use that concentrate for cold brew. If you don't want to make your own concentrate, you can buy it from the store or you can brew a really strong cup of coffee and then let it cool.

As you can tell by reading this blog post, I put a great deal of effort in making sure I use high-quality ingredients to achieve the best tasting product. If I'm going through the effort in grinding my own beans and making my own concentrate, the rest of the ingredients I'm using better be high quality. That's why I only use Challenge butter in my recipes. It creams better, it tastes better, I could go on and on... and it contains no artificial or synthetic ingredients.

I hope you enjoy this coffee cake with your morning (or afternoon or evening) cup of coffee! Stay caffeinated, friends! 


Coffee-flavored coffee cake

Yield: Makes 1, 9x5-inch loaf cake

Time: About 2 hours

Ingredients

For the crumble

  • 1/2 cup (100 grams) light brown sugar
  • 1/4 cup (50 grams) all-purpose flour
  • 4 Tablespoons (1/2 stick) unsalted Challenge butter
  • 1 teaspoon finely ground coffee beans
  • Optional: 2 ounces pecans, chopped 

For the filling

  • 1/4 cup (50 grams) light brown sugar
  • 2 Tablespoons (15 grams) all-purpose flour
  • 1 teaspoon finely ground coffee beans

For the cake

  • 1 1/2 cups (180 grams) all-purpose flour
  • 2 teaspoons cinnamon
  • 1 teaspoon baking powder
  • 1/2 teaspoon baking soda
  • 1/2 teaspoon cardamom
  • 1/2 teaspoon kosher salt
  • 3/4 cup (180 milliliters) sour cream
  • 1/4 cup (60 milliliters) coffee concentrate
  • 8 Tablespoons (1 stick) Challenge unsalted butter
  • 3/4 cup (150 grams) light brown sugar
  • 2 Tablespoons finely ground coffee beans
  • 2 large eggs

Directions

For the crumble

  1. Mix brown sugar, flour, butter, ground coffee beans, and pecans until you have large crumbles. Set aside.

For the filling

  1. Mix brown sugar, flour,  and ground coffee beans. Set aside. 

For the cake

  1. Preheat oven to 350 degrees Fahrenheit. Line 9x5-inch loaf pan with parchment paper or spray with nonstick spray.
  2. In medium-sized bowl, mix flour, cinnamon, baking powder, baking soda, cardamom, and salt. Set aside.
  3. In small bowl, mix sour cream and coffee concentrate.
  4. In bowl of stand mixer, beat butter, brown sugar and ground coffee with paddle attachment on medium speed until light and fluffy. Scrape bowl. 
  5. Add eggs 1 at a time while mixing on low speed.
  6. Add dry ingredients in 3 additions, mixing until just combined and alternating with sour cream-coffee mixture in 2 additions. Scrape sides of bowl after each addition.
  7. Pour half the cake batter into the loaf pan. 
  8. Sprinkle filling mixture over top of cake batter.
  9. Spread remaining cake batter over filling and sprinkle crumb mixture over top of cake batter.
  10. Bake for 45 to 50 minutes, or until cake is baked through. Cake should spring back when touched.
  11. Allow cake to cool in pan for about 20 minutes before cutting or trying to remove from pan.


Friday, September 22, 2023

Apple butter crumb muffins


This is a sponsored post by Challenge Butter, but the text and opinions are all mine. Thank you for supporting brands that make Kylee's Kitchen possible! 

Did you get caught up in fall fever at the apple orchard and now you’re stuck with 20 pounds of apples and you’re not sure what to do with them all? Been there, done that. And I have some ideas on ways to use your apples!

Did you know you can make applesauce by cutting apples into chunks (core apples but keep peels on), sticking them in the microwave, and then blending them in a blender? It doesn’t need to be a multi-hour recipe with a bunch of sugar.

And then you can take some of that applesauce to make apple butter just by simmering it and reducing it on the stove. 

And THEN you can use that apple butter to make the most delicious apple muffins!

A couple of notes before you get started:

1.  There are 2,500 varieties of apples grown in the United States, but not all of them are great for making applesauce. You want to choose a softer apple with flesh that breaks down easily, like fuji, cortland, or McIntosh.

2. You can absolutely add spices and sugar to your applesauce or apple butter if you want! 

3. I was able to blend the apples without adding any extra liquid to the blender. I had to stop and stir the mixture a few times, but eventually it all blended. If your apples aren't very juicy or if you don't have a high-powered blender, you may need to add a little liquid. I recommend apple cider or apple juice if possible, and start with just a tablespoon of liquid, increasing the amount if necessary.

4. Nappe is a term used to describe the thickness and consistency of a sauce. A sauce is nappe when you can coat the back of a spoon and draw a line through the sauce with your finger. The sauce shouldn't move. That's the consistency you want for your apple butter.

5. The amount of apple butter yielded from a certain amount of applesauce will depend on how much liquid evaporates from the sauce and how long you simmer it. So it may not be the same amount each time.

6. I've made the muffins with and without the crumb topping, and I think they're much better with a crumb topping. It adds a lot of texture, and it really jazzes them up. You could also try adding nuts to the muffin batter for texture.

7. You don't want the crumb topping to be a paste. Make sure it looks clumpy. I recommend using Challenge Salted Caramel Butter Snack Spread in the crumb topping. It's the perfect consistency when used straight from the refrigerator, and it gives the muffins an extra flavor boost.


Blender applesauce 

Yield: Makes about 20 ounces applesauce

Time: 20 minutes

Ingredients

  • 2 pounds apples (soft variety like fuji, cortland, or McIntosh)

Directions

  1. Microwave apples in microwave-safe bowl with lid for 10 to 15 minutes, or until apples are easily pierced.
  2. Transfer apples with juices to high-speed blender. Blend until desired consistency. If necessary, add apple juice or apple cider, 1 spoonful at a time, until blender runs.

Apple butter

Yield: Makes about 12 ounces apple butter

Time: 20 minutes

Ingredients

  • 20 ounces applesauce
  • 2 teaspoons cinnamon, if desired

Directions

  1. Bring applesauce to simmer in large pot. Continue to simmer over low-medium heat for 15 - 20 minutes.
  2. Check doneness by using spoon to draw line through apple butter on bottom of pot. Apple butter is done if line holds.

Apple butter crumb muffins

Yield: Makes 12 muffins

Time: About 45 minutes

Ingredients

For the crumb topping

For the muffin batter

  • 3/4 cup / 90 grams all-purpose flour
  • 3/4 cup / 90 grams whole-wheat flour
  • 1 teaspoon baking soda
  • 2 teaspoons ground cinnamon
  • 1/2 teaspoon ground cloves
  • 1/2 teaspoon kosher salt
  • 1/4 teaspoon ground nutmeg
  • 1 cup / 240 milliliters apple butter
  • 1/2 cup / 113 grams butter, melted
  • 1/2 cup / 105 grams dark brown sugar 
  • 2 large eggs, room temperature
  • 1 teaspoon vanilla extract

Directions

For the crumb topping

  1. Preheat oven to 425 degrees Fahrenheit. Line 12-count muffin pan with liners. Set aside. 
  2. Mix together flour, brown sugar, and cinnamon. Use fork to mix in butter until you have large crumbles. Set aside.

For the muffin batter

  1. In large bowl, mix together both flours, baking soda, cinnamon, cloves, salt, and nutmeg.
  2. In medium bowl, mix apple butter, butter, sugar, eggs, and vanilla extract.
  3. Pour wet ingredients into dry ingredients and mix until just combined.
  4. Divide batter evenly into each liner. Spoon crumb topping evenly over batter, gently pressing down.
  5. Bake for 5 minutes at 425 degrees Fahrenheit, then with muffins still in oven, reduce temperature to 350 degrees Fahrenheit. Bake for another 15 minutes or until toothpick inserted in center comes out clean. 
  6. Allow muffins to cool for 5 minutes pan before transferring to wire rack.


Monday, September 11, 2023

Vegan Nachos with Walnut Mushroom Taco "Meat"


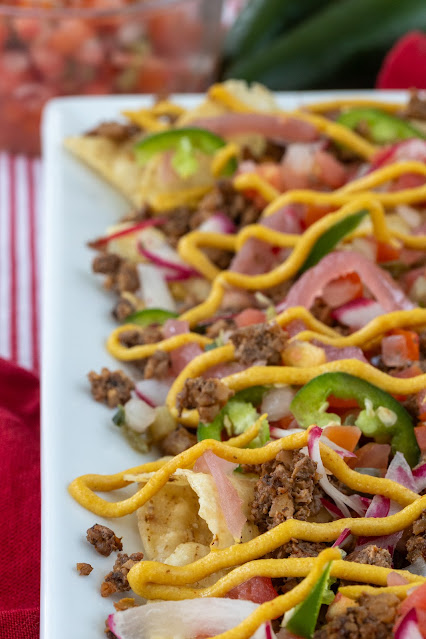
I never thought when we visited the small town of Girdwood, Alaska in 2021 that I would still be thinking about one of the meals we ate there TWO YEARS later. Jack Sprat is an American restaurant that offers a variety of unique vegan options. One of their most popular dishes is the "nacho libre," "adventurous vegan nachos." Normally I wouldn't get nachos at a restaurant just because I feel like that's something I can make at home. But all the reviews raved about the nachos, so we ordered them. I'm so glad we did. They were 10 times more flavorful than any nachos I've ever had, and it had a lot to do with the vegan walnut mushroom "meat."

I've wanted to recreate the nachos at home for a very long time, and I finally did it in honor of National Mushroom Month. The recipe starts by combining sundried tomatoes, spices, lime juice, portobello mushrooms, and walnuts in a food processor. Pulse just until the mixture resembles meat crumbles. DO NOT puree the mixture or pulse too many times. You do not want a paste! Then you brown the mixture on the stove. It's safe to eat without cooking it, but I think it resembles and tastes more like meat when you brown it. I recommend using portobello mushrooms because they are the most meat-like variety of mushroom. Make sure to remove their woody stumps and their gills before using them. The gills can have a bitter taste and trap sand and dirt. Just use a spoon to scrape them out.


After you've made the "meat," it's time to make the "cheese" sauce. It starts by blooming the spices in oil and then making a roux with flour. The gluten in the flour makes the cheese sauce stretchy, like real cheese sauce. Then add nutritional yeast to the flour--this is what gives the sauce its cheesy flavor. The mixture will be very clumpy, so slowly add the milk a little at a time, whisking until its' smooth and the consistency you want. Leftover cheese sauce will need to be thinned out.

Now it's time to assemble the nachos! I followed Jack Sprat's lead by layer pico de gallo and radishes on top of the chips and "meat" crumbles. I also like to add jalapeno slices for heat and pickled red onions for a hit of acid.

Vegan Nachos with Walnut Mushroom Taco "Meat"

Yield: 1 large platter nachos

Time: About 30 minutes

Ingredients

For walnut mushroom taco "meat"

  • 2 Tablespoons sundried tomatoes
  • 2 Tablespoon lime juice
  • 2 teaspoons chili powder
  • 1/2 teaspoon garlic powder
  • 1/2 teaspoon onion powder
  • 1/2 teaspoon cumin
  • 1/2 teaspoon kosher salt
  • 3 portobello mushrooms, woody stem and gills removed
  • 2 cups walnuts
  • 1 Tablespoon avocado oil

For vegan cheese sauce

  • 3 Tablespoons avocado oil
  • 1/2 teaspoon salt
  • 1/2 teaspoon garlic powder
  • 1/4 teaspoon curry powder
  • 1/4 teaspoon ground paprika
  • 1/4 teaspoon cayenne powder
  • 1 Tablespoon yellow mustard
  • 3 Tablespoons all-purpose flour
  • 6 Tablespoons nutritional yeast
  • 1 cup unsweetened almond milk 

For nacho assembly

  • Tortilla chips
  • Pico de gallo
  • Radishes, sliced thin
  • Pickle red onion
  • Jalapenos, sliced thin
  • Avocado, diced

Directions

For walnut mushroom taco "meat"

  1. Pulse sundried tomatoes, lime juice, chili powder, garlic powder, onion powder, cumin, and salt in food processor until tomatoes are finely chopped.
  2. Add mushroom and walnuts to food processor. Pulse until texture resembles ground beef. Don't overdo it! You don't want a paste. Alternatively, finely chop everything and mix with spices.
  3. Heat 1 Tablespoon avocado oil in large skillet over medium heat. Transfer mixture to skillet and cook for about 10 minutes or until mixture releases its liquid and is browned.

For vegan cheese sauce

  1. Heat oil in small saucepan on low heat.
  2. Add salt, garlic powder, curry powder, paprika, and cayenne. Whisk for about 30 seconds to bloom spices.
  3. Add yellow mustard and whisk to combine.
  4. Add flour and whisk.
  5. Add nutritional yeast, and whisk. Mixture will be very clumpy.
  6. Add milk and whisk on low heat for a few minutes. If it gets too thick you can add a little bit more water and whisk again.
  7. Add cold milk a little at a time while whisking until smooth after each addition. If sauce is too thick, add a little more milk.
  8. Remove from heat.

For nacho assembly

  1. Drizzle cheese sauce on bottom of platter and layer tortilla chips on top of cheese sauce.
  2. Sprinkle taco "meat" over chips. Top with pico de gallo, radish slices, pickled red onions, jalapeno, avocado, and finish with more cheese sauce. Serve immediately.
  3. Store leftover taco "meat" and cheese sauce in refrigerator for up to 5 days.


Thursday, September 7, 2023

Blue bean dip


NFL games start this weekend, and the Colts' first game of the season is on Sunday! Many people will gather around their TVs to watch all the action unfold, and undoubtedly they’ll be snacking.

You all know I love to make themed foods, so I wanted to make a special “Colts blue” snack.

The problem: it is very hard to find naturally blue foods! Of course, I could use blue dye, but that is unappealing (no one wants a blue mouth).

But thanks to science, we can use red cabbage and baking soda to make blue bean dip!

Red cabbage (sometimes called purple cabbage) is a natural pH indicator because it contains anthocyanins—chemicals that change color in response to pH changes. Anthocyanins turn red when mixed with acids and blue when mixed with bases.

So if we add a little red cabbage and baking soda to our dip, it will naturally turn blue!

The key is you cannot use any acid in the recipe because then it won't work. A lot of bean dip recipes use lemon juice, but lemon is an acid, so it will mess with the color if we add it to this recipe.


Blue bean dip

Yield: Makes about 1 1/2 cups of bean dip

Time: About 10 minutes

Ingredients

  • 1 (15.5 ounce) can cannellini beans, drained and rinsed
  • 4 cloves garlic
  • 3 Tablespoons extra virgin olive oil
  • 2 Tablespoons tahini
  • 1 teaspoon kosher salt
  • 1 teaspoon ground cumin
  • 1/2 teaspoon black pepper
  • 1/4 teaspoon cayenne
  • 1/4 teaspoon paprika
  • Optional: Fresh herbs like rosemary, thyme, and  parsley
  • 1/2 cup to 1 cup (50 to 100 grams) red cabbage, chopped
  • 1/4 to 1/2 teaspoon baking soda

Directions

  1. Add beans to bowl of food processor or high-speed blender and blend until smooth, creamy, and lighter, about 1 minute. Add up to 2 tablespoons water if necessary to keep blades moving.
  2. Add garlic, olive oil, tahini, salt, cumin, black pepper, cayenne, paprika, and herbs. Blend until smooth.
  3. Add 1/2 cup red cabbage and 1/4 teaspoon baking soda and blend until smooth. Be sure to blend for a full minute to allow for the color to develop. Add more red cabbage and baking soda (a little at a time) if necessary to adjust color. 
  4. Taste and adjust seasonings. Serve with pita chips, pretzels, tortilla chips, etc.

Pin It button on image hover