Thursday, January 27, 2022

Banana Split Ice Cream Cake

This is a sponsored post by Hudsonville Ice Cream, but the text and opinions are all mine. Thank you for supporting brands that make Kylee's Kitchen possible!

Banana split ice cream sundaes are truly an iconic American dessert. My dad told me he always ordered a banana split at his hometown ice cream stand because it was the biggest sundae. So naturally, I did the same thing.

The only way to improve this classic dessert is to create a version that you can make ahead of time and serve to a crowd. That’s when I dreamt up this banana split ice cream cake.

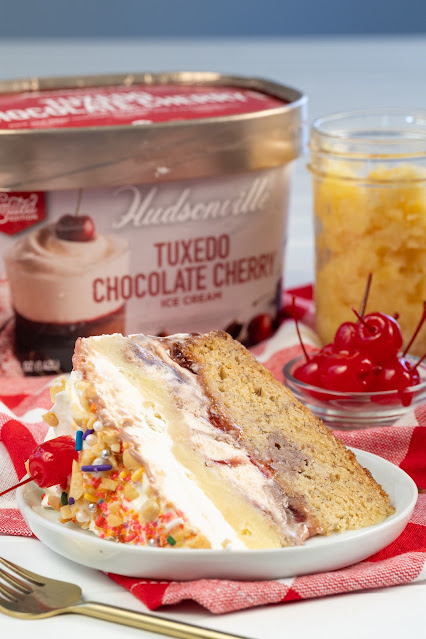
For the first layer, I made an incredibly delicious and moist banana cake. Banana cake is not the same as banana bread even though they are both similar in flavor. Banana cake is lighter and fluffier.

I achieved this by experimenting with the leavening agents and the flour. I used cake flour in this recipe as opposed to all-purpose flour because cake flour has lower protein than all-purpose flour, so it produces less gluten. This results in a more tender structure.

Sometimes cake flour can be hard to find. I can only ever find it at Walmart stores in Indianapolis. But fortunately, it’s easy to make at home. Here is the formula: 1 cup cake flour = 105 grams all-purpose flour + 14 grams cornstarch.

After the cake cooled, I spread a thick layer of strawberry preserves on top. You can, of course, make your own strawberry sauce, but since the strawberries aren’t the star of the cake, I just used store-bought preserves.

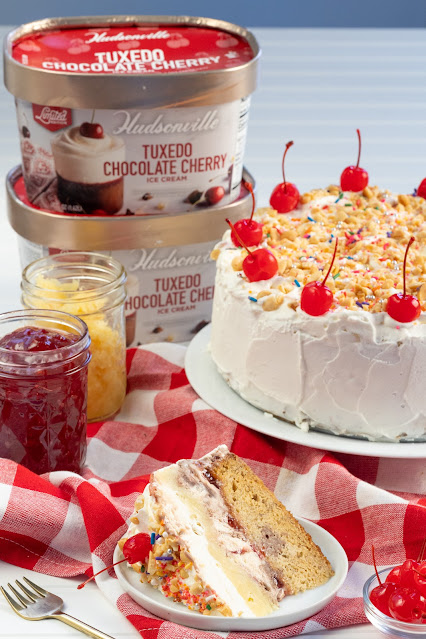
The ice cream, on the other hand, is definitely the most important part of this cake. Every season, Hudsonville Ice Cream comes out with Limited Edition flavors, and each time I try them, I have a new favorite. That’s how I feel about Hudsonville’s Limited Edition Tuxedo Chocolate Cherry ice cream. It has layers of dark and white chocolate ice cream and a tart cherry swirl. My husband and I both said “Wow” out loud after taking our first bite.

Tuxedo Chocolate Cherry ice cream is the absolute perfect ice cream for this cake because it combines the chocolate and cherry flavors we all love and expect in a banana split sundae. I recommend softening the ice cream by moving it to the refrigerator about 20-30 minutes before spreading it on the cake. 

Crushed pineapple is the last layer. Once you spread it on top of the ice cream, stick the cake back in the freezer for at least two hours to firm up.

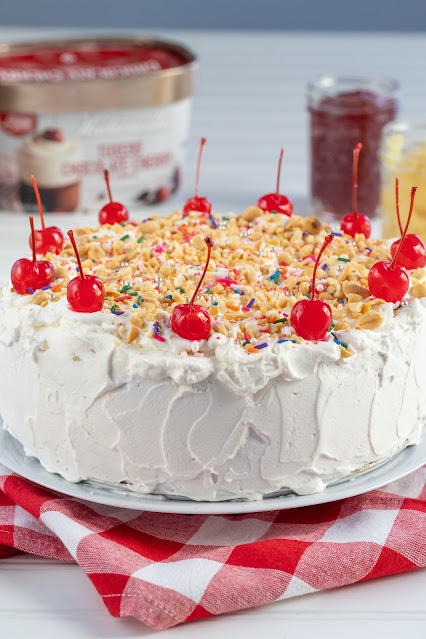
Before serving, I covered the entire cake in homemade whipped cream. If you have never made whipped cream, you’re really missing out. It’s incredibly easy, and it tastes significantly better than the store-bought stuff. 

I love how this cake turned out, and I really don’t think it could be any cuter! It would be so much fun for a special occasion!

Remember, Limited Edition Tuxedo Chocolate Cherry ice cream is only available for a short time, so definitely grab it while you can! You can use this Scoop Locator tool to find it at a store near you.

Banana Split Ice Cream Cake

Yield: 10 servings

Ingredients

For the banana cake

  • 1 1/2 cups (180 grams) cake flour
  • 3/4 cup (160 grams) brown sugar 
  • 1 teaspoon baking powder
  • 1/2 teaspoon baking soda 
  • 1/2 teaspoon salt
  • 1/2 cup (108 grams) canola oil
  • 2 (100 grams) large eggs
  • 2 teaspoons vanilla
  • 2 (250 grams) medium bananas

For the strawberry layer

  • 1 (15.5 ounce) jar strawberry preserves

For the ice cream layer

For the pineapple layer

  • 1 (20 ounce) container crushed pineapple, drained

For the whipped cream

  • 2 cups heavy cream
  • 1/2 cup (57 grams) confectioners' sugar
  • 1 teaspoon vanilla extract

Decorations

  • Sprinkles, maraschino cherries, crushed peanuts

Directions

For the banana cake

  1. Preheat oven to 350 degrees Fahrenheit. Prep 9-inch springform pan with nonstick spray.
  2. Whisk cake flour, brown sugar, baking powder, baking soda, and salt in medium bowl.
  3. Add canola oil, eggs, and vanilla, and mix until just combined.
  4. Stir in bananas.
  5. Pour batter into springform pan and bake 25-30 minutes, or until internal temperature registers between 200 and 210 degrees Fahrenheit.
  6. Allow to cool.

For the strawberry layer

  1. Once cake cools, leave it in springform pan and spread strawberry preserves on top.

For the ice cream layer

  1. Spread Limited Edition Tuxedo Chocolate Cherry ice cream in even layer on top of strawberry preserves.

For the pineapple layer

  1. Drain crushed pineapple and spread in even layer over ice cream.
  2. Return cake to freezer for at least two hours.

For the whipped cream

  1. Combine heavy cream, sugar and vanilla in large bowl. Use hand mixer or stand mixer with whisk attachment to whip the ingredients on medium-high speed until medium peaks form.
  2. Remove cake from freezer and use small spatula to cover entire cake in whipped cream.
  3. Top with sprinkles, crushed peanuts, and maraschino cherries.
  4. Return to freezer until ready to serve.

Sunday, January 23, 2022

Peanut butter upside down cake


This is a sponsored post by Challenge butter, but the text and opinions are all mine. Thank you for supporting brands that make Kylee's Kitchen possible! 

Traditional upside down cake is made by creating a butter and brown sugar sauce in a cast iron skillet, laying pineapple rings and cherries in the sauce, and then pouring cake batter on top. When the cake cooks, the sauce caramelizes at the bottom. After it finishes cooking, the cake is flipped upside down so the caramelized fruit is on top and the sauce soaks into the rest of the cake. 

This peanut butter upside down cake is the same concept EXCEPT I used bananas instead of pineapple, and the base is a super moist peanut butter cake.

Anyone can make this recipe because it doesn’t require any special equipment—just 2 bowls for mixing and a cast iron skillet. 

It's important to use traditional creamy peanut butter as opposed to natural peanut butter. Natural peanut butter is more heavy and oily and will weigh down the cake. For substitutions, you can us any nut or seed butter as long as it’s creamy and no-stir.

I only use Challenge unsalted butter for this cake. Challenge butter is churned daily from the freshest 100% real pasteurized sweet cream. There are no hormones, additives, or fillers. 

It can be hard to tell if the cake is all the way baked through. I always use a thermometer to check the internal temperature of the cake. It should be between 205 to 210 degrees Fahrenheit. If you don't own a thermometer, I highly recommend getting one! I use my thermometer all the time. 

When it comes time to inverting the cake, I recommend waiting about 15 - 20 minutes for it to cool before flipping it onto a cake stand or serving plate. You don't want to flip it right away because the cake will fall apart, but it's much easier to get it out of the skillet when it's still warm.

Peanut butter upside down cake

Yield: 12 servings

Ingredients

For the cake

  • 1 1/2 cups (180 grams) all-purpose flour
  • 3/4 cup (160 grams) brown sugar
  • 1 teaspoon baking powder
  • 1/2 teaspoon salt
  • 2/3 cup (176 grams) creamy peanut butter
  • 1/2 cup (8 Tablespoons) Challenge unsalted butter
  • 1/2 cup (120 milliliters) whole milk
  • 2 (100 grams) large eggs
  • 2 teaspoons vanilla extract

For the topping

Directions

For the cake

  1. Preheat oven to 350 degrees Fahrenheit
  2. Whisk together flour, brown sugar, baking powder, and salt in medium bowl. Set aside.
  3. Melt peanut butter and butter together in medium bowl. Add milk to bowl and stir until combined. 
  4. Whisk eggs in small bowl and mix into wet ingredients with vanilla extract.
  5. Pour wet ingredients into bowl with dry ingredients and whisk until just combined.

For the topping

  1. Melt butter in bottom of 10-inch cast iron skillet
  2. Stir in brown sugar
  3. Arrange banana slices in circular pattern in butter/brown sugar mixture.
  4. Pour cake batter into skillet and smooth top.
  5. Place in oven and bake for 30 to 35 minutes, or until internal cake temperature reaches 205 to 210 degrees Fahrenheit.
  6. Let cake cool for 15 minutes. Invert the cake onto a cake stand or serving plate.


Thursday, January 20, 2022

Chipotle brie mac and cheese en croute


This is a sponsored post by Challenge butter, but the text and opinions are all mine. Thank you for supporting brands that make Kylee's Kitchen possible! 

Chipotle brie mac and cheese en croute

Yield: 4 servings

Ingredients

  • 2 cups macaroni pasta
  • 4 (8-ounce) wheels brie
  • 4 Tablespoons Challenge unsalted butter
  • 1/4 cup (30 grams) all-purpose flour
  • 1 cup (240 milliliters) whole milk
  • 3 Tablespoons chipotle in adobo
  • 2 Tablespoons dijon mustard
  • 1/2 teaspoon cayenne
  • 1/2 teaspoon black pepper
  • 1/4 teaspoon salt
  • 2 cups sharp cheddar cheese, shredded
  • 1/4 cup crispy jalapeño pieces (omit if you can’t find or substitute with crispy onion pieces)
  • 4 sheets puff pastry
  • Egg wash (1 egg + 1 Tablespoon water)
  • Hot honey, optional

Directions

  1. Preheat oven to 400 degrees Fahrenheit. 
  2. Fill large pot with 2 quarts water and bring to boil.
  3. Add macaroni to pot and cook 6 minutes.
  4. Set colander in sink and pour noodles into colander.
  5. Run cold water over noodles until they are cool to touch. Set aside.
  6. Use paring knife to cut circle around inner rim of each brie cheese wheel, being careful not to pierce the bottom of the wheel.
  7. Use spoon to scoop out the brie and set aside in bowl. Set hollowed out brie rinds aside.
  8. Heat large pan to medium heat.
  9. Add butter to pan. Once melted, add flour. Use spatula to stir butter and flour until roux turns blond in color.
  10. Slowly whisk in cold milk.
  11. Whisk in chipotle in adobo, mustard, cayenne, black pepper, and salt.
  12. Whisk in brie that you set aside and sharp cheddar until melted.
  13. Add macaroni to sauce and remove from heat.
  14. Stir in jalapeño pieces.
  15. Roll out puff pastry and and place hollowed brie rinds in center of each sheet.
  16. Divide pasta between each brie rind.
  17. Take each corner of puff pastry and pull it over the pasta to the opposite side of the brie rind.
  18. Brush the puff pastry with egg wash.
  19. Place brie wheels onto a baking sheet and bake for 25 to 30 minutes or until puff pastry is golden brown.
  20. Remove from oven. Drizzle with hot honey and sprinkle with additional jalapeño pieces before serving. 


Pin It button on image hover